


Has your PC lost its pep? How about your network connection, your printer, or even your phone? Here’s our guide to giving your gear new life. Follow our tips, and you can fire up your system and your other tech essentials.
Supercharge Your PC’s Hardware
To get top performance from your PC, use high-performance hardware. No amount of tweaking inside Windows can give you the same kind of speed boost that a few judicious hardware upgrades can–the most effective way to soup up any computer is to start by updating the components inside. Here we’ll explain how to upgrade the two most vital components: the RAM and the graphics card.
WARNING: Before you attempt any of these upgrades, take precautions against static electricity by moving your PC to a clean, uncarpeted workspace and using an antistatic wrist strap to discharge any static electricity from your body.
Upgrade Your RAM
Adding RAM is often the most cost-effective upgrade you can make to speed up a sluggish computer. When a system runs short of RAM, it must swap the overflow data to the hard drive, which can significantly slow performance. Here’s how to add more memory to your desktop, laptop, or netbook.
RAM comes in many flavors, such as DDR2 and DDR3. Newer technologies offer faster performance, but most motherboards accept only one type of RAM. Check your PC’s manual to find out what type of RAM modules you need and how you have to install them.
RAM dealers such as Crucial and Kingston offer handy online tools that identify the appropriate RAM for many PCs and motherboards. Also, to take advantage of more than 4GB of RAM, your PC needs to run a 64-bit operating system; Windows 7 is available in a 64-bit version, and we highly recommend it.
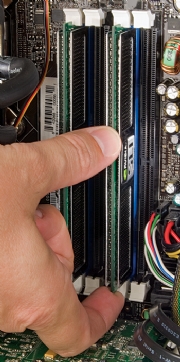
To begin, open your PC’s case and look for the memory slots. In laptops and netbooks the RAM slots are usually under a removable panel on the bottom of the machine. To remove existing RAM, release the clips at each end of the module so that it pops loose. With the slots clear, gently but firmly insert the new module.
On a desktop machine, it’s often best to seat one corner of the module first and then press the other end into place. Once you’ve fully inserted the module, the clips should close to hold the memory securely. On a laptop or netbook, press the end with the metal leads into place first, and then press down until the clips snap tightly around the ends.
Replace Your Graphics Board
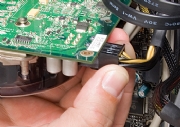
Some new graphics boards require a connection to the PC’s power supply.
Even if you’re not a gamer, upgrading your graphics board can give your PC a serious boost, since Windows 7 and Windows Vista both feature fancy effects in their user interface. Though you can upgrade the graphics on some laptops, in this article we’ll focus on desktop PCs.
When shopping for a new graphics board, select one that fits the slot on your PC. In most newer systems, it will be a PCI-Express slot; some older systems may have only PCI or AGP slots. Fortunately, graphics card makers still sell products to fit older slots, so an outdated motherboard need not be a total obstacle.
With your new board at the ready, open the PC’s case and locate the existing graphics card. Before attempting to pull it loose, remove the screw holding it down and release any plastic clips on the motherboard that may be securing it. Once the old card is out of the way, slide the new board straight down into the slot until it is firmly seated and the plastic clip on the motherboard has snapped tightly around it.
Newer PCI-Express graphics boards often use so much juice that they require a special PCI-E power line from the computer’s power supply. If you’ve installed such a card, connect this power line (the board may have two) before closing up the case. Then boot the PC and install the drivers from the disc the manufacturer provided.
Related Story: Geek’s guide to buying the right graphics card
Streamline Windows
Whether you run Windows XP, Vista, or 7, you have a few really good ways to cut out the fluff and make your OS run more smoothly, quickly, and efficiently. By turning off unnecessary features and disabling unwanted startup programs, you can get an instant speed boost.
Knock Out the Fat
Windows–yes, even Windows XP–is loaded with effects that take up system resources without delivering meaningful user benefits. If you turn some of these items off, Windows can divert the resources to more useful activities, such as running your programs.
In Windows XP, open the System control panel and click the Advanced tab. Click Settings and then select the radio button marked Adjust for best performance. This will turn off some of the frilly effects, such as drop shadows under your menus, and make Windows a little snappier.
In Vista, start by disabling the resource hog known as the Sidebar. In both Vista and Windows 7, turn off the Aero environment to reclaim some of your PC’s lost memory and processor power. To do this, right-click the desktop and choose Personalize from the context menu. In Vista, click Window color and appearance, and then uncheck the box for Enable Transparency. In Windows 7, select the theme labeled Windows 7 Basic.
Shut Down Memory-Hogging Apps
Once you’ve installed a fair amount of programs on your PC–your “core base” of apps, as it were–you’ll want to check that you don’t have any unwanted applications running in the background that could slow down your PC.
Such programs may be designed to launch when Windows starts up so that you can load their corresponding applications faster. The problem is that they run all the time, regardless of whether you intend to use the parent application.
In Windows 7 or Vista, click Start and type msconfig in the ‘Search programs and files’ field. Press Enter. In the System Configuration window, select the Startup tab. In the Command column, look for any programs that you don’t want to wait for at boot-up time.
For example, take iTunes: If you’ve installed this application, you’ll find both iTunesHelper.exe and QTTask.exe. They’re unnecessary additions–the former launches when you start iTunes anyway, and the latter merely places a QuickTime icon in the corner of your screen for easy program launching. Uncheck both. Once you’ve checked all of the programs you want to launch at startup and unchecked the programs you don’t, click OK.
In addition to startup programs, you can find services on your PC; Microsoft recommends trimming them as well. Click Start, type services.msc into the search field, and press Enter. Up pops the Services window, a list of options and executables that’s even more confusing than the Startup window.
To identify which services to turn off (and which to leave on), check out Black Viper’s exhaustive list of Windows 7’s services across all of its various editions, along with a list of which services you should modify and how you should set their parameters. Armed with this advice, just double-click on any listed service.
You need concern yourself only with the ‘Startup type’ listing in the screen that appears next. By switching among the Automatic, Manual, and Disabled modes, depending on Black Viper’s recommendations, you’ll be able to control exactly how services launch–if at all–during the Windows startup process and during your general use of the operating system. Every little bit helps.
Maintain Top Performance
If you want to keep your system fast, clear out your C:\Windows\Temp folder on occasion. Do it as soon as you boot into the OS, or even through Safe Mode, to ensure that you wipe every last unused file from your drive.
In the same vein, don’t use Windows 7’s uninstall function or a program’s default uninstall executable to remove an application from your drive. Instead, use the free Revo Uninstaller utility; this awesome application removes programs using their default uninstall routines, but it also goes one step further by scanning your system and Registry to clean away all traces of the program from your hard drive.
Accelerate Your Network
Network slowdowns can be tricky to troubleshoot. Much depends on what you’re actually doing across your network–copying files to another system, for example, might slow to a crawl if you’re writing to a NAS device attached to a poky PC in the next room. But a few general tweaks and tricks can still boost your network performance in Windows.
Update Firmware and Drivers
The first step in getting your network up to speed is to install the latest Windows updates and to download the newest drivers for your PC’s network cards. Second, install the current firmware for your router. All of these items are essential to optimal network speeds, and you can usually locate them on the manufacturer’s Web sites.
If the release date for a given driver is more recent than the last time you can remember updating, you should probably update again. Most new routers make updating easy if you log in to the Web administration panel; typically it will have an option for you to download and install the latest firmware with just a click or two.
Adjust Network Card Settings
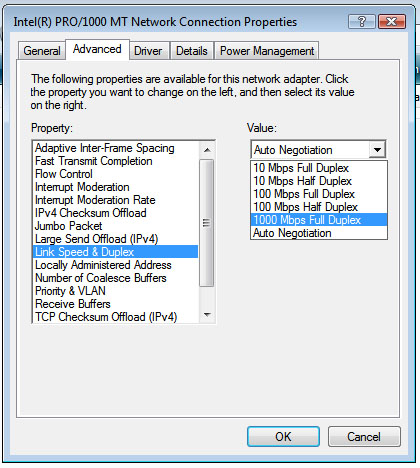
Once you have the latest software and firmware installed, try adjusting your network card’s auto-negotiating setting. In the Control Panel, click Network and Sharing Center. From there, click Change Adapter Settings, and then right-click on your Local Area Connection and select Properties. In the screen that appears, click the Configure button under the Connect Using field. Select the Advanced tab. Set ‘Link Speed & Duplex’ to its highest available setting, such as 100 Mbps Full Duplex or 1000 Mbps Full Duplex
Make Windows Set You Free
Windows Vista has a wonderful habit of throttling down your network connection when you’re playing multimedia files, to prevent movies from skipping during playback. You can adjust this throttling by editing the decimal value of the ‘NetworkThrottlingIndex’ key.
Press Windows-R, type regedit, and press Enter. In the Registry Editor, navigate to the HKEY_LOCAL_MACHINE\SOFTWARE\Microsoft\Windows NT\CurrentVersion\Multimedia\SystemProfile key. Raise the decimal value of the ‘NetworkThrottlingIndex’ key to a higher number. Setting it to 100 disables the service; Microsoft recommends that you go no higher than 70, but there’s no harm in testing settings to see what works for you.
Route Traffic Intelligently
Online games, streaming-media programs, Internet phone services, and peer-to-peer applications such as BitTorrent consume a lot of network bandwidth due to the massive amounts data they transmit. To reduce the amount of strain such apps put on your router and to improve your overall network performance, manage them more efficiently with your router’s port-forwarding feature.
Log in to your router’s configuration screen. Search for an option that lets you specify port forwarding; it will be labeled slightly differently from one router to another. Once you’ve found it, type in your system’s internal IP address (usually in the form of 192.*.*.*), and then input the preferred port found in your application’s configuration screen (for instance, in Skype it’s located under Tools, Options, Advanced, Connection). Pick both TCP and UDP protocols for forwarding, and save your settings.
To see if your chosen port actually has a clear tunnel through your network to the Internet, fire up the application and visit CanYouSeeMe.org. Input your port number and click the Check button–if you get a ‘success’ response, you’re all set.
Choose a Fast Hard Drive
Though we live in an age of cheap, readily available storage, the sheer number of choices available can make selecting the right drive a tricky proposition. But choosing a fast drive–whether internal or external–can have a massive impact on your PC’s performance, as well as on that of your network. Here are some things to consider when selecting a new drive.
Decide Between Internal and External
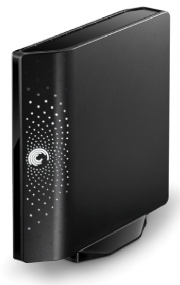
The big advantage to external storage is obvious: You can hide it for safekeeping or take it with you on the road. Most home users choose external storage for backups. With an external drive, though, you’ll probably sacrifice speed. External attachment technologies such as USB, FireWire 400/800, and ethernet are slower than the connections for internal storage; only eSATA can match the data-transfer speeds of internal drives.
If you’re faced with a choice and you want maximum compatibility, choose USB. A much better option is a triple- or quad-interface box (USB/FireWire 400/eSATA, or USB/FireWire 400-800/eSATA) that allows you the fastest possible connection under any circumstance.
Use Fast Connections
For internal storage, SATA connections are the best, fastest choice–and these days, SATA is most likely the primary (or only) drive connector in your PC. Drives with the older PATA connector are still available in up to 750GB capacities, so you can replace the PATA drive in an older system. If your older system has a SATA bus, however, use it instead.
SATA drives also have the unique ability to work externally, in eSATA enclosures. eSATA is far speedier than USB or FireWire, though your PC may require an add-on card to support this type of connector.
Examine Drive Specs
Outside of a laptop or netbook, it’s rare these days to find a drive that runs at less than 7200 rpm; you shouldn’t even consider anything slower for a desktop PC. Windows performance will improve noticeably as the speed of the hard drive increases.
You’ll find 10,000-rpm and 15,000-rpm hard drives, but they carry a premium, and you might not notice much of a performance gain. Unless you have an eSATA connection, don’t bother with such drives for external use–slower buses would merely throttle the drive’s speed, negating any potential for extra performance.
The amount of cache on a drive affects performance, as well, but not usually significantly. You’ll also see some ecofriendly drives with as much as 32GB of cache, and high-performance drives with only 8MB. Be sure to get 8MB or more; beyond that, however, don’t worry about it.
Consider an SSD
Solid-state drives are all the rage these days, but the NAND flash memory used in the majority of SSDs varies wildly in speed. Most serve up data quickly, but some will bog down when writing data. Still, newer SSDs scream past disk-based rivals in performance tests, and faster models are rapidly becoming affordable.
When speed is paramount, study the fine print and opt for an SSD based on SLC (Single Level Cell) technology over an MLC (Multi Level Cell) model. Not only is SLC faster, but it should also last longer: SLC is rated for 100,000 writes as opposed to 10,000 for MLC. That said, 10,000 is actually a lot of writes for a data cell, so don’t forgo MLC if you don’t need ultrahigh speed or if you mostly want a laptop drive that can withstand a shock.
Fire Up Your Printer
Raw printer speeds keep improving each year, but we always seem to want documents to come out just a little bit faster. Thankfully, you can use a few tricks to boost printer performance. Whether you got a bargain inkjet in a bundle with your home PC or you charged a thousand-dollar laser printer to your expense account, these suggestions will kick up your print speeds.
Reduce Print Quality
Often the devil is in the details–with printers, that means detailed prints take longer to produce. If you reduce the quality a little, you can churn out faster prints and save ink.
In any application, choose Print and select Properties. Printer settings will vary, depending on your model; in our case, we found the necessary settings under the Main tab for one printer and the Paper/Output tab for another. Reduce the print quality–try draft mode–and see if the quicker results are good enough.
Fit More on One Page
Print speed mostly depends on the amount of graphics and text on each page, but page quantity also matters. You can slice the time to print in half by formatting two document pages to a single sheet. This method works best for retaining pages of receipts, spreadsheets, or other documents that you’ll reference only occasionally, since everything will be smaller.
Choose Print, and then Properties. Your next step might vary with your specific printer. For our test printer, we clicked the Layout/Watermark tab and picked 2 pages per sheet.
Pick a Fast Interface
The kind of connection you use to hook your printer to the PC directly affects its speed. If you have an inkjet, you probably connected it with USB 2.0, which should be about as fast as possible. But if you have a network printer–or if a networked PC acts as a print server for a USB printer–select the fastest available network connection.
We recommend connecting your network printer to your router with an ethernet cable rather than depending on a wireless signal. A wired connection is more reliable, and it’s almost always faster. Wi-Fi speeds deteriorate with distance, so if you have to use a wireless signal, try to place your printer close to your router. If you must go with a wireless printer, be sure that either the printer itself or any wireless print server you may connect it to supports 802.11n, which is the fastest wireless standard available.
With a wired connection, see if your printer supports 100Base-T or gigabit ethernet. If so, verify that your router and network can handle those speeds–if they can’t, you’re creating a bottleneck, especially when sending graphics-heavy files to the printer.
Print Websites Without Images
When you’re printing information from the Web, ads and graphics will slow down the process. If you need to print a page, first look for a Print link; clicking on one will typically reformat the page without extras. Otherwise, you can manually disable the graphics.
In Internet Explorer, pick Tools, Internet Options. Click the Advanced tab, and scroll to the Multimedia section. Uncheck the box to Show pictures.
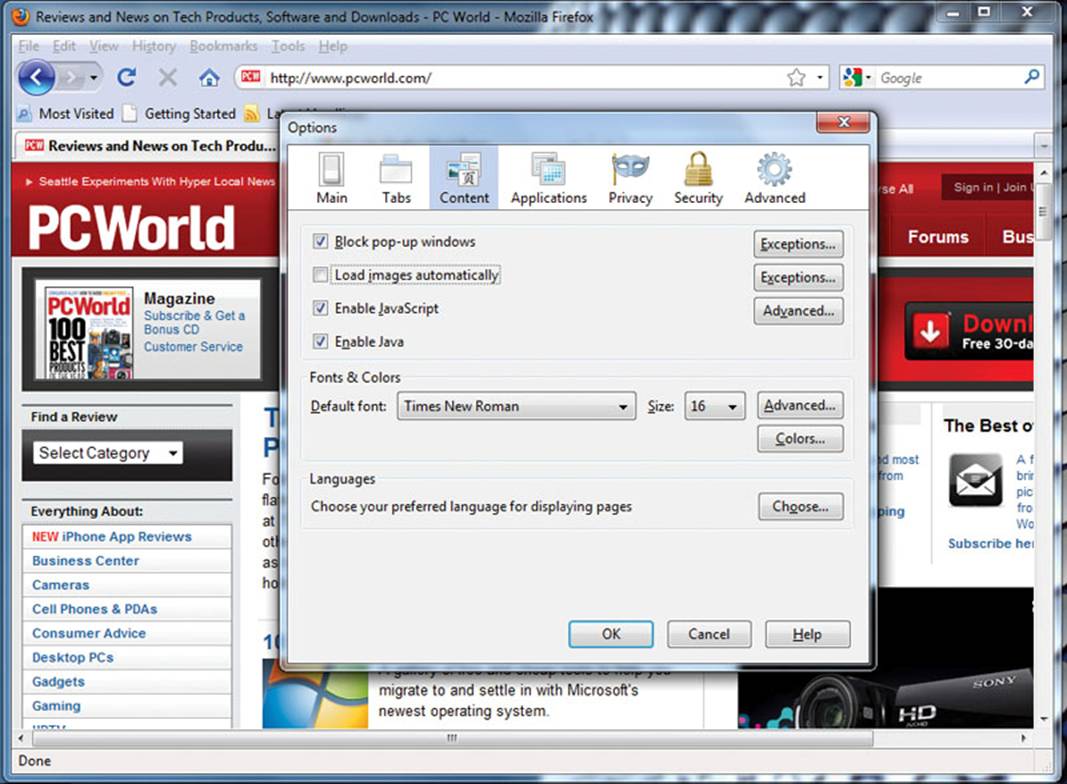
In Firefox, choose Tools, Options, and click the Content tab. Uncheck the box to Load images automatically.
In either browser, click the refresh button to reload the page without the images, and then choose Print. Afterward, toggle the Tools settings to restore the graphics.
Add RAM to Your Printer
High-end printers have shared design concepts with PCs for decades. You’ll find a CPU, a networking interface, RAM, and other parts in laser printers starting at about $400. And just as with a PC, ample RAM can boost a printer’s performance, so you should see if you can add more.
First, look up your printer’s specs at the manufacturer’s Website or through a Web search. If you want to download a PDF manual, search for something like “specific printer name manual”, which will often lead you to the company’s site. Note that some companies refer to “memory” instead of “RAM.”
Now that you know whether your printer can take additional RAM and its maximum capacity, determine how much it currently has. Open the printer driver. In Windows 7, pick Control Panel, Hardware and Sound, Devices and Printers. Right-click your printer, and pick Printer Properties.
You might have to dig around to get the details–various printer manufacturers provide this information in different locations in the software. If you don’t see it in the driver software, check back in the manual.
Give Your Smartphone a Boost
Every day, avid smartphone users push their devices to the limit with downloads, Web browsing, and multitasking in various apps. All of that activity can lead to frustratingly sluggish phone performance.
Smartphone slowness is mainly related to two things–limited memory and a drained battery–though other factors are involved, too. With some routine phone maintenance and the help of apps and accessories, you’ll have your smartphone running as fast as it did on the day you bought it.
Related Story: Six memory management tips to boost your Blackberry’s performance
Clear Your Call Log and Old Texts
When was the last time you deleted your call log? It doesn’t take up a ton of memory, but it does still eat up precious space. Old text messages, too, consume space, so unless you’re holding on to them for sentimental reasons, delete as many as possible. Clear your call log and older texts about every ten days; set a calendar reminder if you’re the forgetful type.
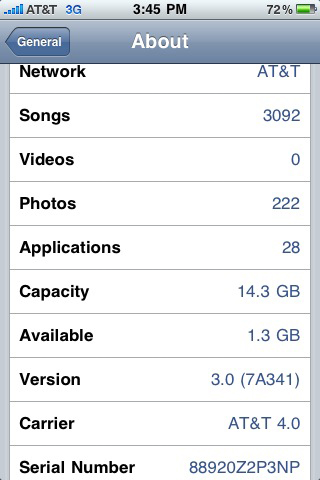
Clean Your Apps and Photos

If you’re like most smartphone users, you’ve downloaded apps and games, and then eventually ignored most of them. Vampire games, apps that change the color of your BlackBerry trackball, and even old pictures you took all tend to lose their novelty with time. iPhone owners are especially prone to this problem, as the App Store has a universe of cool (and completely useless) apps. You don’t want the phone’s nonexpandable memory hogged by lame apps. Look through your apps and downloads occasionally, and delete any that you don’t use. You could see an immediate speed boost.
Keep Your Battery Happy and Healthy
All of the wonderful things you can do on a smartphone (running multiple apps, taking photos, playing multimedia) take a toll on battery life, and a nearly drained battery significantly slows down smartphone performance. Consider investing in a battery pack to keep your phone running faster and longer.
The Phonesuit MiLi Power Pack for the iPhone is slim enough to double as a protective case for your phone, and it provides an additional 6.5 hours of talk time. Also think about downloading a battery utility app. APNdroid (free at the Android Marketplace) selectively turns off your draining data connection while still allowing you to receive calls.
Use Wi-Fi When Possible
A no-brainer, but a sometimes forgotten tip: If Wi-Fi is available and your phone supports it, use it. Web browsing will be faster over Wi-Fi than over a 3G network. You can find some great apps for judging Wi-Fi signal strength. For the iPhone, we like WiFiFoFum, which scans for 802.11 wireless networks and displays their location in relation to you. A slightly different app, Free WiFi Café Spots, does exactly what the name implies and is very useful if you’re searching for Wi-Fi on the go. This particular app is available for the iPhone and for BlackBerry OS, but you can find similar apps for other platforms.
Download Opera Mini 4.2
Tired of your smartphone’s clunky browser? If you have an Android, BlackBerry (recent model), Symbian, or Windows Mobile handset, give the Opera Mini browser a try. Available in most app stores for free, it renders pages on a server and then compresses them by 90 percent. It uses relatively little of the phone’s resources, resulting in a quicker Web surfing experience.
It also helps you save time: When you first open a page, Opera Mini shows you an overview and suggests where you should start reading. And if you’re entering an address, Opera Mini will recognize it and suggest completions based on your history and Bookmarks. Best of all, you can also search for text within a page to find exactly what you want, faster.
Delete Your Browser Cookies and Cache
If you use your mobile browser frequently, this is a good step to take to keep your phone running smoothly. The browser stores the content of pages so that they open faster the next time you visit them, but these temporary files take up memory. Clear your cache every 5 to 7 hours you spend surfing the Web.
Use the Most Recent Firmware
Firmware updates not only add new features to your OS, but they also fix bugs and other issues that might be slowing down your phone. Most firmware updates come over the air from either your carrier or your phone’s manufacturer. Some handsets, such as the iPhone, require you to connect your phone to your PC to receive the update.
Speed Up Your Camera
Want to make your camera faster? You might not be able to swap out its components, but you do have a veritable smorgasbord of options for speeding up your digital photography. We have ways to freeze the action, reduce shutter lag, and reduce the time between taking a picture and doing something useful with it–like printing it or sharing it online.
Reduce Shutter Lag
If you have an older camera or an inexpensive point-and-shoot, you might be frustrated by shutter lag. You can do a couple of things to shorten that wait.
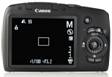
Shutter lag happens because your camera, set at its defaults, has a lot of things to do before it can take a photo. Reduce some of that workload by turning off a few of the automatic settings. Instead of using automatic ISO, set the camera’s ISO to 100 or 200.
Likewise, instead of automatic white balance, set your camera to a white balance that reflects your scene, like outdoor daylight or indoor incandescent. Most important, prepare for your shot by prefocusing: Point at your subject and press the shutter release halfway to lock your focus. When you’re ready, press it the rest of the way to snap the photo. All of these tweaks together can shave several tenths of a second off your time, making your camera a lot snappier.
Save Photos Faster
After you press the shutter release, your camera processes and saves the image. Most cameras can process several photos at once and still be ready to take more. After a certain number of shots, though, the camera has to call a time-out before it can take any new pictures. You can do two things to relieve the bottleneck.
First, if you don’t need to capture a bounty of 12-megapixel shots, use your camera controls to save the images at a lower resolution. That can significantly increase the number of photos your camera can handle without stopping.
Second, buy a faster memory card. Memory cards are rated with different speeds, and faster cards, while they cost more, can write photos from camera memory swiftly enough to improve performance noticeably when you’re taking a lots of pictures in a row, such as a burst of action photos.
Capture Fast-Moving Subjects
Action photos–of rambunctious puppies, grade-school soccer games, air shows, and NASCAR races–are challenging, particularly with slower cameras. But stopping the action is generally just a matter of using a fast shutter speed.
Most DSLRs and some high-end point-and-shoots have a shutter priority mode, which lets you manually dial in the fastest speed available; the camera will accommodate with the appropriate aperture setting. (Alternatively, you can use aperture priority to choose the smallest f-stop number, and the camera will match that with the fastest shutter speed available.)
If that still isn’t quite fast enough, increase the camera’s ISO. By doubling the ISO from 100 to 200, for example, your camera can halve its shutter speed. By pushing the ISO to higher values, you can stop action even in relatively dim light. The cost, though, will be noisier photos.
If your camera doesn’t include these controls, you can improve your action photos by panning. Track the subject in the viewfinder and twist your body as the subject moves across your field of vision. Snap the photo and continue to pan, following through as if you were swinging a baseball bat or a golf club. The background will blur, but the subject will be sharp and distinct.
Benchmark Your PC
If you’re serious about improving your PC’s performance, it helps to measure how fast (or how slow) it is to begin with.
Here at PC World, we’ve been developing our own powerful benchmark tool for years. WorldBench 6, the latest version, tests all facets of a PC’s performance on both 32-bit and 64-bit versions of Windows. At $249 for a single-user license, WorldBench isn’t cheap, but it’s a proven benchmark that’s trusted by industry leaders ranging from Intel and HP to Microsoft and McAfee.
If you’re on a tighter budget, you can find cheaper benchmarks that can give you an indication of your computer’s speed. OpenSourceMark is, as its name implies, an open-source tool that you can download for free. This simple utility runs your PC through assorted operations, from spreadsheets to image editing. Armed with a starting score, you can then compare it with a post-upgrade score or see how much of an effect some of our Windows tweaks have on your machine’s overall performance.
Better Broadband
While a variety of products on the market claim to boost your broadband Internet performance, none have proven effective enough for us to recommend them. If you’re not getting the Internet speeds you’re paying for, you can try a couple of basic fixes.
First, measure your connection speed at Speedtest.net. This quick assessment will give you a fairly accurate picture of your download and upload speeds. After the test, if the results are well below the advertised speeds for your service plan, you can call your carrier to complain. This is the single most effective thing you can do.
Second, ask your carrier whether a newer broadband modem is available, and try to get the provider to send you one. ISPs frequently upgrade their base equipment, and existing customers almost never receive notification. But if you ask for the latest model, many ISPs will send one out free of charge (especially if your contract has expired).
PC Performance Myths
You have lots of good ways to speed up your PC, but you’ll encounter plenty of bogus tips, too. Here are three common PC speed-up tactics that just don’t do the trick.
Cleaning the Registry
Hard-core Windows users love to tweak their system settings via the Registry Editor, and many claim to have elicited some performance benefits from doing so. The idea is that you can improve Windows’ efficiency by weeding out broken entries in this giant database, you can save Windows some energy at boot time, and you can make Windows start and run faster. Unfortunately, there’s no real evidence that this approach works, and you can do more harm than good by mucking around with the database that runs your whole PC.
Disabling System Restore
Many supposed Windows gurus will tell you that disabling the System Restore feature can speed up your computer by freeing up hard-drive space and preventing it from kicking in while you work. But since System Restore activates only when you install new applications or when your PC is idle, and since it uses only a small fraction of your hard drive anyway, turning off this feature robs you of a valuable safety measure without providing any real benefit.
Defragging Your Drive
Back in the days when drives were small and operating systems were simpler, running Defrag now and then was necessary to keep your computer running smoothly.
But Windows XP, Vista, and 7 all include automated disk optimization, and it’s rare for a drive to become so fragmented that it hampers performance. So, while firing up your Disk Defragmenter isn’t likely to do any harm, it’s usually a waste of your time.
