


If you’re the kind of person who insists on handpicking a road-trip playlist rather than just setting your music player to shuffle, you were born for radio, baby.
Fortunately, you don’t have to let your daily life get in the way of your broadcasting fantasies. As long as you have a PC with a broadband connection, you have what it takes to inflict your talk-radio rants or musical taste on anyone who’ll listen.
The Quick Way
For a quick and dirty way to stream music to your buddies, you can simply grab a male-to-male 3.5mm RCA audio cable, plug one end into the microphone jack and the other end into the headphone jack, and either start a Skype session or sign up for an account with a Web-based streaming service (Justin.tv or Ustream.tv, for example) to get going.
Your computer will feed your audio output (from the headphone jack) to the audio input (from the mic jack) and broadcast it to whoever is on your stream. All you have to do is open up your MP3 player of choice and you’re ready to rock.
Justin.tv even supports Youtube playlists, so your listeners can stay on after you sign off.
Of course, if you want to set up something that gives your listeners a distinctly radio experience, you’ll have to do a little more work than that.
Perform the steps below, and you’ll have an online radio station that can stream to Icecast or Shoutcast servers like the big radio stations do.
Step 1: Get Your Gear
You don’t need any special audio gear for this project–aside from a mic, if you plan to say anything (song introductions, station identifications, or whatever). What you do need is a handful of different apps: one to play your music files, one to turn the audio feed into a streamable source, and one to act as a server for sharing your stream with the world.
You have plenty of options to choose from in all of the above categories, and each app has its own merits. In this tutorial, we’ll use Winamp to play the music, Edcast (the Winamp plug-in, not the stand-alone version) to turn it into a stream, and Icecast2 to serve it up. The Edcast/Icecast2 pairing is unusually easy to configure for different types of radio servers and audio formats.
You’ll also need to download a special .DLL file (lame_enc.dll) if you want to broadcast in an MP3 format (which is more compatible with older audio players): Download the zipped version, unzip it, and put lame_enc.dll in Winamp’s root directory (it usually is located in C:/Program Files/Winamp).
Step 2: Set Up Your Server
Before you start streaming, you’ll need to estimate the size of audience you expect (or want). Your capacity to stream music depends on your Internet connection’s upstream speed–the speed at which you can send data to other computers. At faster upstream speeds, you can accommodate more listeners with a higher level of audio quality.
Since both connection speeds and digital audio quality are measured in kilobits per second (kbps)–not in kilobytes per second (KBps)–you can figure out how much bandwidth you need to serve your radio station by plugging the numbers into this formula:
Simultaneous listeners x Audio bitrate = Required bandwidth
If you’re hosting the station on a home PC with a typical cable or DSL connection, your upstream speeds probably aren’t great. My home DSL’s upstream speeds tops out at about 500 kbps (about 50 KBps), and a high-quality MP3 feed requires at least 192 kbps, so I’d be able to accommodate only two listeners and I’d barely be able to do anything with my Internet connection.
I could lower the quality of the feed to, say, 96 kbps, but then the audio quality of my stream would be significantly worse. For talk radio, it would probably be fine; but for music, it might sound as though songs were being transmitted over a phone.
Fortunately, the stream server doesn’t have to live on the same PC as the audio source. You can use your PC to play the music with Winamp and to source it with Edcast, and then send the stream over the Internet to a dedicated radio stream server equipped with a high-bandwidth connection.
If you use that approach, your broadband connection needs to strong enough to send out one stream to the dedicated server–but it doesn’t have to be any stronger. Also, you don’t have to monopolize your Internet connection to keep up your radio station, since you’re sending a single stream to the server, which then handles each listener with its own broadband connection.
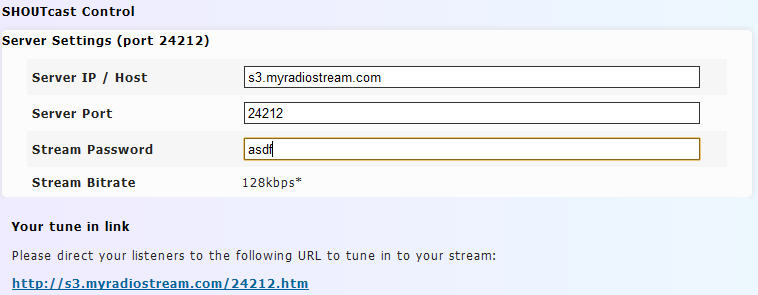
Shoutcast server configuration screen.
Typically, you have to pay for a dedicated radio server; the rates start at about $6 per month and increase as your radio station’s traffic grows. But some free Shoutcast radio servers rely on ads to pay the bills. One such server, FreeStreamHosting.org, invites you to broadcast a 128-kbps stream to up to 1000 users at no charge–and the ads stay out of your audio stream (instead, they get displayed on the Web page you use to advertise your station).
I recommend signing up for a dedicated radio server: The cost is far less than what you’d pay for a home Internet connection (which for practical purposes you wouldn’t be able to use for anything else), and such servers are slightly easier to configure.
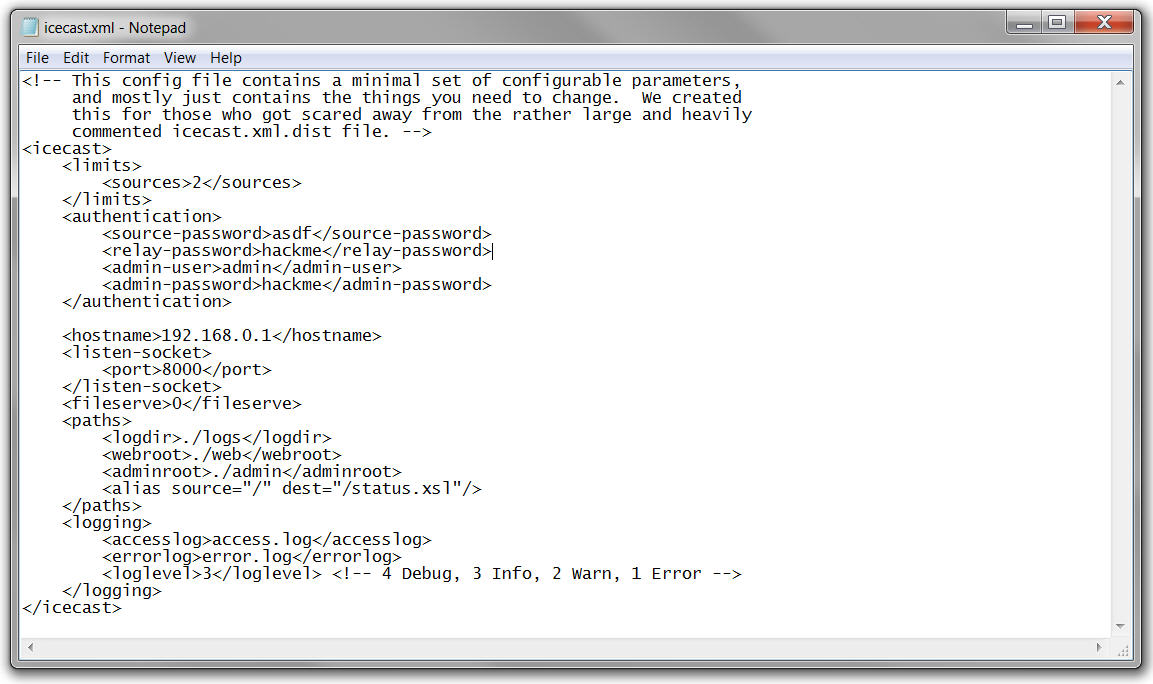
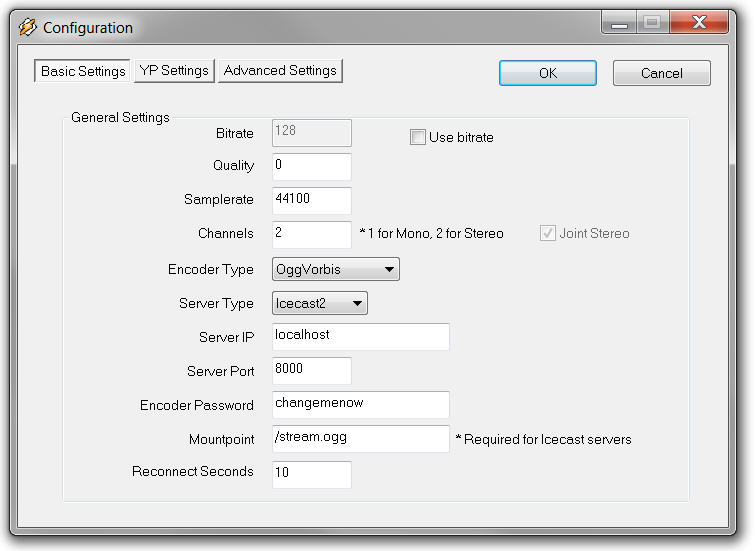
Icecast2 configuration screen.
If you opt for a dedicated streaming server, make sure that you know the host’s IP address or URL, the correct port number, the stream password, the server type (usually it’s either Shoutcast or Icecast2), and the maximum bitrate (if applicable) before moving on.
If you want to run your own server, download and install Icecast2, open the app, and select Edit Configuration from the Configuration menu. This will open a text document called ‘icecast.xml’, which you’ll have to tweak a bit. From top to bottom:
- For the ‘sources’ tag, enter the maximum number of listeners you want your station to have.
- For the ‘source-password’ tag, enter the password you want to use for your stream app (Edcast).
- The ‘relay-password’ and ‘admin-password’ tags aren’t important for this how-to, but change them from the default ‘hackme’ anyway.
- For the ‘hostname’ tag, enter your IP address. If you want to broadcast only to your network, use your internal network’s IP address. Otherwise, you can find your outside IP address at WhatsMyIP.net.
- The ‘port’ tag refers to the port you’d like to use to stream the music. I left mine on the default 8000. Remember, you’ll probably need to open this port in your firewall in order for your radio station to work.
Save the icecast.xml doc (in the root icecast2 directory, usually C:/Program Files/icecast2), and click Start Server in Icecast2’s main window.
Step 3: Configure the Source App
Now that your stream server is running, you need to give it something to stream. That’s where Edcast comes in. Grab the Edcast Winamp plugin, open Winamp, go to Options, Preferences, Plug-ins, DSP/Effect, select edcast DSP v3 [dsp_edcast.dll], and click Configure active plugin.
Here you can set Edcast to use either your microphone jack or your Winamp playlist. Just click the mic picture to enable or disable the mic; when the mic is disabled, Edcast will use Winamp for its input. You can test this yourself by clicking on the sound-level meter to activate it, playing some music through Winamp, and toggling the mic off and on to see whether each input is working.
Next, click Add Encoder to add a new entry (Vorbis: Quality 0/Stereo/44100) in the box below, and double-click the new entry to configure it. Here you’ll need to plug in your server settings–make sure that the server type is set to the right protocol (Shoutcast or Icecast2, depending on which server you chose in step 2), enter your server’s IP in the Server IP field (if you’re hosting the Icecast server on the same PC, it’s your IP address), and enter the corresponding port and password.
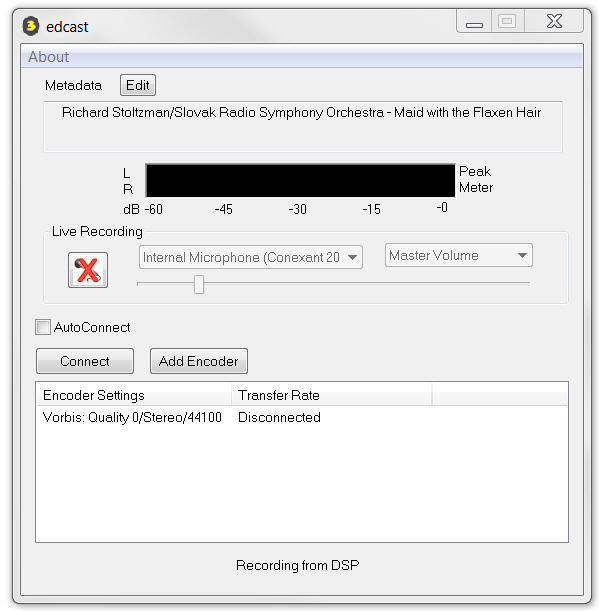
The Edcast interface.
You’ll also want to set your encoder type here: AAC and MP3 tend to be the most widely compatible; AAC+ is optimized for lower-bitrate audio applications (perfect for streaming), but it sometimes doesn’t sound as good; and Ogg Vorbis has fairly high audio quality at lower bitrates, but certain music player apps (iTunes, for example) don’t natively support it.
If you’re using Icecast2, note the ‘mountpoint’ entry in the Basic Settings tab. You’ll need to put a path here depending on your encoder type: Ogg Vorbis streams can be called ‘/whatever.ogg’; AAC streams, ‘/whatever.aac’; and so on. This string will eventually appear at the end of your radio station’s URL, as in ‘http://xxx.xxx.xxx.xxx:8000/whatever.aac’.
Edcast configuration screen.
When you’re satisfied with the way your station works, you’ll want to click over to the YP Settings tab to configure your public listing information (station name, URL, genre, and so on), but for now you don’t need to mess with it.
Step 4: Play That Funky Music
Icecast2 (or your dedicated radio server) is up, Edcast is configured, and your Winamp collection is ready to rock. So click Connect in the Edcast window to connect Edcast to your radio server, and start spinning away.
It’s no fun if you don’t have an audience, though. If you opted for a separate radio server, you’ll probably have your own URL (something like http://s3.myradiostream.com/24212.htm) but if you’re using Icecast2, the URL to access your radio stream will be http://(youripaddress):(port)/(mountpoint), without parentheses.
If your IP address is 192.168.0.1 and you are using port 8000 and you set the mountpoint to ‘/stream.ogg’, your listeners can tune in by pointing their audio player of choice to http://192.168.0.1:8000/stream.ogg.
Linking your radio station URL to your IP address can be a pain–particularly if you don’t have a fixed IP address for your home broadband–because your listeners will have to keep up with your IP changes. To avoid this complication, you can register your own domain name; but if you don’t want to shell out the cash, you can sign up for a free DynDNS.com domain name instead.
Step 5: Don’t Get Sued
The intricacies of broadcasting and copyright law are outside the scope of this how-to. Generally speaking, however, if you want to broadcast someone else’s music legally, you need to obtain the permission of both the artist and the recording company that produced and distributes those recordings, which can cost a small-time broadcaster a lot of money and time.
Rather than play Russian roulette with the RIAA, consider acquiring licensing through a service such as Live365.com, the JPL program of the SWCast Network, or LoudCity. These organizations offer different ways to get your station appropriately licensed for a monthly fee based on factors such as how many listeners you have.
You also need to ensure that your radio station complies with the DMCA (Digital Millenium Copyright Act) when you program your playlists. Live365.com has posted a summarized list of rules you must follow.
Alternatively, if you play your own music or if you get permission from independent bands that don’t have a recording industry contract to play their music, you’re all set. Music licensed under the Creative Commons can work, too, though it depends on the specific license that the artist uses: If you run advertisements on your station, you might not be able to use music licensed for noncommercial broadcasting only.
Now you’ve started your own radio station. Give us a link in the comments!
Source: PCworld.com
