


Buying a new hard drive with lots of storage space can give your PC a new lease on life and can improve your system’s performance.
But you need to make some decisions before you start transferring your data. I’ll show you some smart tricks for moving your apps and files from their old home to their new one, so you can get back to work fast.
I’ll assume that you’ve installed your new drive in your machine as a secondary hard drive (if not, see “How to Install a New Internal Hard Drive in Your Desktop PC”), and that you’ve successfully booted up onto your normal (old) Windows partition.
The operating system has recognized the new, empty drive, and you’ve formatted the drive in Windows. Now how do you get your data from point A to point B?
You might think your final destination is but a drag-and-drop away-and it is, from a certain point of view. But if you want your new hard drive to be the primary storage device for your system, you need a suitable tool to handle the transfer. Moving the entire contents of your current drive to the new one isn’t a task for Windows Explorer, by any means.
If you’re satisfied with the storage you already have and want to use your new hard drive as extra space for your PC, just drag and drop the files you want to store on your new drive.
But if the files you’re moving reside in their default Windows location (such as the Documents, Music, or Videos folder), your system will default to its original folders in all of the applications you run-unless you alter some XP or Vista settings to instruct the operating system otherwise.
Set Up the New Drive as the Primary
You can’t just drag and drop the contents of your primary hard drive to a new hard drive. For starters, Windows doesn’t run in a void. The operating system itself is composed of a bunch of files on your hard drive.
Also, depending on whether you’ve set up your machine to show Windows’ hidden or critical operating system files, you may not be able to select and drag all of the files on the old drive anyway. In short, you will need some help.
One option is to buy commercial software. Norton Ghost ($70) does an admirable job of backing up files, and it has a cloning feature that lets you create a one-to-one replica of your primary drive. After creating this clone (outside the Windows environment), you can pull out your old drive, slap in your new drive, and get right back to work.
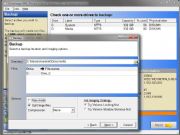
You can use a free application called DriveImage XML to perform the same task as Ghost. It lets you create an archive of your entire hard drive in two simple files: an XML file containing the backup information, and a DAT file representing a compressed copy of all your files.
You can extract this archive on a new hard drive by booting off a Live CD with DriveImage XML preinstalled.
Set Up the New Drive as the Secondary

If you’re content with your primary hard drive’s size and speed, and you just want the new drive to supplement your existing storage setup, the job is easier. After installing your hard drive, use a program like the free CubicExplorer to transfer files.
This Windows Explorer replacement has tabbed windows, bookmarking, and session-saving in its file management window. You can easily switch between different file directories without having to lots of Explorer windows at once. A powerful filtering tool enables you to drill down and view the exact file types that you want to work with.
Once you have set up your folders on your new drive-Documents, Downloads, Videos, and so on-find the original location of these user folders on your XP or Vista drive, right-click, and select the properties option. In XP, you’ll be looking for the Target tab; in Vista, it’s the Location tab.
Click this and look for the box that details where the folder currently resides on your primary Windows partition. Enter the location of where the new folder is on your new hard drive, and click OK. As easy as that, you have established the new hard drive as the primary location for Windows’ default folders.
A final note: This trick is only for media-themed folders like My Pictures and My Videos that are created for any new XP or Vista user. You can’t remap the Program Files folder using this trick. If only it were that easy!
How to Install a New Internal Hard Drive in Your Desktop PC
Installing a new hard drive in your PC is a fairly straightforward task that an intermediate user can typically accomplish in about 20 to 30 minutes. Follow these simple directions to get your new hard drive up and running quickly.
First, be sure to obtain a new drive that uses the same connector interface as your existing drive. In most current models, this will be a SATA connector. With your new drive in hand, disconnect your PC’s power supply, and open up the case.
If the new drive is going to be your system’s only hard drive, remove the old one by detaching the power and data cables from it, unscrewing the screws (usually two or four) that mount it to the case, and then sliding the drive out of its cage. Once the old drive is out of the way, screw the new one into the drive cage and attach the power and data cables just as they were on the old drive.
If the new drive is an addition to the existing one, leave the old drive in place and screw the new drive into an empty spot in the drive cage. Then use the SATA cable that came with your new drive to connect the drive to the motherboard’s SATA port, according to the motherboard’s instructions. Finally, attach an appropriate hard drive power connector from your power supply to the drive.
Once you have connected your new hard drive to your motherboard and power supply, boot up the PC to confirm that the system BIOS recognizes the new drive. If it doesn’t, recheck your connections and consult the drive and motherboard manuals. As soon as the system BIOS recognizes everything, close up the case and configure your drive using the advice on the first page of this story.
Source: PCWorld.com
