If you’re creating a CD or DVD as a gift, you may also want to print artwork on it that’s worthy of your vision. When I want something nicer on my disc than a few words scrawled with a marker, I turn to my trusty inkjet printer.
However, I never use paper labels on discs, and here’s why: I don’t trust them. No manufacturer can convince me that their adhesive will last as long as the disc, through repeated bakings in parked automobiles and endless playings in high-temperature slot-loaded optical disc drives. I will not give someone a potential time bomb that could destroy their disc drive, and I certainly don’t want one for myself.
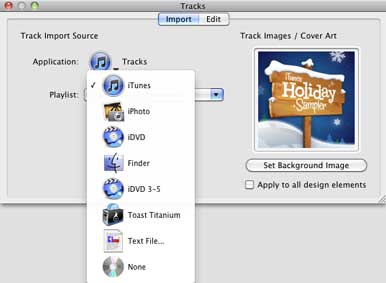
DiscLabel’s integration with Apple’s iLife apps makes it easy to import playlists, photos, and movies.

So, I use a desktop inkjet printer that can print directly onto blank discs. Canon, Epson, and HP all make affordable all-purpose printers that can do that, and Dymo’s DiscPainter does nothing but print on discs. For high-volume, automated printing, check out Epson’s DiscProducer or Primera’s line of disc printers.
The first thing to know is that inkjets can only print onto discs that have a special coating. I use archival-quality DataLifePlus discs from Verbatim, but inkjet-printable discs are available from other manufacturers as well. Although the coating is most commonly white, silver inkjet-printable discs are also available. The silver color provides an additional design element—what would normally be white is silver, and any artwork that relies on the underlying paper for its “white” parts will look decidedly different.
You can use any program to create disc artwork, and the printer companies provide templates for common desktop publishing applications. However, be prepared for some trial-and-error when it comes to positioning—depending on your settings, your art may print slightly off center on the disc.

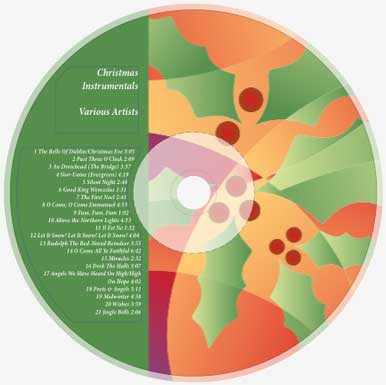
Here’s one of many template styles included with DiscLabel.

A better use of your time and energy may be to invest in one of the affordable programs for making disc art. (For an overview of some of the options, including instructions on how to make paper-based labels, see Macworld’s previous label how-to story.) My favorites are DiscLabel from Smile Software ($36) and Disc Cover from BeLight ($35). They not only help you print perfectly centered labels on your discs, they include lots of attractive design templates and stock art, including templates for the various kinds of covers and inserts for CD and DVD cases. But perhaps most importantly, they integrate with iTunes, iDVD, iPhoto, and Aperture to save you the trouble of copying track lists and importing photos and still images from your movies.
I’ll use DiscLabel to illustrate how straightforward and enjoyable it is to create disc art, but the process is similar to using Disc Cover. First, create a new project and choose a template. You can build your own from scratch, but I find it easier to start with a template and customize it as necessary.
Since I’m making disc art for a holiday audio CD, I clicked the Tracks button and chose iTunes from the list of applications. Then I selected one of my playlists.
At this point, I could choose to use the album artwork from iTunes instead of the artwork in the template, but I’ll keep the template art. If I wanted to change any of the information about a track such as its artist or album, I could click the Edit button.

DiscLabel asked Mac OS X which printer you have, and it gives the choices for that printer.

The default layout is pretty nice, but I can change the font or any other graphic element using the buttons at the bottom of the window. The Random button is particularly interesting—each time you click one of its options, it changes the related settings for that item, saving you the trouble of choosing combinations of new fonts, colors, layouts, and so forth.
My first click actually gave me something I like. Now I may want to create a jewel case booklet or insert (with spines), or even a DVD case. DiscLabel automatically formats all of them for me!
Once again, I can change any element, replace images, apply image effects, or edit and format text if I like. When it’s time to print, DiscLabel helpfully walks me through the process of making the correct choices—a huge help, since there are literally hundreds of options.
Since I’m printing my disc directly on my Epson printer, I’ll choose Epson as the manufacturer. (If you don’t see your printer or stock listed in the media popup menu, click the button labeled Update from Internet to have DiscLabel add the latest printer and stock information.) Next there’s an important detail: some blank discs are coated for printing almost all the way to the center hole, while others have a larger clear circle around the hole. Since mine can be printed all the way to the hole, I’ll choose Full Coverage.
DiscLabel then helpfully adds that choice to its short list of Printing Media for quick use later.
Note the button named Calibrate Printer. This incredibly helpful feature lets DiscLabel know where your printer actually prints on a page. To use it, you print the page it displays, then measure the location of the crosshair on it. By entering those measurements into DiscLabel’s calibration fields, your future pages should print exactly where they’re supposed to.
Now you’re ready to print your disc! Just choose File -> Print to summon your printer’s normal Print dialog.
When you’re ready to print your jewel case booklet or tray insert, select it in your project window, choose the stock you’re printing onto, and choose File -> Print once again.
The new font, courtesy of the Random button, demonstrates how programs like DiscLabel and Disc Cover enhance creativity and professional-looking results.

If you don’t want to cut out and fold the booklets or inserts yourself, you can purchase perforated stock from your local office supply store—Avery makes a line of jewel case inserts. For tray Inserts in particular, this can save you a lot of work.
With your custom-designed disc and packaging in hand, all that’s left is to wrap it up and then bask in the glow of appreciation when your recipent opens it!
Source: Macworld.com