


Every day you probably run your hands across various different keyboards, touchpads, and plastic buttons. But working with so many different devices poses some challenges.
The hard part is getting the various products to talk to each other. You may store your business files on your work computer and your personal files on your home laptop. Your cell phone may be the hub of your social life, but that means nothing when you surf the Web on a Mac. You’d like to watch movies on this system while you work, but they’re stored on a Windows-based computer elsewhere in your apartment.
Sure, you can use removable media to transfer files, but the process is slow, you have to keep the media on hand in order to access files, and the cost of scratching a disc, losing a thumb drive, or dropping a portable hard drive is high. In the case of frequently updated files, you have to run back to your host system to copy new material. And of course you can’t do anything by phone.
The solution to this problem of data creep is synchronization. Lots of free applications and utilities can ease your multidevice lifestyle by keeping your critical files up-to-date and accessible to all of your deskbound or mobile systems. The result is a smooth, seamless (and free) process for ensuring access to the latest versions of much-needed files.
The underlying synchronization philosophy is the same, but different devices have different foibles that affect your ability to sync them easily. With that in mind, we’ll focus on three different types of synchronization: PC to PC, PC to Mac, and PC to mobile device.
Sync PCs to PCs
There are two primary ways to synchronize files across PCs, be they desktops, laptops, or a combination of the two: through direct, system-to-system synchronization, or by uploading files to and downloading them from a third-party cloud service.
Direct synchronization benefits from faster transfer speeds and an unlimited capacity for changed data (because you perform the sync directly across two connected computers on your personal network). Its primary disadvantages is that you have to run both systems simultaneously to perform the synchronization, which eats up electricity and limits your ability to sync files when you’re on the go.
Cloud-based synchronization services act as a third-party host for your files. Anything you upload will exist in its own protected space on the Internet, accessible from any device that you allow into your cloud network. Computers will sync with your virtual storage space whenever they come online, eliminating the need to keep two or more systems running in order to keep files matched between the two.
The major downside of the cloud is limited capacity. No service provider gives you access to more than a few gigabytes of free storage space for your files. And since the available bandwidth between you and your ISP effectively caps your synchronization speed, relying on the cloud may not be a good idea for heavy file transfers.
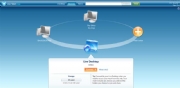
Windows Live Mesh offers the best of both worlds.
This beta tool for Windows XP, Vista, and 7 systems combines Microsoft’s Windows Live Sync utility–a free, direct-synchronization tool–and 5GB of space in a Microsoft-hosted cloud. Soon it will support Macs and phones, though these services have not yet been enabled. At this writing, the service is entirely free for download and use.
To get started with Live Mesh, head over to Mesh.com and click the Sign In link. To use Live Mesh, you must have a Windows Live ID; if you don’t have one, create it now. After logging in via new accounts or by typing your log-in name and password, you’ll jump to the ‘Review and accept agreements’ page for Live Mesh. Click the I Agree button to transfer to the main Live Mesh screen.
The Live Desktop screen is where you’ll manage the connections between your PCs and your Microsoft cloud. But before you can look at what’s in your cloud-based storage, you’ll want to add a system or two to synchronize. Click the large Add device button, and download the accompanying Live Mesh software for your system. Run the installation routine, which adds a small Live Mesh icon to the lower-right portion of your taskbar.
Sign into Live Mesh with your Windows Live ID, assign your current system a name, and click the Add Device button. With that, you’ve completed your basic Live Mesh configuration. Repeat the preceding series of steps for each additional system you want to add to your synchronization network.
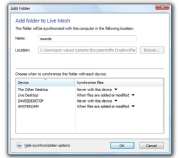
Once you’re done, you can start adding files and folders to sync. Select a folder (excluding Windows system folders, hidden folders, your desktop directory, and folders on removable media or mapped network drives) on one of your systems, right-click the folder, and left-click the Add Folder to Live Mesh option that appears in the context menu. Give the folder a name, and click OK.
A shortcut to the folder will appear on the desktop of every other computer that runs Live Mesh. Go to one of these systems and double-click the new desktop shortcut. Use the screen that appears to assign the selected folder to a new location on your PC, if you wish.
Once you make the change, Live Mesh will sync the folder on this computer with the one on your original computer. Repeat this process for all of the connected systems in your Live Mesh.
If you want to perform synchronizations exclusively as peer-to-peer transfers (thus bypassing the 5GB limit of the Live Mesh cloud), click Show synchronization options after double-clicking the desktop Live Mesh folder shortcut.
From there, select the Never for this device option for the ‘Live Desktop’ device. Otherwise, anything you add to the folders will transfer to the cloud as well–which you can view by signing into Mesh.com and double-clicking on your Live Desktop.
Windows Live Mesh and its direct-synchronization-only variant, Windows Live Sync, aren’t fleshed out for the Mac platform yet, and successive upgrades to OSX have broken the syncing capabilities of both Microsoft tools.
To sync directly between a Windows PC and a Mac, you must first confirm that full network sharing is in effect between the two platforms.
Setting this up can involve a complicated series of steps on the OS X side of things, so be sure to read Apple’s handy walkthrough for the process. Once you can see shared folders on your Windows machine, and your Windows machine can see shared folders on your Apple machine, you’re ready to start synchronizing.
Head online to the 2BrightSparks Website, and grab the Syncback Freeware program. While the app installs itself on your Windows machine, use Windows Explorer to surf to a shared network folder on your Apple system. Right-click the folder, map it as a network drive, and assign it a unique driver letter for your Windows PC.
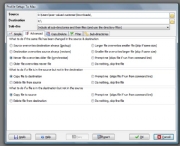
Once the Syncback installation is complete, launch the executable file and create a profile, which represents a single link between a folder on your Windows machine and a folder on your Apple machine. After you give this link a name, a screen containing a multitude of options appears before you.
If you want to run a one-way backup between the mapped network folder (a folder on your Apple system) and a Windows-based folder–or vice versa–the first three backup options are for you. We’re interested in synchronization, however, to insure that the mapped network drive and an individual Windows-based folder will always contain the same items on both systems.
Select any folder on your Windows system to serve as one of these portals, and then select the mapped network drive you created earlier as the destination folder. Highlight the syncing option that best applies to your folder structure and click OK.
A description of your synchronization setup will appear below the listed options; to tweak the description, click the program’s Advanced tab. Select options in the Filter tab to include or exclude to a greater specificity–useful if you want to limit syncing to, say, all of your music files in your Windows downloads folder.
Finally, click the OK button to set up your profile. You can create multiple profiles for additional syncing tasks as you see fit. You can manually run these whenever you like it through the SyncBack program itself, or you can instruct Windows to run synchronizations at fixed time intervals. To do this, right-click a profile you just made and select Schedule.
Click the set password button and enter in the password associated with your Windows User Account. From there, click the Settings tab and set the syncing frequency. Remember, this procedure won’t work unless your Apple system is running; similarly, your Windows system must be set to log automatically into your mapped network drives at boot-up.
Sync PCs to Phones and Mobile Devices
The way to synchronize contacts, mail, calendars, and files from your PC to your mobile device depends on the particular phone you have.

If you’re hefting Apple’s iPhone, you’ll find that the synchronization options built into Apple’s iTunes software are more than adequate to sync your device with Windows Mail, Outlook, Internet Explorer, and Safari, as well as with your photo, video, and music folders. All of these options congregate under the Info tab when you click on your iPhone device in iTunes.
Unfortunately, iTunes doesn’t come with built-in support for file and folder syncing between your PC and your iPhone’s hard drive. To handle that operation, you’ll need a program called Dropbox.
When you install the application, you’ll receive 2GB of free, cloud-based storage, represented by a new Dropbox folder in your My Documents folder. Any file that you assign to this folder will sync up to your Dropbox storage. Install the free Dropbox app on your iPhone, and you’ll be able to access (and download for offline viewing) any iPhone-readable file while you’re on the go.
If you use a BlackBerry, Android phone, or Windows Mobile device, the appropriate application to use is called SugarSync. Functionally it’s similar to Dropbox: You move the files that you want to sync into your 2GB of free cloud space by assigning them to a single shared folder.
Depending on your phone’s functionality, you may even be able to edit files, in addition to viewing, sharing, and sending them remotely. Consult the SugarSync Website for customized instructions and applications for your specific phone model.
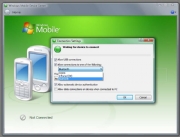
For phones that run some variant of the Windows Mobile operating system, Windows Mobile Device Center is the ticket for synchronizing e-mail, contacts, calendars, and media files between a Vista or Windows 7 PC and your mobile device over a USB connection.
Legacy systems running Windows XP can use a program called ActiveSync to accomplish the same task. If you have access to a Microsoft Exchange Server, you can use either application to synchronize your data wirelessly.
If you don’t mind using Google’s array of services–including Contacts, Gmail, and Calendar–you can sync your data wirelessly by installing one of the company’s Google Sync apps for BlackBerry, Nokia, and Windows Mobile phones (among others).
In this case, Google provides the Exchange Server, ensuring that your data will stay up-to-date without requiring a physical connection to a PC. Instructions for using the service vary by device. Google’s easy-to-use walkthroughs will hold your hand as you take your first steps into synchronization land.
Source: PCworld.com
