


The verdict is in: Windows 7 is Microsoft’s best operating system ever.
It’s stocked with genuinely handy interface upgrades (hello, Aero Snap), long-overdue networking improvements (we love you, homegroups), touchscreen support (long live tablet PCs), and the best Windows Media Center experience yet (ClearQAM support at last).
Like every operating system, though, Windows 7 can benefit from a few tweaks here, some add-ons there, and a smattering of OS-enhancing apps and utilities.
We’ve rounded up 25 of them, each one designed to make Windows 7 faster, easier, safer, or more fun. And because we know that many people still run Windows XP or Vista, we’ve identified the tips that work with those versions as well.
MAKE IT FASTER
Is Windows 7 really speedier than Vista or XP? Different Windows 7 performance tests have yielded varying results, but ultimately it depends on your hardware and the apps you run. Of course, with a few simple tricks, you can wring better performance from any system.
Go 64-Bit – Works in: Vista, 7
The old saw still holds true: Windows loves RAM. The more memory that you supply, the less the OS has to rely on the comparatively poky hard drive. But if you want Windows to address more than 3GB of memory, you have to run the 64-bit version. If you’re buying Windows 7 as an upgrade, you should find a 64-bit installation disc in the box; ignore the 32-bit disc entirely. In addition to recognizing more RAM, 64-bitWindows makes better use of your PC’s processor, giving you the best Windows experience possible.
Boot More Quickly – Works in: XP, Vista, 7
Does Windows 7 really boot more rapidly than other versions of Windows? Yes, a little. But the more programs you install, the slower your system will start (something that’s true of all Windows editions). Many apps force Windows to run them at startup–a situation not unlike a dozen cars trying to merge into one lane.
Startup Delayer is a great tool that tells the startup programs you select to sit tight, be patient, and run a little later–after some of the traffic has cleared. The end result is that your PC boots much more quickly.
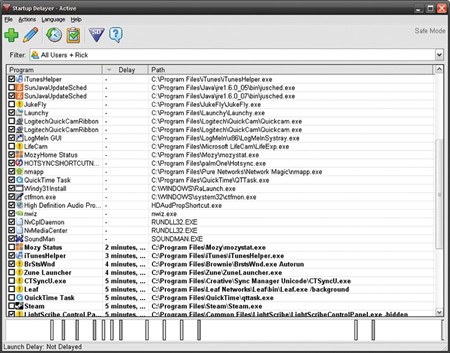
Startup Delayer lets you control how applications load at boot time.
The utility presents you with a list of all the programs that start when your system does. To set a delay for any of them, just drag the item to the white bar at the bottom of the window. You’ll see a line representing the app; drag it left or right to decrease or increase the delay.
Startup Delayer is a freebie, and it’s one of the best ways we know of to speed up a slow-booting PC. Even one that runs Windows 7.
Switch to Chrome -Works in: XP, Vista, 7
Quick–what’s the single most-used app on your PC? The Web browser, of course. So it’s no surprise that one way to make your Windows experience faster is to switch to the swiftest browser, and that’s Google Chrome. As we reported in “Browser Speed Tests,” Chrome loads pages faster than Firefox 3.5 (which ran a close second), Internet Explorer 8, Opera 10, and Safari 4. Granted, the advantage may amount to only a second or two, but those seconds add up.
Tweak Your Power Settings– Works in: Vista, 7
Using Windows’ power-management features to save energy makes sense–but you shouldn’t do it at the expense of productivity. For example, if you’re working on a desktop PC (or using a plugged-in laptop as your desktop), you don’t need your hard drive to turn off after 5 minutes, your processor to throttle back when idle, or your video playback to be ‘optimized for power savings’. Since you’re not trying to preserve battery life on this machine, you should crank every performance setting to maximum.
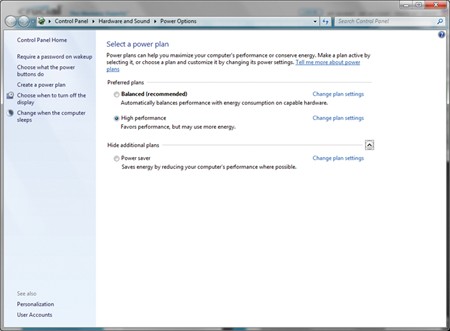
On a desktop PC, switch to the ‘High performance’ plan for better results.
By default, Windows Vista and 7 both come configured for ‘Balanced’ performance. To crank things up a bit, click Start, type power, and select Power Options. Choose the High performance plan. (If you don’t see it listed, click Show additional plans.) Now your machine will run with desktop-optimized power settings. If you want to tweak individual settings, such as how long the hard drive should sit idle before shutting down, click Change plan settings, Change advanced power settings.
Turn Off the Eye Candy– Works in: Vista, 7
Everybody loves bells and whistles, but Windows’ eye candy come at a price — especially on older PCs with single-core processors or minimal RAM. If you’re more concerned with zippy performance than you are with transparent windows and animated controls, consider turning off the visual effects.
Open the Control Panel, type visual in the Search field, and click Adjust the appearance and performance of Windows. Choose Adjust for best performance, and then click Apply. After a few seconds you’ll see a decidedly plainer Windows interface–and enjoy a much snappier response. If the look is too stark, you can choose the Custom option and then select any effects you want to restore. Just remember: The more you enable, the greater the performance hit.
Remove Shovelware – Works in: XP, Vista, 7
To this day many PC manufacturers insist on stuffing new systems with unnecessary, unwanted software that consumes drive space and slows startup. We’re talking security suites you may not require, games you might not want, and vendor-branded utilities that are more nuisance than necessity.
Kick that junk to the curb. You can venture into the Control Panel and click Uninstall a program, or use one of our favorite freebies, Revo Uninstaller, to make a clean sweep; the utility not only uninstalls software, but also removes leftover files and Registry entries. Just make sure not to firebomb anything important, like Adobe Flash Player or Microsoft .Net Framework.
Expert Tip: Eliminate the Aero Peek Delay – Works in: 7
Aero Peek, one of Windows 7’s most celebrated enhancements, temporarily turns all your windows transparent when you mouse over the Show Desktop button.
However, if you accept the default settings, the effect takes nearly a full second to kick in. Why wait? A simple Registry hack will enable instantaneous transparency.
Press the Windows key to open the Start menu, type regedit in the search box, and press Enter. In the Registry, navigate to HKEY_CURRENT_USER\ Software\Microsoft\Windows\CurrentVersion\ Explorer\Advanced. Right-click an empty area in the right pane, and choose New, DWORD (32-bit) Value. Name it
DesktopLivePreviewHoverTime. By default, Windows will assign a value of 0, which is exactly what you want. Now just restart your computer (or log off and back on). The next time you mouse over Show Desktop, you’ll be Peeking at light speed.
Expert Tip: Run Performance Monitor – Works in: 7
If you like charts, numbers, and data sets, Windows 7 has just the tool for you. Performance Monitor tracks your PC’s hardware and applications in real time, generating all kinds of data that you can review and compare.
It’s aimed more at system administrators than at everyday users, but if you’re trying to confirm a sneaking suspicion that, say, iTunes is single-handedly tanking your system’s performance, it can help.
To access Performance Monitor, press the Windows key, type perfmon, and press Enter. You can start assessing your system by expanding the Monitoring Tools folder and clicking Performance Monitor. From there you’ll probably need to delve into the built-in help files, as the tool isn’t exactly user-friendly. For more, check out the Microsoft Developer Network blog post on using Performance Monitor.
MAKE IT SAFER
Still looking for a good reason to trade Windows XP in for Windows 7? One word: security. The new OS is inherently better at fighting infections, blocking hackers, and thwarting phishing attempts. And with the extra tools described here, you can lock it down like a digital Fort Knox.
Install Microsoft Security Essentials
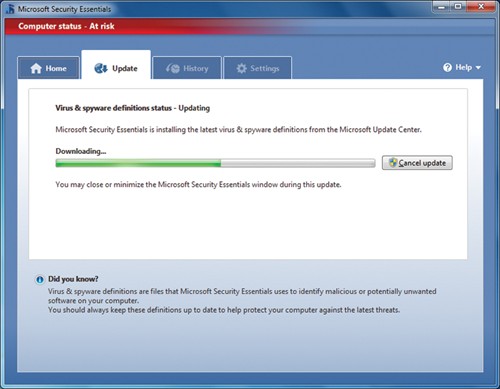
The free Microsoft Security Essentials antimalware app offers good protection.
Works in: XP, Vista, 7 Windows 7 comes equipped with some solid security tools, including a robust firewall and the spyware-blocking Windows Defender. On top of that, you need a good antivirus program, one that works quietly in the background and won’t bog down your system.
Microsoft Security Essentials provides real-time protection against viruses and other kinds of malware, and its performance impact is negligible; PCWorld security guru Erik Larkin says it “holds its own” against other free antivirus utilities. Sounds like a fine alternative to paying an annual fee for virus protection.
Install Web of Trust – Works in: XP, Vista, 7
The seemingly innocent act of clicking a link–even one that’s at the top of a Google search-results page–can result in “drive-by downloads” infecting your PC. Scary, right? But how do you know whether a link is safe to click? Try Web of Trust, a browser add-on that will warn you of unsafe sites.
Specifically, the plug-in adds color-coded icons to each link that your search engine produces: green for safe, yellow for risky, and red for dangerous. You can also right-click any link, such as one that appears in an online forum, and choose View WOT scorecard to perform a manual safety check.
WOT is free, and available for both Firefox and Internet Explorer. Although its rating icons add a little clutter to some Web pages, we recommend it very highly for anyone concerned about security.
Create a System-Repair Disc – Works in: 7
Stop–before you do one more thing with your PC, dig out the box it came in. Do you see a Windows 7 disc or a system-recovery disc? They’re less common these days, so chances are it falls to you to create your own. And it’s vital that you do, because if your system ever becomes unbootable, a recovery CD or DVD might be your only recourse.
Thankfully, Windows 7 makes the task exceedingly easy. Just pop in a blank, recordable CD or DVD (you’ll need a burner, natch), click Start, type repair, and choose Create a System Repair Disc. Follow the instructions from there, remembering to label the disc when you’re done.
If you ever run into trouble, boot your system with the repair disc. It includes a variety of recovery and diagnostic tools, and also lets you choose a System Restore point to help get your PC back to a previous, working state.
Make this disc now. If you wait until after you encounter a problem, it’s too late.
Expert Tip: Tweak the UAC – Works in: 7
You remember User Account Control, right? Incessant annoyance? Poster child for everything that was wrong with Vista? Yep, that UAC. It’s back in Windows 7, and its heart remains in the right place: It’s still meant to protect you from running dangerous software or making unauthorized changes to your system–you know, of the malware, identity-stealing variety.
Of course, it can still be annoying, too. Fortunately Microsoft now gives you control over when and why UAC issues warnings. To tweak the settings, click Start, type account, and select Change User Account Control settings. You’ll see a slider with four notification levels. By default, UAC is now a little less intrusive than it was in Vista, notifying you only when programs try to make changes and not when you make changes to Windows. Want UAC to take a hike altogether? Drop the slider down to Never notify.
MAKE IT EASIER
When is an operating system easy to use? When it works the way you want it to work. Here’s how to make your Windows life simpler and more productive.
Close All Your Apps in a Flash
Works in: XP, Vista, 7
Done working for the day? Don’t try to close all your open programs individually. Instead, close them all in one fell swoop with a click of the Close All Windows icon. Unlike the Show Desktop function, which merely minimizes all open windows. Close All Windows terminates each running program. Don’t worry about losing your work: If an open document needs saving, the program will prompt you–the same as if you had clicked the red Close button up in the corner.
To make the best use of Close All Windows, pin it to your taskbar. (Windows XP and Vista users can add it to the Quick Launch toolbar.)
Move the Taskbar — Works in: Vista, 7
Widescreen monitors are great for watching movies and organizing windows side by side, but much of the time all that screen real estate goes to waste. Why not move the Windows taskbar to the side of the screen? This may sound crazy at first (and you’ll need a few days to get used to the results). But since Web pages, Word documents, and the like run top-to-bottom, the more vertical space you can give them, the better.
By relocating the taskbar to the left side (or the right, if you prefer), you’re freeing up vertical space for the stuff you use every day while making smarter use of wasted horizontal space.
To give this a whirl, right-click an empty area of the taskbar and clear the check mark next to Lock the taskbar. Next, left-click and hold on an empty area of the taskbar, and then drag it to the left (or right) side of the screen. Once you get close, you’ll see it lock in, at which point you can release the mouse button.
Vista users may want to extend the width of the taskbar (by clicking and dragging the right edge) to better see the labels for currently running programs. But Windows 7 users can keep the taskbar narrow, as the new OS doesn’t use taskbar labels anyway.
Tweak the Taskbar — Works in: 7
Jump Lists, program pinning, rich thumbnail previews–the Windows 7 taskbar definitely offers some nice amenities. However, since it’s “your” Windows (at least according to Microsoft’s recent ads), you should be able to make the taskbar work exactly the way you want it to.
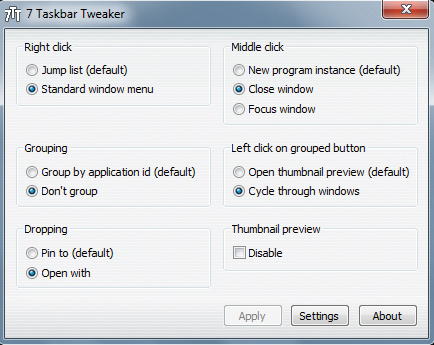
7 Taskbar Tweaker lets you adjust Windows 7 taskbar settings to suit your work style.
Enter 7 Taskbar Tweaker, a free program that…well, the name pretty much says it all. This little utility offers six taskbar adjustments, including one that replaces the Jump List with the old-fashioned window menu when you right-click a running program.
Other options include disabling thumbnail previews, turning off window grouping, opening (rather than pinning) a file that you’ve dragged to a taskbar program, and cycling through windows when you left-click a grouped button. Our favorite tweak reassigns the middle mouse button to close or focus a window instead of opening a new instance of the program.
Reload All Your Apps After a Reboot — Works in: XP, Vista, 7
Windows XP, Vista, and 7 have at least one thing in common: They always urge you to reboot after installing new updates and patches. Afterward, you’d think the OS would be courteous enough to restore your currently running programs, much as Firefox and Internet Explorer 8 restore tabs after a crash or restart–but, alas, no.
Thankfully, Cache My Work can reopen your apps after a reboot. It’s especially handy for those times when you step away from your PC for a while only to discover upon your return that Windows has restarted without even asking you.
The no-cost utility builds a checklist of “cacheable” programs that are currently running. Check off the ones you want to restore, click Save, and you’re done. (The tool also gives you the option of restoring Windows Explorer windows, a nice touch.)
Install Apps in a Flash — Works in: XP, Vista, 7
So you just made the move to a Windows 7 PC, and now you need to install all your software. Talk about a hassle, what with digging out the CDs, downloading programs from various sites, and then babysitting your system while you install one app after another. There has to be an easier way.
There is. Ninite, an awesome free service, automatically downloads and installs a variety of popular no-fee apps. All you do is scroll through Ninite’s list of 70-plus programs, checking off the ones you want. The service offers the most current versions of nearly every popular freebie, including Firefox, iTunes, Microsoft Security Essentials, OpenOffice, Picasa, Skype, and Steam.
Once you’ve made your picks, click Get Installer to download a small executable file. Run that file and sit back while Ninite goes to work. How long it takes depends on how many programs you’ve selected. We chose a baker’s dozen (including the trial version of Office 2007 Standard, which we already own–now we just have to type in the security key), and Ninite was done in all of 10 minutes. That makes the service a must-have for anyone setting up shop on a new PC.
Expert Tip: Turn Your PC Into a Wi-Fi Hotspot — Works in: 7
Say you have a broadband card in your laptop, but no way to share its whiz-bang wireless connection with your iPod Touch or another PC. Or maybe you’ve paid for a hotel’s Wi-Fi service but you don’t want to pay again just to connect other devices.
You need Connectify, a clever utility that turns your Internet-connected PC into the equivalent of a Wi-Fi hotspot. Though at press time it was an early-stage beta, it worked quite well on our test systems. After installing the program, just click the Connectify icon in the system tray, choose the connection you want to share, and then enter a name and password for your wireless network.
Now fire up your other devices and look for the new connection. Join it, enter the password, and you’re off to the Internet races. Just keep in mind that because Connectify is still in development, it may not work perfectly with every device. On the plus side, it’s free while in beta, and it may remain an ad-supported freebie once it’s finished.
MAKE IT MORE FUN
Illustration by Edwin Fotheringham
Looking for entertainment? Windows 7 has a couple of tricks up its sleeve: media sharing and Windows Media Center. The latter is available in the Home Premium, Professional, and Ultimate editions of the OS; only Starter doesn’t have it. Here’s how to get more enjoyment out of your Windows entertainment apps.
Autorotate Your Wallpaper
Works in: 7
Wouldn’t it be nice if Windows greeted you with a new wallpaper every time you start your PC? Or at regular intervals throughout the day? Windows 7 makes this so simple that you really have to wonder what took Microsoft so long.
To set your wallpaper options, press the Windows key, type background, and then click Change desktop background. By default Windows will show you its stock background art (and some lovely selections they are), but you can peruse different images (such as those in your Pictures Library) by clicking the Picture location drop-down or choosing Browse to pull from a specific folder on your hard drive.
Next, click Select All if you want to add all the displayed photos to your wallpaper rotation, or click the checkbox next to each individual photo you want to include. Then, click the Change picture every drop-down and set the desired interval (how often Windows will swap the current wallpaper for the next one on the roster) to 30 minutes, 1 day, or whatever. Finally, click Save changes.
Download More Themes
To spiff up Windows 7, you can download new themes from a large collection.
Works in: 7
Microsoft stocked Windows 7 with some seriously stunning Aero themes–packages of wallpapers, sounds, and a pervasive color palette–that range from architecture to nature to the good ol’ USA. To see that array of choices, press the Windows key, type theme, and click Change the theme. You can browse what’s there or click Get more themes online to tap into Microsoft’s Personalization Gallery. It’s home to about a dozen branded themes (Bing, Ferrari, the game Gears of War, the movie Avatar, and so on), plus 20 international themes with gorgeous artwork from places such as Brazil, Japan, and Taiwan. You’ll also find instructions here on creating your own theme or customizing existing themes. This site is a great resource for anyone looking to spiff up Windows 7.
Ditch the Antenna, Keep Your Digital Channels
Works in: 7
In previous versions of Windows, the built-in Media Center software could tune in (and record, DVR-style) locally broadcast digital channels–but only if you used an ATSC tuner and connected a reasonably good set of rabbit ears. This over-the-air approach worked well enough, but Windows 7 offers a much better option: ClearQAM, which delivers unencrypted digital channels via your basic-cable feed assuming that you’re still a cable subscriber, of course).
All you need is a tuner card that supports ClearQAM technology (which virtually all current models do). With that, you should be able to tune in your local channels in all their digital, high-def goodness, no antenna required.
If you already own a tuner, such as AverMedia’s AverTVHD Volar Max, just install the latest drivers, disconnect your antenna, and replace it with your cable-TV coaxial cable. You’ll need to restart Windows and then run through Media Center’s signal-setup process, which you can find under Tasks, Setup, TV, TV Signal, Set Up TV Signal. Don’t be surprised if you actually gain some additional channels compared with what you received from the antenna alone.
If you’re in the market for a tuner add-on, check out the SiliconDust HDHomeRun, which includes two ClearQAM-compatible tuners. Instead of plugging directly into one of your PC’s USB ports as most tuners do, the HDHomeRun connects to your router. Once attached, this “network tuner” lets you watch and record live TV on any Windows Media Center-equipped system in your house. It runs about $150.
Watch Tuner-Free TV in Media Center
Works in: 7
Although Windows Media Center does a pretty good TiVo impression with its DVR features, you typically need at least one TV tuner to watch and record live shows. If your PC doesn’t have a tuner, however, you can just stream shows on demand–the Windows 7 version of WMC makes that possible, though it doesn’t exactly have a Hulu-like selection of programs.
Windows 7’s Media Center has a selection of TV shows ready for streaming.
To get started, click TV, Guide; you’ll see an entire grid of Internet TV, headlined by CBS Primetime and CBS Classic. Within those two categories you’ll find everything from The Amazing Race to Twin Peaks, all ready for near-instant streaming (WMC will need to perform a couple of one-time updates before you can watch anything). Alas, while CBS offers full-length episodes of shows like NCIS: Los Angeles and The Good Wife, you’ll have to settle for mere clips of The Big Bang Theory and others. The same goes for most of the non-CBS shows mixed into the News, Comedy, Drama, Movies, and Sports categories.
Despite the limited selection of shows, this is a well-executed approach to streaming TV, and it’s hard to beat the comfort and convenience of living-room-friendly, on-demand media.
Stream Your Media to Other PCs – Works in: 7
Much like the popular Orb service, Windows 7 allows you to stream your music, photos, and videos (including recorded TV) from your home PC to other PCs running Windows 7. That’s great if you’re on the road with your laptop or netbook and you want to watch the football game you recorded at home. What’s not so great is the number of hoops that Microsoft makes you jump through to set the feature up.
Here’s how to do it.
Start Windows Media Player, and click Stream, Allow Internet access to home media. Click Link an online ID, and then select Add an online ID provider. On the Web page that appears, choose either Download for 32-bit or Download for 64-bit, depending on which version of Windows 7 you have. Save and then run the downloaded file, which installs the Windows Live ID Sign-in Assistant app.
When that’s done, return to the Link Online IDs window and, under Online ID Provider, click Link online ID. Enter your Windows Live ID username and password. (Don’t have a Live ID? Click the link in the box to sign up.) Finally, click OK. Return to Windows Media Player, and click Allow Internet access to home media.
That’s one computer done. On your second system (say, your laptop), you’ll need to repeat the entire procedure. Afterward you’ll be able to browse the Other Libraries section in Windows Media Player to find the music, videos, pictures, and/or recorded TV that you want to view from afar. Setup may be a hassle, but Windows 7 media streaming works beautifully.
Expert Tip: Watch Netflix From the Couch – Works in: Vista, 7
If you’re a Netflix subscriber, the Netflix Windows Media Center plug-in isn’t just optional, it’s practically essential. Just click Movies, Netflix in Media Center to install the plug-in and sign in to your account.
Then get ready for a shock: The Netflix plug-in offers way more functionality than you get from, say, a stand-alone Roku box or an Xbox 360. While those devices also provide Netflix access, they limit you to viewing your queues and streaming movies from whatever is in your Instant Queue. The WMC plug-in, on the other hand, lets you browse and search the entire Netflix catalog, adding movies to your standard queue or Instant Queue as you go. Netflix memberships start at $9 per month.
Expert Tip: Enjoy Hulu in Comfort
Works in: Vista, 7 Hulu Desktop is an experimental, Hulu Labs-devised app that gives you a 10-foot, remote-controllable interface for the TV-streaming service. Just one problem: You have no way to reach that interface from within Windows Media Center.
The free but unimaginatively named Hulu Desktop Integration download adds a Hulu Desktop icon to WMC. One click closes the latter and opens the former in maximized, full-screen view. When you’re done streaming, click Close to exit Hulu Desktop and return to WMC. It doesn’t get much easier than that.
Source: PCWorld.com
