PowerPoint is practically synonymous with presentations. The application has all the tools you need to make a professional-looking slideshow that pops with audio, video, and custom animations. However, some features for designing a slick presentation are hidden deep beneath PowerPoint’s interface.
For example, what if you want to animate a chart, hide an image on a slide until you’re ready to drive a point home, or broadcast a presentation to remote clients? Read on to learn some of PowerPoint’s best-kept secrets.
1. Display a Chart, One Step at a Time
As you’re giving a presentation, you may prefer to reveal a chart on a slide by displaying it one column at a time, instead of showing it all at once. You can arrange this in PowerPoint by using its chart animation options.
To begin, select the chart and click the Animations tab on the Ribbon toolbar. Click Animation Pane to open the pane along the right side of the screen. From there, click the Add Animationbutton on the Ribbon and select an Entrance animation effect, such as Fade.
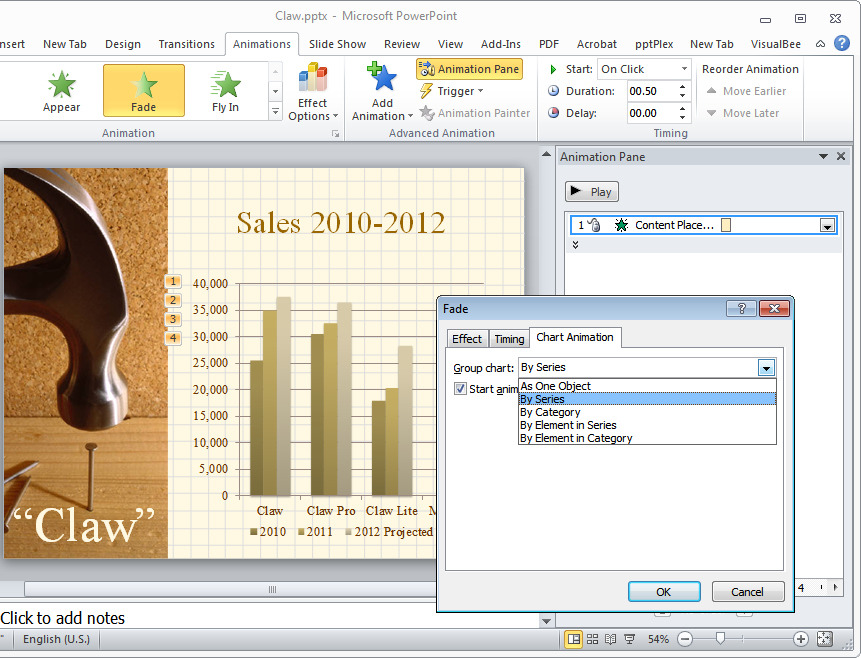
PowerPoint can automatically break up a chart so that it will display in sequence rather than all at once.

In the Animation Pane, right-click the entry that appeared when you added the effect. Choose Effect Options and then click the Chart Animation tab. By default, the ‘Group chart’ option will be set to ‘Show As One Object’ so that the chart will appear all at once. To reveal the chart one series at a time, chooseBy Series, and each series will display one by one, with a delay in between. If you choose By Category, the chart will display one category at a time.
Check the Start Animation by Drawing the Chart Background checkbox, and then click the Timing tab. To make the chart animation begin automatically after the slide appears on the screen, set the Start option to After Previous.
Select the animation speed by choosing an option from the Duration list. Click OK, and then preview the animation by clicking the Play button at the top of the Animation Pane.
2. Hide an Image Until Your Great Reveal
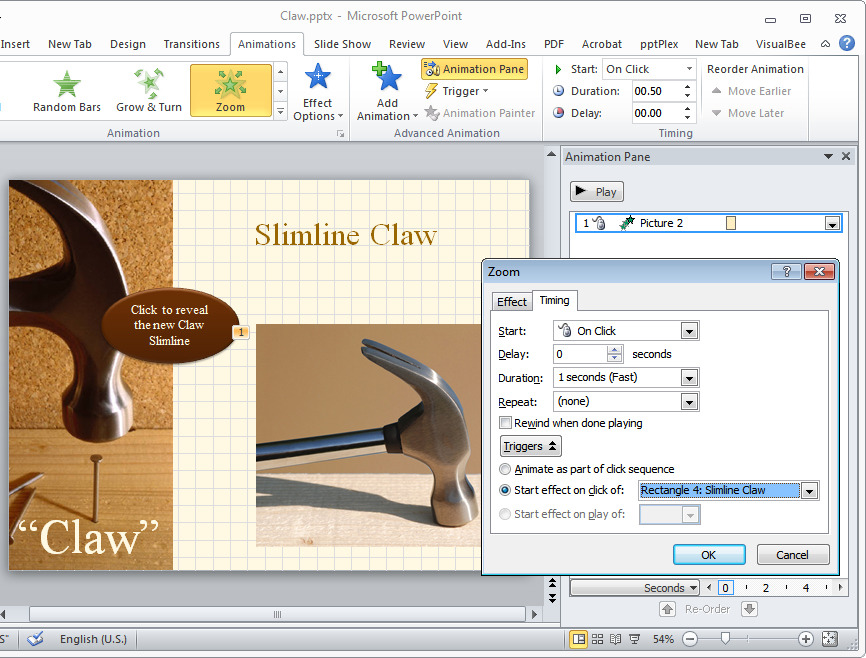
The Trigger feature allows you to set up an image so that it appears only when you click a shape.
Imagine that you want to keep a picture hidden on a slide and reveal it only when you are ready to do so. You can accomplish this by linking the image to a shape and setting up the image so that it appears when you click the shape.
First add a picture to a slide, and then insert the shape you will click to reveal the image. To do this, choose Insert, Shapes. Select a shape, such as Oval,and draw the shape on the slide. Right-click the shape, choose Edit Text, and type something like Click Me! on the shape.
Select the picture and choose Animations, Add Animation. Pick an Entrance animation, such as Zoom. Display the Animation Pane if it is not visible by clicking Animation Pane on the Ribbon toolbar. Then, right-click the entry in the Animation Pane and choose Timing. Click the Triggers button, click to selectStart Effect on click of:, and set the option in the drop-down menu to the name of the shape that you created. Click OK.
To preview the effect, choose the Slide Show tab on the Ribbon and click From Current Slide. When the slide appears, the picture will be invisible. Only when you click the shape will the picture appear.
3. Style a Presentation With the Slide Master
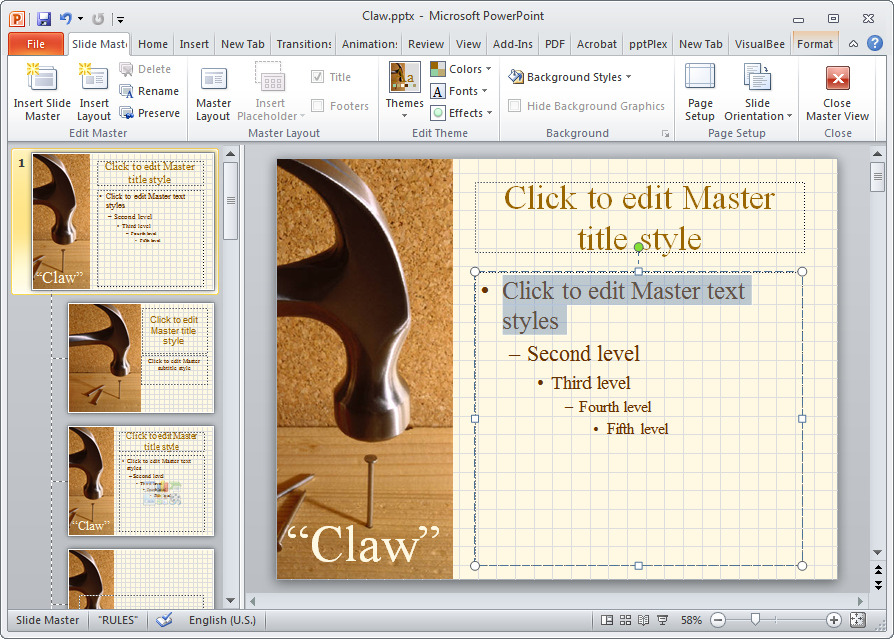
The formatting on the Slide Master controls the formatting of text on all your slides. You can alter it to suit your needs.

You may be familiar with using styles in Microsoft Word and Publisher to apply consistent formatting to text in a document. Although PowerPoint does not have styles, as such, its Slide Master performs a similar job: By making changes to the Slide Master, you can change the text formatting on each slide.
To see the Slide Master, choose View, Slide Master on the Ribbon toolbar. A panel will open along the left side of the screen, showing the Slide Master at the top and the available slide layouts below.
To set up the text the way you want it to look, select the appropriate item to change in the Slide Master. For example, to change the formatting of the titles, select the title text and adjust it as desired. You can change any or all of the text styles here.
When you’re done, click the Slide Master tab and choose Close Master View to return to editing the presentation. All the slides in the presentation will automatically reflect the changes that you’ve made, and the Slide Master formatting will apply to all new slides.
4. Preview Your Presentation With Reading View
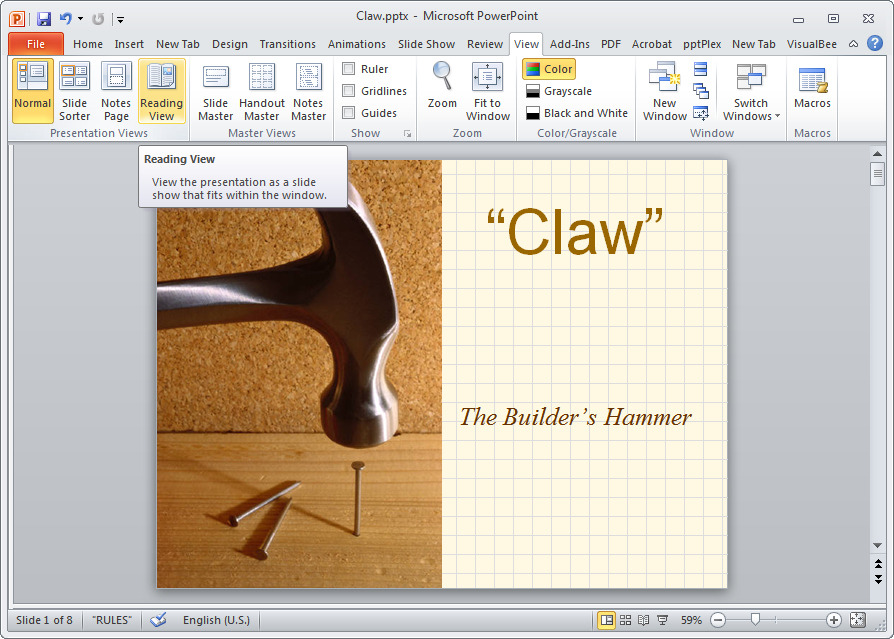
PowerPoint 2010’s Reading View offers a handy way to preview a presentation.
New to PowerPoint 2010 is the Reading View. This convenient feature allows you to preview and test your presentation inside the current PowerPoint window, without its consuming the entire screen and the taskbar. To try the feature, choose View, Reading View. The editing view will disappear, replaced by your slideshow beginning at the first slide.
You can progress through the presentation to see how it looks. When you reach the end, press the Right Arrow key to exit. You can also return to PowerPoint’s editing view at any time by pressing the Esc key.
5. Set Up an Autoplaying Presentation
PowerPoint is a great tool for creating slideshows that you can automate to play at a trade show or in a booth at your business. To do so, you must set up the slideshow to play “kiosk” style so that it will progress and loop continually until you stop it.
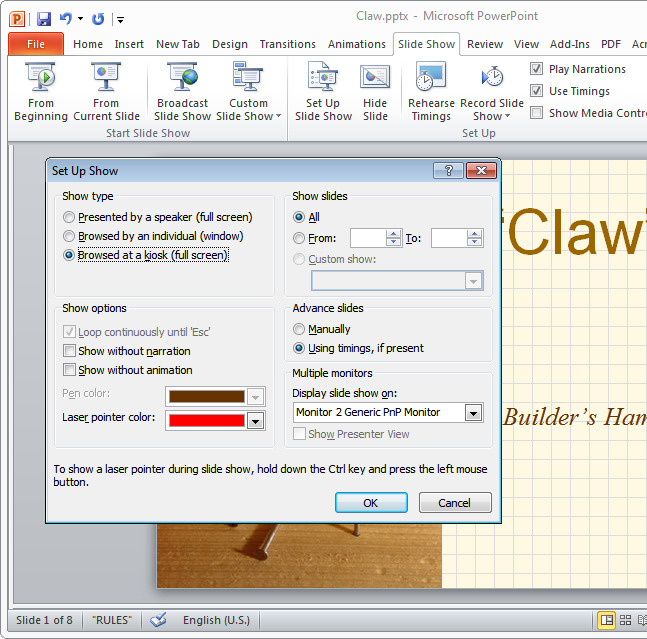
You can set up a presentation for a trade show so that it plays automatically and loops when complete.

To configure a kiosk presentation, click the Slide Show tab on the Ribbon toolbar and choose Set Up Slide Show. Among the ‘Show type’ options, chooseBrowsed at a kiosk (full screen). Set the ‘Advance slides’ option to Using timings, if present. Click OK.
Next, click the Transitions tab. In the ‘Advance slide’ options, choose After, and set a timing (such as 00:05:00 to display the slides for 5 seconds each). Click Apply to All so that this transition affects all the slides in the presentation. Now, when you play the presentation, it will run automatically, displaying each slide for 5 seconds, and looping when it is complete. To end the looping playback, press Esc.
6. Reuse Slides From Another Presentation
When designing a slideshow, you may need to re-create a slide that you’ve already made for an earlier presentation, such as a slide that details the key people in your business, or displays company contact information. To reuse this content, import the existing slides into the current presentation.
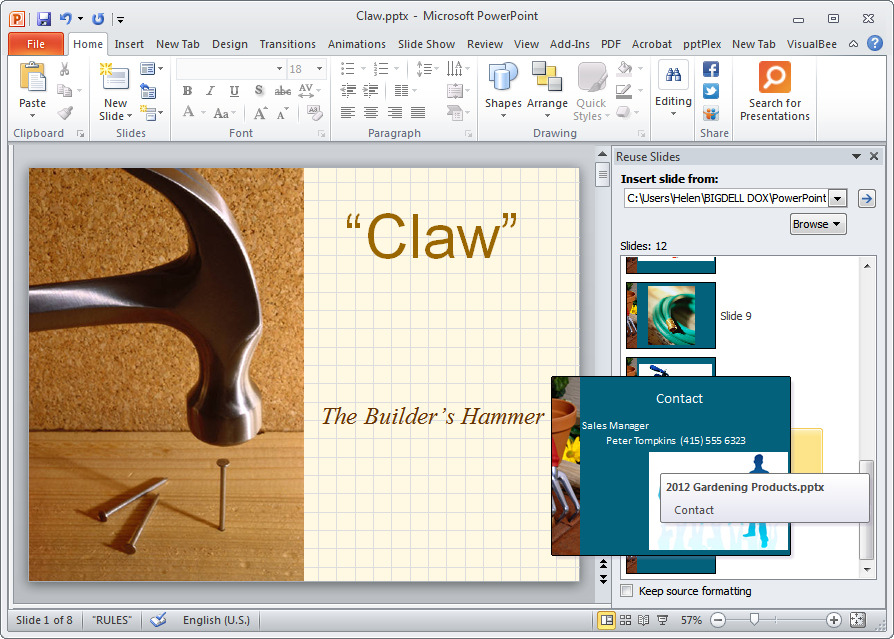
The Reuse Slides feature lets you import slides from other presentations and control their formatting as you do so.
First, click the Home tab on the Ribbon toolbar and choose New Slide, Reuse Slides. Click Browse, Browse File and select the PowerPoint presentation that contains the slides you wish to reuse. The presentation opens, with a list of its slides in the right-hand slide panel. Hold your mouse over a slide to preview a larger version.
Click the slide to add it to your new presentation; PowerPoint will format it to match your new presentation’s style. If you prefer to use the formatting from the original presentation instead, select the Keep source formatting checkbox at the foot of the Reuse Slides panel before clicking to insert a slide.
7. Create an Instant Photo Album
PowerPoint is ideal for creating photo albums for a catalog, or for displaying images for a product launch. To create an album-style presentation, you have to start by configuring the photo album; once that’s done, you then build the remainder of the presentation around it. This order is required, as the Photo Album feature creates a brand-new presentation for the images.
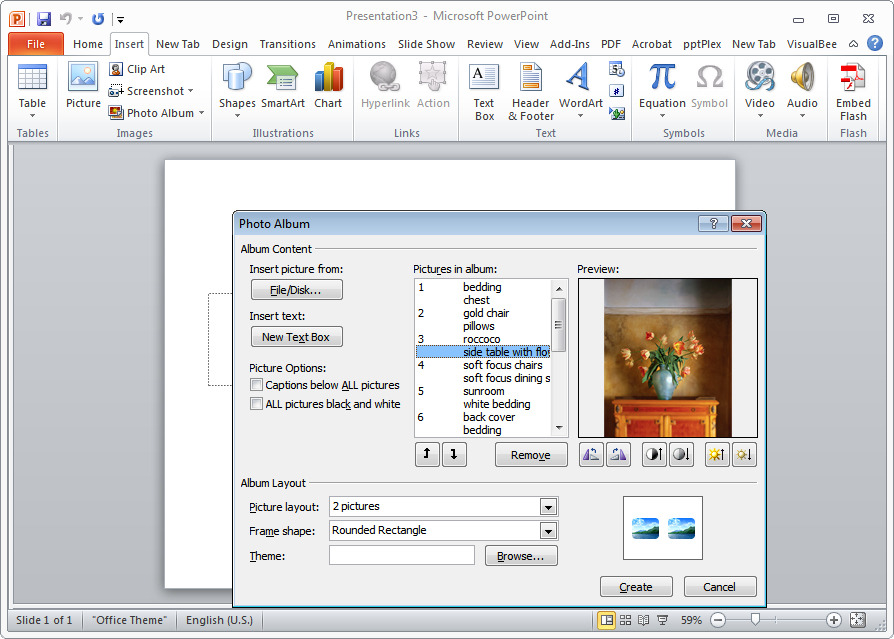
The Photo Album feature gives you a quick way to assemble a lot of images into a series of slides.
Choose the Insert tab on the Ribbon toolbar and click Photo Album. When the dialog box opens, click the File/Disk button, select the images to use in the photo album, and click Insert. To specify how to arrange the images on the slide, choose an option from the ‘Picture layout’ list; the preview shows how the slide will look with the selected option. The setting you pick will apply to all the slides in the album.
You can configure other options, too, such as ‘Frame shape’. When you’re done, click Create, and PowerPoint will create a new presentation with the images inserted and arranged. You can now edit individual slides, and move and size the images on the slides if necessary. You can also add more slides to complete the presentation.
8. Make a One-Click Link to a Website
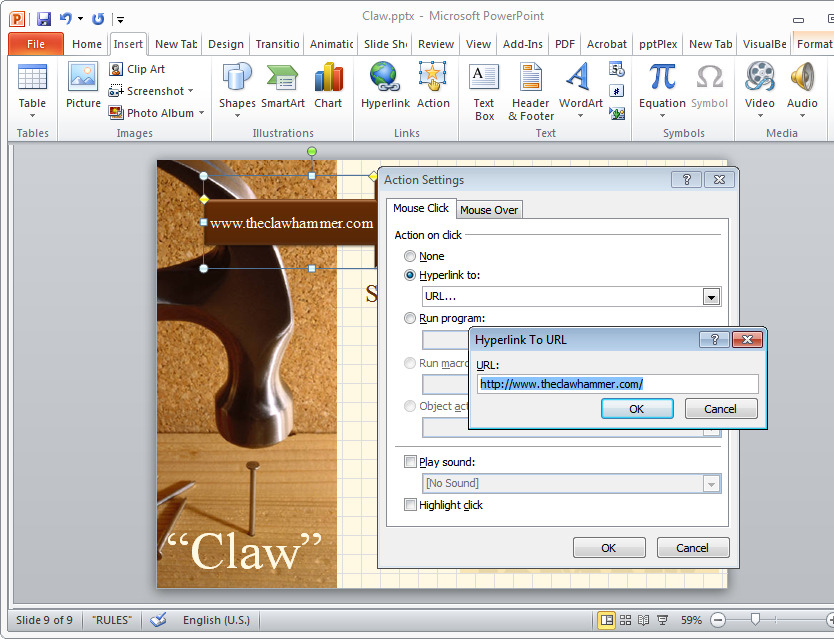
You can create a shape that, when clicked, automatically launches Internet Explorer and displays a website.

You can create a website link in a presentation that, when clicked, will open a browser to display the site.
Select the Insert tab on the Ribbon toolbar, and click Shapes. Draw a shape on the slide–any shape you want. Right-click the shape, choose Edit Text, and type something that describes the site to which you’re linking. With the shape still selected, click Insert, Action, and click the Mouse Click tab. Then clickHyperlink to:, and in the drop-down list choose URL. In the ‘Hyperlink To URL’ dialog box that appears, type the full Web address; click OK.
Provided that you are connected to the Internet at presentation time, you can click the shape to launch your system’s default browser and view that website.
9. Play Music Across Your Slideshow
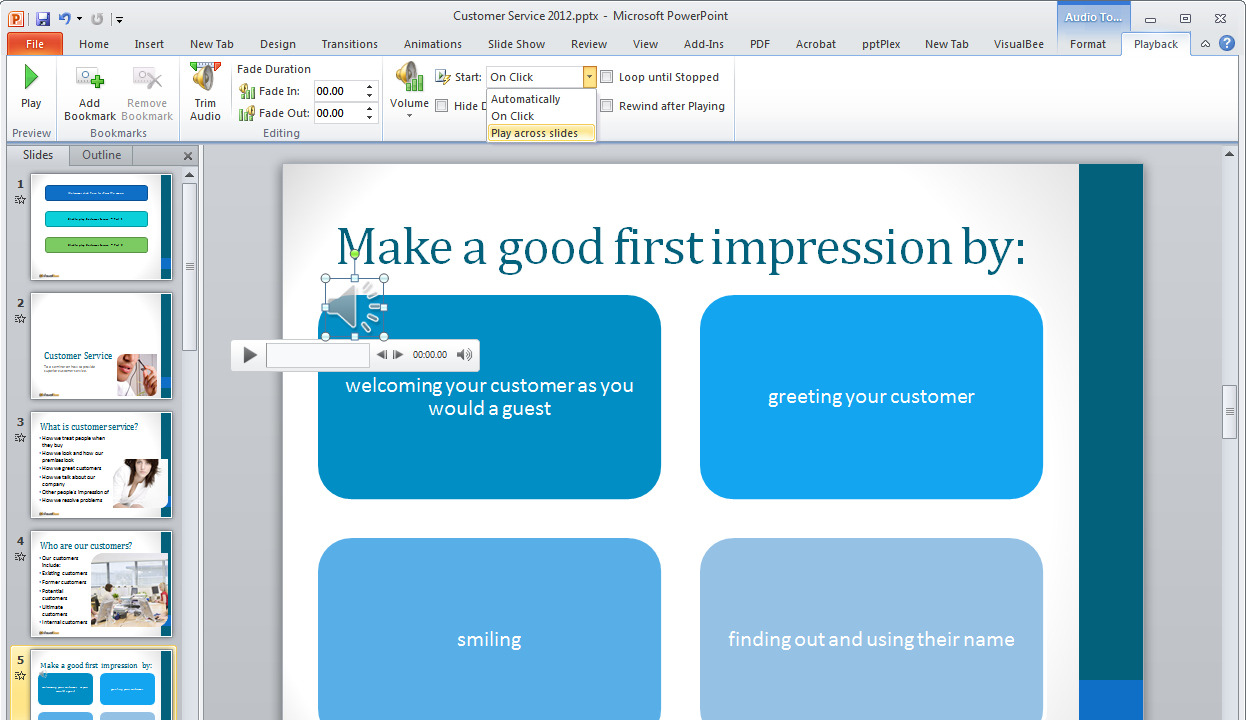
The Start option lets you configure music to play across a series of slides.

Since the early days of PowerPoint, configuring a music track to play across a series of slides has been difficult. PowerPoint 2010 is no different, since it hides this setting in a place where you may not think to look.
To play music across your slides, first click the slide where you wish the music to begin. Choose the Insert tab on the Ribbon toolbar, click Audio, and select the music track to play. Next, select the link for the music track on the slide, and click the Audio Tools, Playback tab. In the ‘Start’ drop-down list of options, choose Play across slide. The music will now play during your presentation, until it ends.
10. Broadcast a Presentation Across the Web
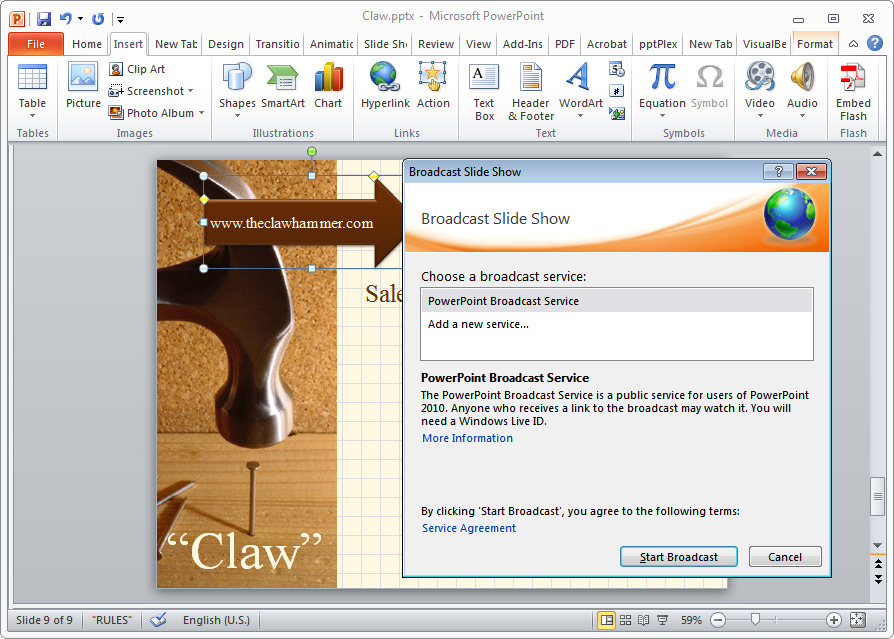
PowerPoint 2010 lets you broadcast a presentation on the Web.
If you’re hosting a remote meeting, PowerPoint 2010 lets you broadcast a slideshow on the Web. In your completed .pptx document, choose File, Save & Send, select Broadcast Slide Show, and click the Broadcast Slide Show button. When the Broadcast Slide Show dialog box appears, click Start Broadcastand then sign in using your Windows Live ID. You will receive a link to the presentation, which you can click to send via email or copy and paste into, say, an instant message to invite people to view the presentation.
When you are sure that your attendees are online, click Start Slideshow to begin playing. The presentation will broadcast so that the participants can view the slides as you navigate. The broadcast will not include sound, however, unless you use a separate audio-conferencing service. When you’re done, click the End Broadcast button to automatically disconnect participants and finish the presentation.