


We live and work in a cold, cruel world where our laptops take a lot of abuse. Regardless of how gentle we try to be, it’s inevitable that sooner or later our notebooks will get dropped, spilled on and worse.
While many people think that notebook damage can be repaired only by the manufacturer or a computer shop, there are some problems that can be inexpensively and easily fixed with common tools, spare parts and a little effort. Many of these repairs are no harder than high school art projects.
Using a couple of old, beat-up notebooks, I’ll show you how to fix everything from a broken case and frayed charger cord to a bad fan and scratched screen. Each restoration project has time and cost estimates as well as what materials you’ll need to do the trick. Just follow the directions I’ve outlined for each repair — but be warned, your system might be a little different or require special parts and a slightly different approach.
Related stories:
Three tough notebooks that can withstand daily abuse
How to know when it’s time to repair or replace your laptop
One additional note: While I generally applaud improvisation and recycling old parts for repairs, there’s nothing like having the right part to do the repair. In fact, while fans and notebook keyboards may all look alike, they are very different, and chances are the wrong one won’t fit right and work properly. Each repair has links to where you can get the right parts, but they are just a sample of what’s available. If all else fails, try eBay to get what you need.
Follow along and soon your system will be good as new and ready for its next mishap.
Problem: Frayed charger cord
Cost: $5 to $15
Time: 1 to 2 hours
Materials: Silicone sealant, painter’s tape (which is less sticky than regular masking tape), protective gloves (optional)
Because a notebook that travels needs to be plugged in and unplugged several times a day, the cord and connector can take a beating, leading to a frayed power cord. If this happens, it’s important to get a new cord or fix it right away, because it not only can damage the system’s battery through intermittent charging, but it can also be a fire hazard.
Fortunately, most power adapters have removable AC power cords, which cost a few dollars and are available at stores like Radio Shack. On the other hand, if the connector that plugs into the computer is the problem, it can cost $50 to $75 to replace because you have to find the exact AC adapter for your laptop from your notebook manufacturer or an online retailer such as Shop For Battery, LaptopTraveller.com or Notebook AC Adapter (search for your make and model name followed by “AC adapter”).
Or you can just fix it yourself.
There’s a quick-and-dirty repair for a frayed cord: Just roll electrical or duct tape over the damage and hope for the best. A better way is to make a more permanent repair with silicone sealant, available at any hardware store and many supermarkets, which will insulate and protect it. It’s best to use black to match the cord’s color, but clear sealant works just as well.
To protect the surface you’re working on, lay down a wide strip of painter’s tape, sticky side down, and place the frayed area of the cord on top of it. The sealant won’t stick to the back of the painter’s tape the way it might to other barriers made out of paper or plastic, and the painter’s tape should peel right off the table when you’re done. (Note, however, that you shouldn’t be doing any kind of computer repairs on your good furniture.)
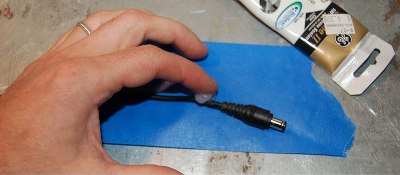
*Work the gooey sealant into the area that needs fixing
Next, squeeze out a gob of sealant onto the area that needs fixing. Work the gooey sealant into place, covering the damage with a liberal coating. If you have sensitive skin, it’s a good idea to wear thin protective gloves for this part.
Let the sealant cure for an hour or two until it is firm. Gently remove the cord from the tape (and the tape from the table), and you have the equivalent of a new power cord that’s flexible and ready for years of road work.
Problem: Cracked notebook case
Cost: $15
Time: 2 to 3 hours (20 minutes to set up the repair, 5 minutes to place and shape the putty, an hour or two to let it cure, 10 minutes to sand it, 30 minutes to paint it and let it dry)
Materials: Epoxy putty, sandpaper, razor blade, Sharpie marker or paint, gloves (optional)
When notebooks get dropped, more often than not they land on the corner, one of the weakest parts of the case.
Unless you have a rugged notebook, there’s a good chance that after an encounter with gravity, the corner will be cracked or — as was the case with my Toshiba Satellite Pro 6100 — broken through completely.
It happened in an airport holding pen some time ago when I sneezed while typing an e-mail. The system went flying and smacked into the floor. Before I got home, I put a Band-Aid over the damaged area to keep the elements out. Now it’s time to fix it for real.
The secret is to use epoxy putty to fill in the broken part of the case. Epoxy putty is available online or at any hardware store for around $4 to $6 a tube, so you can even do this repair on the road. The brand of putty you choose doesn’t matter, but avoid the quick-setting variety because it might harden before you’re done.
First, make sure the damaged area is clean and free of dirt and loose pieces.
Then it’s time to prepare the putty. It comes as a cylinder with two components wrapped around each other. Just cut a section off and twist the parts together.
The key to a smooth case repair is to thoroughly mix the two components together in your hands. Because the putty hardens as the result of a chemical reaction between the two parts, it’s important that they are completely blended together. You might want to use gloves for this part because some people are sensitive to the chemicals in the putty.
Try rolling the putty into a long cylinder and then folding it over itself several times. After a few minutes, the putty becomes a uniform white or gray and you’re ready.
You’ll feel like a kid working with Play-Doh, and in fact, the putty should be the consistency of Play-Doh, which is perfect for working it into the damaged area. Press it firmly into the hole in the case and use your finger or a razor blade to shape it to follow the contour of the case. When it covers the area, take the flat side of a razor blade or back of a ruler and compress the outer surface to flatten it. Any excess putty can be wiped off the case with paper towel before it dries.
When you like the way it looks, go do something else for an hour or two until the epoxy is cured. When it has hardened, the epoxy patch is just as strong as the plastic case.
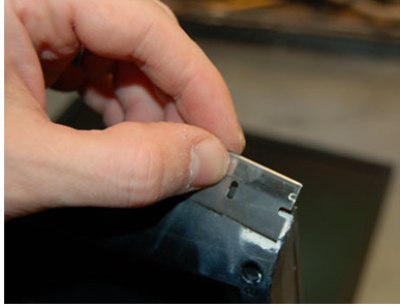
*Press the putty into the damaged area and flatten the outer surface
Many DIYers stop here, and use the obvious repair as a road warrior’s badge of honor or conversation starter on road trips. I prefer a little more finishing, so I smooth the epoxy with 150- and then 220-grit sandpaper. Then I give it a final sanding with 2,000-grit paper that is slightly wet to remove any surface scratches.
Naturally, the color doesn’t match. If it’s a small repair, try using a Sharpie marker to cover it up. For this repair, I used model airplane enamel paint, which costs about $5 for a small bottle; a full set of colors with brushes is $10. When it’s dry, the repair is done and can only be seen if you look closely.
Problem: Bad fan
Cost: $15 to $25
Time: 1 hour
Materials: Screwdriver, compressed air, replacement fan
A noisy or broken cooling fan is not only annoying but doesn’t bring enough cooling air into the case, potentially causing the notebook to overheat and damage the electronics inside. Fortunately, it’s not a hard repair to make. In fact, if you’re lucky you may not need to replace the fan at all.
My Toshiba Satellite Pro 6100 has a single cooling fan, although many systems, particularly larger gaming and entertainment systems, have two or more fans to bring in cool air for the processor, graphics hardware and hard drive. More often than not, the fans get clogged with dust, debris and dirt, which can make them noisy and lower their efficiency. If your system is making a whirring or grinding noise or is overheating, this repair is for you.
Before you do anything else, find the place(s) where fresh air comes in and hot air escapes — usually one or more slotted grilles on the side or bottom of the system. There could be two or three vents, so don’t give up easily. Insert the plastic straw from a can of compressed air into each vent and blow out all the dust that you can; you might want to put on a dust mask or have a vacuum cleaner running because there can be a disgusting amount of dust.
If this doesn’t fix things, it’s time to dig in and open the case. There are generally about a dozen screws on the bottom of the case that you’ll need to remove to open the case, but it varies widely depending on the notebook — for instance, some models require you to remove the keyboard to get inside. If it’s not immediately obvious, check your manual or do some online research to find out how your case opens.
After carefully opening the case, find the fan and blow away any additional dust or detritus.
While you’re there, take a good look for anything stuck in the fan’s blades that might be impeding it. Twirl the blade with your finger, and if it makes noise or doesn’t spin freely — as was the case with my Toshiba — it needs to be replaced.
Before going further, write down the model number of the fan and go online to find a replacement fan. Use your favorite search engine and type in the model number and “cooling fan.” Chances are that even for a five- or six-year-old computer, there will be fans available from several spare parts stores, such as NotebookRepairParts.com and Excel Computer, Inc. The replacement should cost anywhere from $5 to $20.
Once you have the new fan in hand and are sure it’s the right one, you can take out the old fan. First, unplug the fan’s power connector. Each system is different, but you’ll probably need to unscrew a frame that holds the fan in place, and then undo some screws holding the fan to the frame.
Now you can gently remove the fan. It might take a little finesse to work the fan loose because it’s generally a tight fit in there. Many notebook fans are connected to the heat pipe, a thin silver- or copper-colored tube that draws heat off of the processor or graphics chip. The heat pipe usually snaps or screws into the fan assembly. Try not to bend the heat pipe when you’re removing the fan because that will reduce its efficiency at cooling the processor.
With the new fan ready to go, slip it in and carefully screw everything back in place. Before you screw the bottom of the case back on, plug in the power connector and fire the machine up. Don’t worry if it doesn’t start right away because the fan may turn on only after the system heats up. Once you’ve verified that it’s working, close the machine up and get to work.
Problem: Stuck key
Cost: $10 to $100
Time: 10 minutes to 1 hour
Materials: Screwdriver, replacement keyboard for your system
One of the most common and frustrating ways good notebooks go bad is with a stuck or broken key. In my case, the Satellite Pro 6100 had an “R” key that stuck — when I hit it, I got a line or two of Rs.
In some cases (most notably MacBooks) you can get individual replacement keys, but they are quite expensive — often $8 or $9 per key. In most cases, a full keyboard costs only a little more and is a better deal in the long run.
Start by locating a replacement keyboard for your system. All you need to do is fire up your favorite Web search engine and type in the notebook model and the word “keyboard.” There’s a good chance that you’ll find several online stores — including GetPartsOnline and LaptopZ — that sell the right keyboard for between $5 and $20 for a refurbished or used one and between $15 and $100 for a new one.
I opted for a refurbished keyboard at $10 because the system I have is more than five years old — a new keyboard would likely outlive the rest of the machine.
Some laptops have a locking bar above or below the keyboard that holds it in place. Others make you remove screws from the bottom of the case before the keyboard can be removed, and still others require you to open the whole case to get at the keyboard. (If that describes your system, this is a good project to do while you’re replacing the fan.) Your best bet is to nose around and look for a way in or leaf through the system’s manual to find the answer.
My Satellite Pro 6100 has a locking bar above the keyboard that holds it in place, so the instructions that follow are for that type of device.
After prying up the locking bar at the top of the keyboard, pull it off. Unscrew the keyboard.
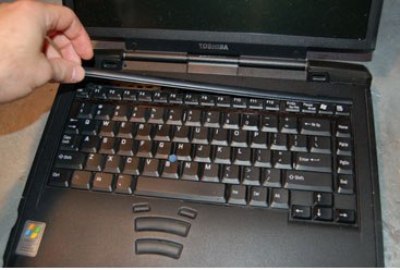
*Remove the locking bar and unscrew the screws that hold the keyboard in
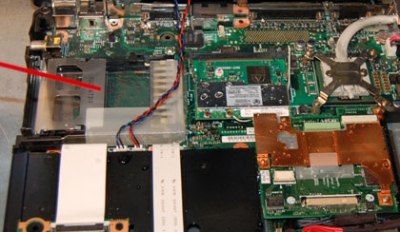
Lift the keyboard slightly, but before you remove it completely, make sure you unplug the ribbon cable that connects it to the motherboard so you don’t damage either piece. With the keyboard safely unplugged, lift it out.
It’s now time to install the new keyboard. After plugging the new keyboard in, slip it into place and screw the keyboard in. Finally, snap the lock bar back in.
That’s it, but I suggest trying all the keys out before celebrating a job well done. Even refurbished and new keyboards are known to have bad keys, so you might have traded one problem for another. Most come with at least a 30-day warranty — you might need it.
Problem: Scratched screen
Cost: $5
Time: 5 minutes
Materials: Toothpaste, cloth, window cleaner
Replacing a screen and its inverter electronics is a tough job that can cost several hundred dollars and take hours. For an old system, it’s likely not worth it. But if the display is only slightly scratched, it’s a no-brainer to fix it.
After a trip to the beach on a windy day last summer, I noticed a bunch of small scratches and one big one on the display of my Intel Classmate PC netbook. The scratches annoyingly obstructed the screen’s image.
Top tips on buying a nifty Netbook … at the right price
These types of scratches can be smoothed out with a dab of toothpaste (and I do mean toothpaste — the gel varieties usually don’t have the necessary abrasives) and a little elbow grease.
Rub the toothpaste between your thumb and forefinger and it should feel slightly sandy and gritty. It’s these mild abrasives that will fix the screen’s problem.
Gently rub the toothpaste in a circular motion over the scratches for a few seconds (not too hard — you could rub off the screen’s surface coating).
Then wipe the screen clean with a soft cloth.
Finish up by cleaning the screen with a non-ammonia-based window cleaner.
My favorite is Sprayway, but there are grocery store shelves filled with these products. Look it over and if the scratches aren’t gone, repeat the process.
This strategy isn’t perfect. With my netbook, the toothpaste only partially removed the big scratch, but it did get rid of all the minor scratches. Plus my netbook now has a minty fresh aroma.
Problem: Waterlogged laptop
Cost: $4
Time: About 20 minutes (followed by overnight drying)
Materials: Towel, screwdriver, compressed air — and hope
Why is it that when there’s a glass of water or coffee to be spilled, a notebook is generally there? Call it Murphy’s Law of Mobility, but I’ve seen several notebooks die because of spills.
If you’ve spilled a soda or a caramel macchiato into your notebook, you’re probably out of luck. Anything with sugar is death — once it dries it’s there forever, eating away at your system’s components. At that point, you could send it to a professional to use deionized water and a lot of patience, which can be a $1,000 job and take weeks, but you’re probably better off just pulling out the hard drive and buying a new machine.
If it’s just water or non-sugared coffee that you’ve spilled, your chances of saving it are much better. Although it’s important to act quickly, the worst thing you can do to a wet system is start it up right away to see if it works. If there’s water inside, you run the risk of creating an electrical short and potentially causing permanent damage. The thing to do is to calm down and dry out the system before hitting the power button.
Quickly unplug the machine and take out all of the easy-to-remove components like the battery, CD drive, hard drive and keyboard, and set them aside to dry separately. (You’ll need a screwdriver to remove some of these parts; consult your manual for instructions.)
Tilt the system on its side to help drain the water out. Do yourself a favor and put a towel underneath. Try to keep the liquid away from the display as you’re removing parts and draining the system.
Gently shake the system to get liquid out of the many nooks and crannies inside; the air vents generally act as water canals. Next, use a can of compressed air to blow the inside of the case as dry as possible.
*Use compressed air to help dry the insides
It’s a good idea to let the machine sit near a heating or cooling air vent overnight — or longer if you can stand the suspense — to fully dry it out.
When you’re sure the system has dried out, put it back together, start it up and hope for the best. If it starts OK, let it run for a while to remove any remaining condensation or droplets. If it doesn’t start up, it’s time to consider getting a new machine.
Brian Nadel is a frequent contributor to Computerworld and the former editor in chief of Mobile Computing & Communications magazine.
Source: Computerworld
