


Small, light and extremely portable, netbooks are ideal for computing on the move. But deciding which mini laptop is best for you isn’t an easy task – particularly when every choice demands a trade-off.
You may have to sacrifice battery life, storage space and keyboard size in order to satisfy other priorities and keep your netbook within budget.
What you skimp on now needn’t haunt you for the life of the device, however. A netbook’s RAM, storage, battery and wireless connectivity are all easy to upgrade later, as we demonstrate in the following walkthrough. You can even rearrange the cramped keyboard to make typing easier. Screen size, on the other hand, is something you’re stuck with – don’t skimp here if an extra inch will make all the difference.

If you’re new to upgrading PCs, it’s a good idea to read up on the advice offered by online communities who are knowledgeable about netbook hacks.
Read related story
Five ways to breathe new life into your old laptop
Overclocking is another way to improve performance on mini laptops running Windows, since many models are factory-underclocked to preserve battery life. You do so at your own risk, however. If you accidentally fry your motherboard, don’t expect the manufacturer to honour the warranty.
Get a bigger hard drive
Whether your netbook’s storage capacity is too small, or you couldn’t afford to add a solid-state disk (SSD) to the original configuration, you needn’t go without. Start by consulting the appropriate user forums to get a sense of which ‘aftermarket’ SSDs or traditional hard drives are compatible with your machine.
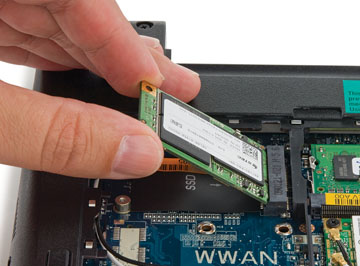
Next, flip the netbook over and remove the two screws that secure the larger back panel into place. Prise off the panel with your finger or the tip of a screwdriver.
You’ll see a set of four electronic boards inside the machine. On the Dell, these are the hard drive, the memory, the network card and an unoccupied space for a 3G card. With the battery facing north, remove the two screws that secure the board in the upper-left quadrant. This is the SSD, which should lift up a little as you loosen the screws. Replacing the drive is then a simple process of pulling the old one out, inserting the new one and tightening the screws.
Install more RAM
Piling on the memory is a good way to pile on the pounds. You can keep costs down by purchasing the bare minimum of RAM necessary to complete the original configuration, then upgrade it yourself for less than the vendor would charge you.
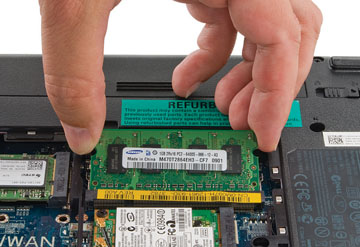
Remove the back panel as described on the previous page and look for the memory. On the Dell, it’s in the upper-right quadrant. Inspect the existing RAM to discover its specification, then purchase the same type in a larger size – we plumped for a 2GB DDR2 533MHz Sodimm. If you’re tempted to splash out on faster RAM, check that your netbook can support it. In all honesty, you’ll barely notice the difference between DDR2-4200 and -5300 memory.
To replace the memory, push outwards on the two clips holding the existing module in place near the notched groove on each side. The RAM will pop up for easy removal. Remove this and insert the new memory module, pushing it into place.
Restart the netbook and quickly press the appropriate key to bring up the system Bios (for the Dell Mini 9, it’s the 2 key). Head to the main tab and confirm that the system recognises the new memory.
Add wireless-n connectivity
Upgrading the internal Wi-Fi capabilities of a netbook from 802.11g to 802.11n sounds like an easy task. And in theory, it should be. You ought to be able to purchase any miniature wireless card, pop off the back of the netbook, do a quick shuffle of components and enjoy the increased functionality and speed of the new card.

Alas, it isn’t that easy. Just because a Wi-Fi card looks like it will fit in your netbook, that doesn’t mean the card is compatible with the operating system/motherboard combination. But before we even get to that, there’s the issue of sizing. When purchasing a replacement Wi-Fi card, you need to know whether your netbook can support a full-height or half-height card.
Remove the back panel and look for the existing Wi-Fi card. A full-height card is long and rectangular, almost like the shape of an SD Card. In contrast, a half-height card is stubbier – it resembles the shape of a CompactFlash card (or, for that matter, a full-height Wi-Fi card cut in half vertically).
Once you’ve figured out the available space, you’ll know which type of card to get. As for the specific brand of Wi-Fi card, there’s no hard-and-fast rule to determine which will be compatible with your netbook.
Using a system of trial and error to find a compatible card could become rather expensive, so instead read up online on other users’ successful Wi-Fi upgrades using your netbook model.
Installing the card itself is an easy task. Remove the rear panel and find the Wi-Fi card. On the Dell, this lies at the centre-right of the system; it’s the card with white and black antenna wires running into it.
Gently disconnect those wires, undo the screws holding the card in place and remove the card from the slot. Insert the new card, reinsert the screws and reconnect the two antenna wires. The specific card you buy will dictate whether you should reverse the wires compared with their positions on the original card.
Depending on the size of the card and the configuration of your motherboard, you might have to remove a motherboard standoff clip to make for a solid fit.
If Windows can’t find the new card after a reboot, install the drivers for your new card. You should be able to find these on the manufacturer’s website; if not, you might have to install drivers from a third-party netbook manufacturer whose product happens to use the same network card.
Overclock the processor
Overclocking is the ultimate upgrade if you want more speed and can be performed without disassembling your netbook. It’s also one of the more dangerous upgrades, given that these netbooks don’t have the best cooling systems.
Your netbook could crash or freeze if you raise the speed or temperature too high, too fast. In many cases, overclocking will void your warranty, too.
For the brave, then, we’ve listed a number of applications that can help.
Abo’s free, open-source SetFSB tool lets you tune the speed of your CPU, memory and key controllers on virtually any Intel Atom-powered netbook.
Asus Eee PCs can be overclocked to run 10 percent faster (or 30 percent in the case of the Eee PC 1101HA) using the preinstalled Super Hybrid Engine preinstalled. If you hunger for yet more speed, turn to Eeectl.
This free two-year-old app from Russian developer DCI lets you control the speed of the motherboard’s front-side bus as well as the CPU voltage – the two virtual knobs you need to twiddle to over-/underclock your CPU. The ever-handy Eeectl also lets you double your screen’s brightness, control the fan and configure various hotkeys.
It works on older 700-series Eee PCs with no need for modification. For other Eee PC machines, you may find you need to modify the code.
Finally, any netbooks that use the Intel GMA 950 graphics chip that’s integrated with the motherboard of most Atom-based laptops – that includes the Acer Aspire One, most Asus netbooks, Dell Inspiron Minis, MSI’s Wind, all the HP Minis except for the 2133 and Samsung’s NC10 – can make use of GMABooster.
This handy application can boost your netbook’s graphics chip from 133/166MHz to 400MHz without increasing the voltage.
GMABooster is easy to use, but it isn’t without its hassles. To use the app for free you must download and install a new version each week. By making a donation you can avoid this annoyance.
Replace the battery
Probably one of the easiest ways to upgrade your netbook is to replace the battery. Most netbooks come with a three-cell battery, but replacing this with a six-cell version will extend life considerably.
You may find advice online that suggests creating a larger pack by wiring together a number of aftermarket batteries. But this is a recipe for disaster. Instead, check eBay: here, we managed to pick up a larger-capacity battery compatible with the existing connections (and size) of our Dell Inspiron Mini 9.
To replace the battery, flip over your netbook and look for two switches marked with lock and unlock icons. Slide both to the unlocked position, then slide out your old battery. Insert the new battery and lock it into place.
You’ll almost certainly find that the battery won’t lie flush with your netbook, so only attempt this upgrade if you don’t mind a lump sticking out the rear.
Install a new OS
Installing a new OS can improve your netbook’s performance no end. Note that you’ll need at least 16GB of space to install Windows 7, however. You’ll need to plug in an external optical drive or follow our instructions for installing Windows using a USB drive at tinyurl.com/yayctp6.
If you don’t want to replace your current OS, consider a dual-boot setup. GParted is a handy utility for such a task. Download the .iso file for its LiveCD and burn the file on to disc. Insert that disc into the external optical drive, restart your netbook and enter the Bios to alter the boot settings for your machine.
Opt to boot from the optical drive first, causing GParted to load at startup. You’ll need to install the new OS on a second partition, which can be created after shrinking the size of your existing partition.
Right-click the primary partition and select Resize/Move. Enter a new partition size of your choosing. Click Resize, and you’ll see the new space sitting to the right of your primary partition in GParted’s interface.
Right-click this area and select New. Enter 0 in the fields for ‘Free Space Proceeding’ and ‘Following’. Now select Primary Partition under ‘Create as’ and click the Add button.
If you prefer not to use an external optical drive, the same steps will apply for using a USB key instead.
Re-arrange the keyboard
Another easy upgrade is to alter your keyboard to suit your usual computing habits by physically rearranging the keys. Wedge a tiny screwdriver under any key and gently apply upward pressure to remove a key. Then simply interchange them as you please.
Once you’ve made the physical transformations, use the Sharp Keys utility to reassign how Windows interprets your keystrokes.
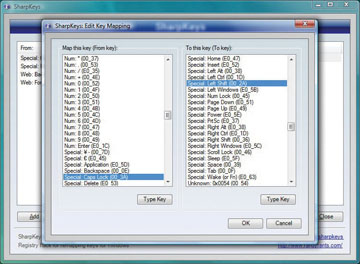
Of course, if you don’t mind a bit of visual confusion, you could leave the keys exactly where they are and simply redefine their purpose with this helpful, free application.
Source: PCAdvisor
