


Creating a compelling background design can be a challenge. Your followers will come to associate you with this image and color scheme, so you’ll want to craft a background that has character, that says something about you.
If you’re a long-time gamer, you might want to brand your page with an image of an old-school gamepad; if you’re an avid toy-collector, maybe you’d like to decorate your page with your most prized collectible, for example.
Once you’ve come up with an idea, you’ll need to adapt it to the page layout. Twitter has two visible areas you can design for–the top margin and the left margin. The top margin is smaller and more restrictive due to the masthead and navigation menu, and if you start to scroll down, the image disappears. The left margin is a better choice for most designs. It varies in size depending on the width of the browser window, but there is significantly more viewable area than the top margin.
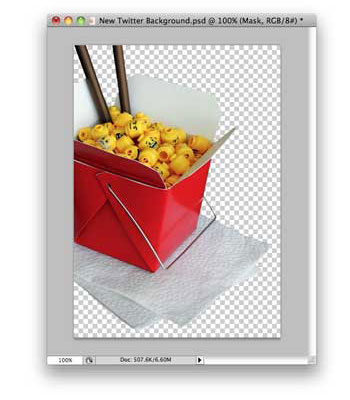
A top-left background image should blend seamlessly into the page’s background colour. In my example, I’ve taken a photo of a toy and then knocked out (or masked) the background.
All areas around the toy are transparent, and as a result, the toy image can now be placed on a background of any colour. This is a somewhat cumbersome step that is beyond the scope of this article, but have a look at Masking 101 to get you started with Photoshop masking techniques.
Launch Photoshop CS4 (or any recent version of Photoshop) and the file that contains your masked image. In the layers palette (Window>Layers) you should see two icons on one layer: one will show a thumbnail of the image itself, and the other will show a black and white thumbnail of the mask. Right-click on the mask icon and choose Apply Layer Mask, and then copy the contents of the layer (Cmd/Ctrl-A and then Cmd/Ctrl-C).
Now choose File>New. Set a width and height appropriate for the design you have in mind; for the toy example, I’ve chosen a width of 350 and a height of 500 pixels. Ensure that Background Contents is set to Transparent and then click OK to create the file. You can certainly make your design taller or wider; just keep in mind that the focal point of the design is at the top left, adjacent to your most recent tweet.
Now paste the masked image into the document (Cmd/Ctrl-P). Resize, rotate, and position the image as you wish. Avoid centring the object within the document; instead, offset it to the left so that part of it is out of view. Once the object is in place, you can incorporate text or graphic elements to give the background a bit more flair.
When you’re done, follow these steps to export your image:
* Choose File>Save for Web & Devices.
* Choose PNG-24 from the Preset pop-up menu.
* Ensure that Transparency and Convert to sRGB are both checked.
* Ensure that the projected file size (seen in the bottom right) is less than 800k.
* Click Save and save the file to your Desktop.
Getting your design online
Go to your Twitter home page and, from the top right menu, click Settings. Twitter will present you with a series of tabs; to continue, click Design. In this section, you’ll find Twitter’s selection of ho-hum themes. Right below that, you’ll find two important links: Change background image and Change design colors.
Start by clicking Change background image. Click Choose File and find the picture you just saved to your Desktop; once you’ve selected it, click Choose. (Don’t check the option to tile the background.) Click Save Changes to confirm the change.
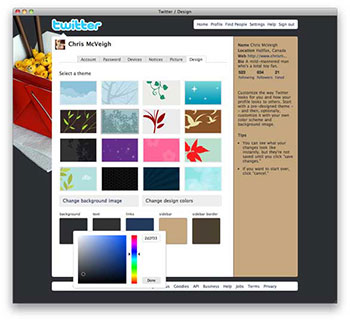
Now you’ll need to tweak the page colours. Click Change design colours and then click the colour block under Background. Twitter’s colour picker will appear. Choose any colour and you’ll see that the background of your page is instantly updated.
As long as you’ve masked your image well, you should be able to choose any colour background; experiment with different hues until you find one that really complements your image. Once you’ve found the right color, click Done. You can then set custom colours for your text, links, sidebar and sidebar border; to finish up, click Save Changes.
And that’s it. The new design is locked in — now it’s time to tweet about it!
Source: Digital Arts
