


So you’ve had Google Buzz for a few days, and you’re starting to figure out how you can fit Google’s latest social media venture into your digital life.
Well, now it’s time to take your Buzz experience to the next level, with a few power user tips that will let you add some pizzazz to your text, give you greater flexibility in how you send out buzzes, and take control of those annoying Buzz notifications hitting your inbox.
Mark Up Your Text
Google Buzz understands some very basic text markup language. That means you can spice up your text entries on Buzz by using bold text, italics and strikethroughs. Here’s what you do:
*Make your text bold by placing an asterisk at each end of your word or sentence*.
_Using underscores at each end will italicize this Buzz comment_.
-Use a dash at each end for a strikethrough-
For an em–dash, just place two hyphens side–by–side
(via ReadWriteWeb)
E-Mail Your Buzz
If you don’t have access to a Web browser, you can still send out your buzz via e-mail using your desktop e-mail client or your mobile device. Just send your post to [email protected] from the same Gmail account that displays your Buzz activity. You can use e-mail to send photos or text.
TIP: In my tests, only the text in my e-mail subject lines was displayed from my buzzes sent via e-mail. So any text in the message body of your e-mail will not be displayed. Photo attachments should show up automatically.
Bonus Tip: The e-mail feature will work only with the Gmail account where you get your Buzz notifications. It does not work with other Gmail accounts you might have or with a non-Gmail e-mail account. To find out how to access your Gmail from a desktop e-mail client (Outlook, Thunderbird etc.) via POP or IMAP protocols, visit the Gmail help pages.
Get Those Buzzes Out of Your Inbox
Three kinds of Buzz updates will be automatically sent to your inbox: Whenever anyone comments on a buzz created by you; when another user comments on a buzz created by someone else that you have also commented on; or when someone tags you in a Buzz through the @reply system.
Google send these notifications to you, because the company believes you’ll want to be notified when things happen on Buzzes you are actively participating in. But if you find these notifications annoying, Google doesn’t have an obvious way to change this behavior. So it’s up to you to employ the power of Gmail filters and labels to take control of your buzzes. Here’s what you can do:
Labels
Note: this step is only useful if you are going to use the Multiple Inboxes tip detailed below.
The first thing you want to do is create two labels: “My Buzzes” and “Buzzes.” To do this, click on the “Labels” button at the top of your Gmail inbox and select “Manage labels.”
Scroll down to where you see a text entry box that says “Create a new label.” Just type in the name of each label one at a time and click “Create.” Now go back to your inbox, and it’s time for part two.
Filter Buzzes created by you
1) Go to your Gmail inbox, and at the top of the page next to the “Search the Web” button click on “Create a filter”

2) In the “From” section type out your name and in the “Has the words” box type “label:buzz” and click on “Next step.” If you get a pop-up warning telling you this is a highly unusual step, don’t worry about it and just click “OK.” (Click on the images below to enlarge them for a closer look at the screen.)

3) On this page, select “My Buzzes” from the “Apply the label” drop down menu. Then you can decide what you want Gmail to do with these Buzz notifications: Skip the inbox, Mark as read, and so on. I would recommend having them skip the inbox; that way you can always view your buzzes by clicking on “All mail” in the left hand column of your Gmail page.
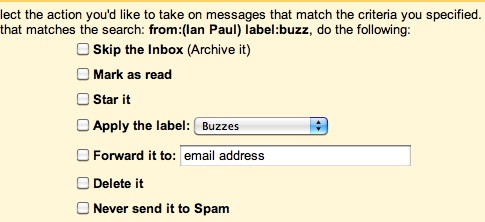
4) Now just check off “Also apply filter to…” and then click the “Create filter” button, and you’re done with this filter.
For Buzzes created by others
For the second filter, step 1 is exactly the same. For step two place a minus sign (-) in front of your name. Click on the image to see what step two looks like.

For step three, apply the label “Buzzes” and then choose your other filter options as you did previously.
(via jungleG)
Multiply Your Inbox
Now that you’ve got the buzzes hitting your inbox under control, let’s get serious about organization by using Multiple Inboxes.
This is a relatively new feature in Gmail that lets you view several different sections in your Gmail inbox to make it easy to separate messages from specific people, groups or message types like buzzes.
For our purposes, we are going to add two different inboxes to your Gmail homepage: one for Buzzes created by you (labeled My Buzzes) and one for Buzzes created by others (Buzzes).
Here’s what you do to activate Multiple Inboxes:
1) Open up Gmail labs (the little green beaker in the top right corner) and enable Multiple Inboxes. Then scroll down to the bottom of the labs page and press “save changes.”
2) Back at your inbox click on “Settings” next to the Labs icon and you should see a heading called “Multiple Inboxes.”
3) In “Pane 0” type “is:My Buzzes” and then type “My Buzzes” in “Panel title (optional)”
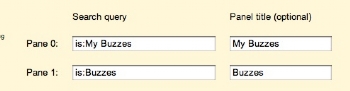
4) In “Pane 1” type “is:Buzzes” and type “Buzzes” under “Panel title (optional)”
5) Now adjust your optional settings for how many conversations each inbox should show at once, and where you want them placed in relation to your general inbox.

6) Press “save changes” and your inbox should now look something like this (click on the image to enlarge).
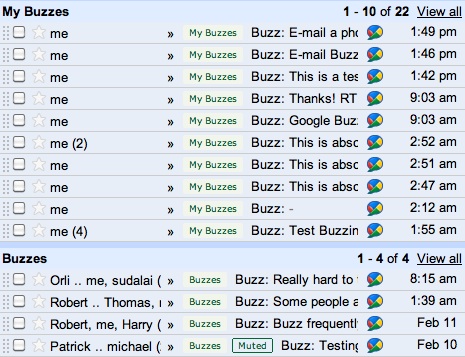
Now, you’ll be able to see your incoming buzzes at a glance, and they still won’t be blocking up your general inbox.
So there you have it — five great tips to get your new buzzes under control. Got any other tips? Share them in the comments.
Connect with Ian Paul (@ianpaul).
Source: PCworld.com
