


Software upgrades come and go but the newest version of Adobe’s flagship image editor, Photoshop CS6, makes you sit up and take notice. This release sports a darker interface (its first new paint job in more than 20 years), a noticeably faster graphics engine, and some amazing new features that promise to improve the productivity of professional designers and photographers alike.
Here are a few examples: The auto save and recovery features keep you from losing all your work if you suffer a crash; the new Content-Aware Move tool lets you scoot objects around the canvas; the new blur filters create shallow-depth-of-field and tilt-shift effects in no time flat; the new Adaptive Wide Angle filter fixes in-camera lens distortion; and a new Oil Paint filter lets you create a painting with nary a brushstroke. Whew! But that’s just the beginning.
Many items that have been parked on customers’ wish lists were incorporated into this version, too, such as duplicating and changing the blend mode of multiple layers at once; creating dashed and dotted lines; a Migrate Presets option that lets you easily share all your presets; and more. Video editing is also included in the Standard version of Photoshop CS6 (previously it was available only in the Extended version). All this adds up to one of the most feature-packed releases Photoshop has ever seen.
As in the past, Adobe offers two versions of the program—Photoshop for $699, and Photoshop Extended for $999. Photoshop Extended has all the features of the standard version, but adds extensive 3D capabilities, quantitative data extraction, and DICOM (Digital Imaging and Communications in Medicine) file support.
Workspace udpates
No matter which version of Photoshop you’re currently using, the CS6 workspace looks completely different thanks to a new charcoal-gray color theme with light-gray icons and text (four color schemes are accessible via preferences, including the lighter color of previous versions). While the darker color reduces eye-fatigue and can help you see more accurate color when correcting images, the text labels in the Options bar and panels are harder to read. Adobe also removed the Application bar in this version to give you more screen real estate; the controls that roosted in it are now sprinkled throughout the Tools panel and menu system. Settings for Adjustment layers, layer masks, and 3D items are now consolidated into a new Properties panel, plus you’ll find slightly more consistent wording through the interface.
Under the hood you’ll find a new Mercury Graphics Engine that relies heavily on your computer’s graphics processing unit (GPU), making Photoshop CS6 run noticeably faster. This also speeds up, among other things, the live previews of features like Free Transform, Warp Transform, Puppet Warp, Liquify, and Lighting Effects. And if Photoshop CS6 crashes, don’t panic: the new auto-save/auto-recovery feature means your documents are automatically saved every few minutes (you control the interval via preferences), and the last saved version pops open the minute you restart the program after a crash. Saving documents also takes place in the background in CS6—whether it’s an auto-save or you’ve chosen File -> Save—meaning you don’t have to wait until the program is finished saving your document before you perform other edits.
Several familiar items—such as the Move tool, Crop tool, and the Free Transform command—now display an incredibly handy info overlay next to your cursor when you use them that shows size, rotation angle, and other useful information (depending on what you’re doing). For example, if you’re trying to resize layer content using Free Transform, you can see the exact dimensions as you’re resizing the item without having to open the Info panel. You also see these new “rich cursors” when you resize a brush by Ctrl-Option-dragging, in which case you see brush size, hardness, and opacity.
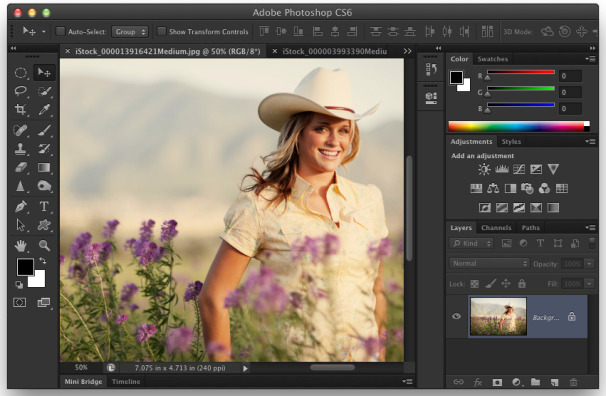
The darker interface is easy on your eyes and makes your images pop onscreen, though you can use Photoshop’s Interface Preferences to make it one shade darker or two tints lighter. You can also customize the background to any other color combination you want.
Content aware patch-and-move
With each new version of the program, Adobe adds more tools that use Content-Aware technology, wherein Photoshop analyzes image content and prioritizes it according to importance (green and blue are low priority as they’re often grass or sky, whereas skin-tones are high priority). In Photoshop CS6, the Patch tool takes advantage of it, which makes removing objects from photos more realistic, especially when horizontal lines (like a horizon) are involved. Using the Adaptation menu in the Options bar, you can determine how much blending occurs inside the selected area to make the patch look real. That said, it’s tough to spot the difference between a regular patch and a Content-Aware patch; however, perhaps best of all, setting the Patch tool to use Content-Aware technology reveals a new Sample All Layers option that lets you perform the patch non-destructively on an empty layer.
Photoshop CS6 also includes a new tool called Content-Aware Move that lets you move an object from one spot to another, as well as extend objects beyond their original size (to make them taller, wider, and so on). In either case, start by selecting the object—either with the Content-Aware Tool itself, or any other selection tool, and then switch to the Content Aware Move tool—and then dragging the selection to a new position. When you do, Photoshop blends the object into place and removes it from its previous position. If you move or extend the object in very small amounts and you’ve got some free background space around the object, this tool does an amazing job, though you may need to use the Spot Healing Brush or Clone Stamp tools to perfect the change.
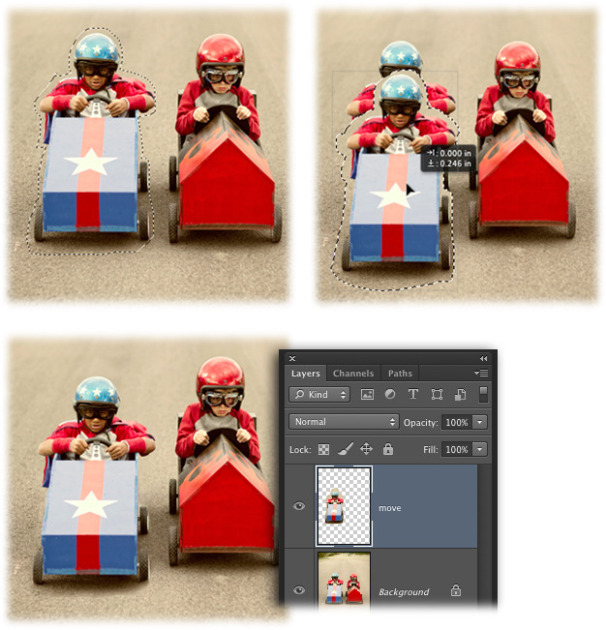
Once you’ve selected an object (left), you can use the new Content-Aware Move tool to drag it to another position in the frame. As you drag, you see an overlay that displays position information (right). While this tool does a great job on the right photo, you may have some cleanup to do; both the Spot Healing Brush and Clone Stamp tools were used around the right rear wheel of this now-winning soapbox (bottom).
New crop tools
The Crop tool’s behavior and Options bar settings changed drastically in CS6. For example, a crop box automatically appears whenever the tool is active, and dragging to move the crop box moves the image underneath it. Adobe also removed the Resolution field in the Options bar so you can’t accidentally change pixel size when cropping (though if you really want to crop and change resolution at the same time, choose Size & Resolution from the Aspect Ratio presets pop-up menu to open a dialog box that lets you do so). While this is handy for beginners, seasoned users will undoubtedly experience frustration. On the upside, you can use the Crop tool to straighten your images, thanks to a new setting in the Options bar (instead of reaching for the Ruler tool).
Turning off the new Delete Cropped Pixels checkbox in the Options bar (labeled Hide in previous versions) makes the Crop tool non-destructive. To resurrect the cropped portion—even after you’ve saved and closed the document—activate the Crop tool and then immediately press Return (Enter on a PC). Photoshop displays the previously hidden edges of the image and places an active crop box around the previously cropped area. At that point you can resize the crop box, reposition it, and so on. CS6 also includes a bushel of new crop overlay options including Diagonal, Golden Ratio, and Golden Spiral. Last but not least, a new Perspective Crop tool lets you quickly straighten a photo shot at an angle.
These changes certainly take some getting used to, though if they drive you crazy you can revert to the behavior of the old Crop tool by clicking the gear icon in the Options bar and then turning on Use Classic Mode, though nothing brings back the Option bar’s missing Resolution field.
New and improved filters
One of the most practical new features in Photoshop CS6 is the new Field Blur, Iris Blur, and Tilt-Shift filters; they’re perfect for creating beautifully blurred backgrounds after the shot, and they’re a lot easier to use than the Lens Blur filter. These filters also use a brand-new workspace with a full-size image preview and clever on-image controls that let you determine blur placement, size, and strength (no selection required). Field and Iris blur are great for producing a shallow-depth of field effect, though the latter gives you more control over the shape and size of the blur to make it look more realistic. The Tilt-Shift filter mimics the effect of shooting with a Lens Baby, a popular and bendable tilt lens. Each filter also includes a Bokeh option that you can use to make specular highlights sparkle and shine.
The new Adaptive Wide Angle filter makes it easy to fix geometric distortion problems inherent in shooting with a wide-angle or fish-eye lens. Simply draw a line across the distorted area (like a curved horizon that ought to be straight) and Photoshop uses its lens profile database to straighten the image; though you can also straighten it manually if your lens profile can’t be found. Rounding out the new filters in CS6, you can use Oil Paint to create a shockingly nice painting from a photo with the flick of a few sliders.
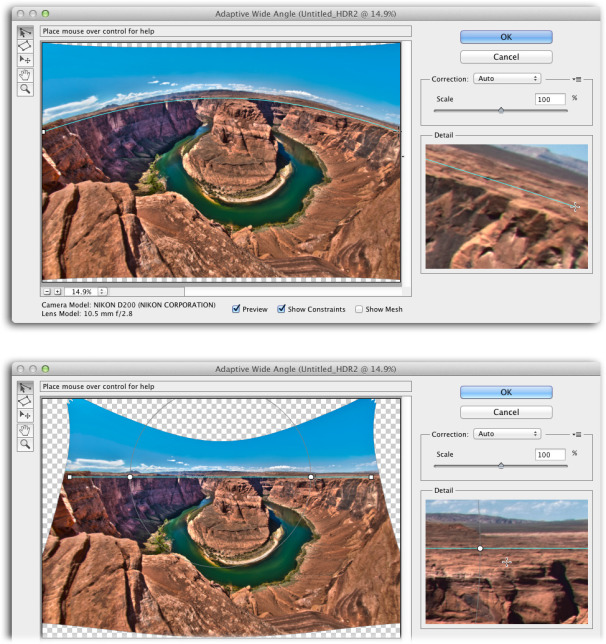
Top: Wide-angle and fish-eye lenses are great for exaggerating depth and relative size of an object or scene, though you may end up with straight areas that look curved. Bottom: If Photoshop can find your lens profile, it can fix an image like this in just two quick clicks. (Credit: Horseshoe Bend by Karen Nace)
The Lighting Effects filter isn’t new, but it was redesigned and optimized for 64-bit so it’s faster. It uses the same interface as the new blur filters and includes on-image controls making it easier to use. The Liquify filter also got a speed boost due to the new graphics engine and changes now appear in real-time. You can also increase brush size inside the Liquify dialog box using keyboard shortcuts and brush size is now capped at 15,000 pixels (instead of 3,000).
Adobe pruned the Filter menu, too, by removing categories accessible inside the Filter Gallery. While this makes for a shorter Filter menu, it also makes it challenging to keep track of which filters you’ve used. For example, by choosing Filter -> Filter Gallery and then running a filter on a Smart Object, Photoshop generically names it Filter Gallery in the Layers panel (instead of naming it Gaussian Blur). Since you can’t double-click to rename the filter manually, the fix is to repopulate your Filter menu using preferences and then run the filter by choosing its name instead of choosing Filter Gallery.

By choosing the Tilt-Shift filter, you can reproduce the effect of using a tilt lens. The area between the two solid lines remains in focus—though you can change that by dragging in a circular motion atop the black and white blur ring shown here; the area between a solid line and a dashed line is partially blurred; the area beyond the dashed lines is completely blurred. Drag anywhere on a line to adjust that area’s size. To rotate the blur, grab one of two white resizing handles and drag (Photoshop displays the rotation’s angle, as shown here). Here you can see the original image (left) versus the Tilt-Shift effect with Bokeh applied (right).
Layers and text
Layers got a few upgrades, too. For example, you can filter your Layers panel based on criteria that you set using a new row of buttons at the top of the panel (layer content remains visible; only the layers themselves are hidden). You can filter layers by kind, name, effects, attributes (whether the layer is locked, linked, and so on), and color-coding. This makes it incredibly easy to locate, and thus activate, specific layers for editing.
Photoshop CS6 also lets you change the blend mode of multiple layers at once, duplicate several layers simultaneously by pressing Command-J, as well as see the Opacity, Fill, and blend mode settings of layers whose visibility eyes are turned off. And once you’ve highlighted a layer’s name to rename it, you can press Tab to highlight the next layer’s name or Shift-Tab to highlight the previous one instead.
Using the new Fill and Stroke options for Shape layers, designers can finally create dashed or dotted lines. Once you create a Shape layer in CS6, you’ll spot a slew of new settings in the Options bar that let you add a fill and/or stroke—even dashed and dotted lines—as well as align paths in a variety of ways. These new settings work like their counterparts in Adobe Illustrator.
When it comes to text, you can save frequently used formatting using the new Character Styles and Paragraph Styles panels (unfortunately the styles are document-specific and can’t be imported or exported from Adobe InDesign). You’ll also spot a new Type menu that includes handy commands to convert text into a shape or path, change font preview size, rasterize Type layers, and so on. This version also includes a Paste Lorem Ipsum command that automatically creates placeholder text.
Painting upgrades
Photoshop CS6 includes two new brush tips that make digital painting more realistic than ever before. The new Erodible brush tip wears down as you use it (like real chalk or a pencil), and the new Airbrush tip works less like a can of spray paint and more like a professional airbrush rig. You’ll also find new customization settings in the Brush panel that let you introduce color changes to individual brush marks within a brushstroke (look for the Apply Per Tip checkbox in the Color Dynamics settings), while Texture settings now include Brightness and Contrast sliders.

You can use CS6’s new layer filtering feature to view layers that match specific conditions that you set. This is extremely helpful when you’ve got a gazillion of layers (like the document shown at left) and you need to find, say, all the Type layers in order to change fonts.
Video editing
Photoshop Extended has included video-editing capabilities for years, but in CS6 you also get the full suite of video-editing controls in the Standard edition. Using the new Timeline panel (called Animation in previous versions), you can easily import, trim, split video clips, add transitions, text and other graphics, and apply special effects using familiar tools. Photoshop CS6 also lets you add and control audio.
Photoshop’s video layers are similar to image layers and can be converted into a Smart Object in order to apply filters non-destructively or to make the filter affect each frame in your clip (instead of just one). You can use Adjustment layers to correct your clip’s color or apply a creative color effect, like a black-and-white or sepia-tone, and add layer styles (an Inner Shadow makes for a striking, dark-edge vignette effect!). And adding transitions between clips is a simple, drag-and-drop affair.
You can add text to your video with the Type tool and by using keyframes—the way Photoshop marks a moment in of time in your video—you can animate layer content like text, graphics, and layer masks to make them appear to fade in or out or move from one location to another within your clip. You can even create an animation from scratch (a process called rotoscoping), by turning on the Onion Skin feature so Photoshop displays a ghosted image of the frames it creates to produce the desired motion. With enough patience, you could create an animated masterpiece, but the process is tedious.
When you’re finished, you can export the final piece in a slew of video file formats or a Photoshop Image Sequence. The program includes several handy new video document presets for iOS devices, too.
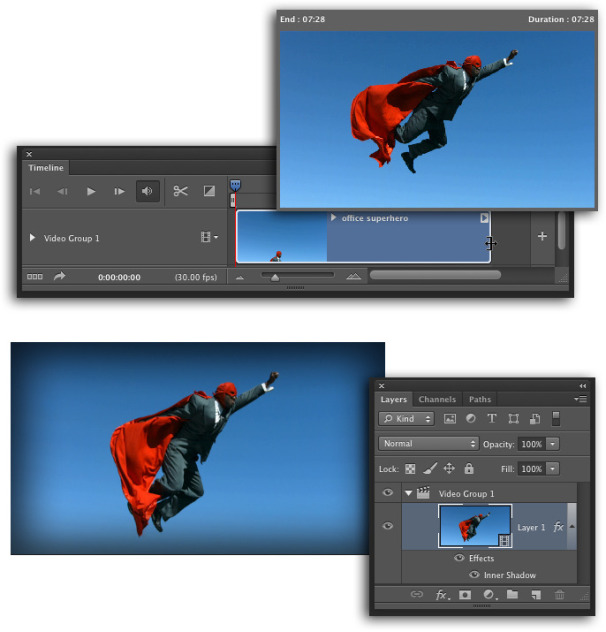
Top: Trimming a video clip is as easy as dragging its start point or end point. Photoshop also opens a preview window that shows exactly which frame you’re trimming the video down to. Bottom: To add a darkened-edge vignette effect to a video clip, apply an Inner Shadow layer style. Any layer styles you add apply to the entire length of the video clip.
3D enhancements
If you work with Photoshop’s 3D tools (Extended edition only), you’ll be treated to faster performance as well as a more fully integrated 3D workspace thanks to the new 3D panel and a minimized toolset available in the Options bar. Instead of using a complicated dialog box to manipulate objects, you can click an object to rotate, reposition, and adjust its geometry (on-image tools let you extrude, twist, and so on). Repositioning light is as easy as shift-clicking the object and then dragging its shadow elsewhere. You can also use the Character panel to change the properties of 3D text, and you can render a portion of your project by selecting it first (a huge time-saver).
Everything else
There are also a ton of little changes in Photoshop CS6, too, that are the direct result of Adobe’s customer feedback initiative called Just Do It (JDI). For example, the Contact Sheet II and PDF Presentation plug-ins are back (both were removed in CS4); you can apply custom scripts to introduce randomness into patterns made with the Edit -> Fill command; you can increase Brush tool size to 5000 pixels; record strokes made with the Brush or Pen tools in actions; the new Migrate Presets command lets you easily import and export actions, workspaces, and tool presets; the Eyedropper tool’s Sample menu lets you snatch color from the current layer and any layers below it (you can make it ignore Adjustment layers, too); Photoshop automatically chooses the best resampling (interpolation) method when you use Free Transform, the Crop tool, or the Image Size dialog box; holding the Shift key while you launch the program disables third-party plug-ins; the Auto button in a Levels and Curves adjustment uses new and improved math; the Color Range command includes a new option for helping you select skin tones; and more.
Improved Camera Raw and Bridge
The newest version of the Camera Raw plug-in also got a substantial overhaul, but for unknown reasons it didn’t get a coat of dark gray paint. Take a peek in the Basic panel and you’ll find a re-ordered set of sliders with a wonderfully consistent starting point of 0. The Recovery, Fill Light, and Brightness sliders were replaced with Highlights, Shadows, and Whites sliders, respectively, which should let you do a much better job of correcting the color and lighting in images while preserving details in the shadows and highlights. You can also apply these new settings selectively using the Adjustment Brush, wherein you’ll also find new sliders for Noise and Moire Reduction (all the new sliders are available for use with Graduated Filters, too).
The newest version of Bridge—Adobe’s importing, organizational, and batch processing powerhouse—also sports a dark-gray interface and zips along more quickly now that it’s optimized for 64-bit. The Mini Bridge panel in CS6 also has a simplified interface and a new filmstrip mode that lets you view images in a single row at the bottom of your screen.
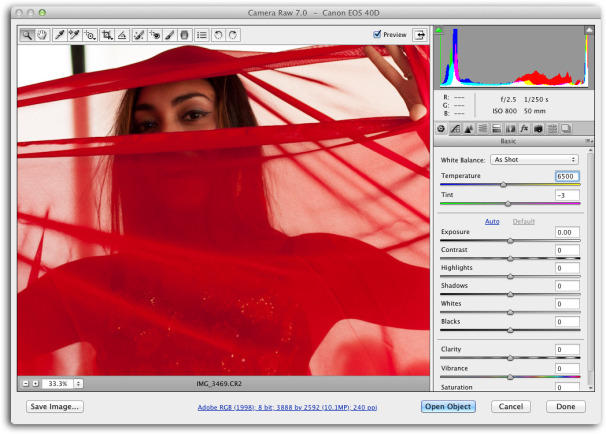
Adobe Camera Raw launches automatically when you open a Raw file in Photoshop, Bridge, or the Mini Bridge panel. Here you can see the new and reordered sliders in the Basic panel.
Buying advice
Photoshop CS6 is overflowing with new features and productivity enhancements. The auto-save feature plus the blur filters alone are worth the upgrade price and the Camera Raw enhancements produce better-looking images faster than ever before. If you dabble in video, CS6 relieves you of the burden and expenditure of learning another program just for video-editing. If you don’t work with 3D, medical imaging, or quantitative analysis, you should be fine with Photoshop CS6, which will save you $300 off the price of the extended version. Regardless, if you’re a professional designer or photographer, you simply can’t afford to miss this upgrade.
