


We may be a country obsessed with fixing our homes and tricking out our cars, but we usually throw away our PCs when they start to give us trouble. These days, however, the recession and the tight credit situation are combining to make it more attractive to fix up an old computer, because a three- or four-year-old PC can be rejuvenated fairly easily.
On top of keeping about 25 pounds of aluminum, silicon and heavy metals out of the garbage dump, a revamped PC will likely be more powerful than a new budget model. As with any renovation project, though, you need to be careful — if you buy the latest and greatest parts, you could end up paying more than you would have paid for a new PC.
Related stories
Simple ways to supercharge your PC and other digital gear
How to set up a Windows 7 PC to share printers, files with XP, Vista machines
Build your own Windows 7 power PC from scratch without breaking the bank
How to swap your laptop’s hard drive for a fast solid state drive
With that in mind, I’ve taken up a challenge: To upgrade my four-year-old Dell Dimension 8300 desktop PC. When new, it cost more than $1,700 with a 17-inch monitor. Today it is slow, tired, loud and prone to overheating.
I’ve been given two figures for my PC resurrection budget. The first part of the upgrade should give me some extra speed and power for around $250 in parts — less than the price of a new budget system. By carefully selecting which components to replace and what parts to use, I hope to boost my system’s performance by about 30 per cent. To accomplish that, I plan to install more RAM, a modern hard drive and more-capable graphics and audio cards.
My challenge for the second part of the upgrade is make “This Old PC” fit today’s digital lifestyle for an additional $125, bringing my total budget to $375. I plan to add a TV tuner, a webcam and a wireless keyboard/mouse combo. In other words, my goal is to make it a better computer than it ever was for significantly less money than I’d pay for a new desktop system with those extras. My labor is free, so I may even have enough left for a pizza when I’m done.
(Note: Because sales taxes and shipping fees vary so widely depending on where you live and who you buy from, I haven’t included them in either the prices of the components I’m adding or in my estimates of new PC prices.)
Surprisingly, the only tool I need to do these upgrades is a Phillips screwdriver, and the whole project can be done in a weekend. When I’m finished, I may not have the best system for editing video or handling complex Excel calculations, but it should be more than enough for writing, browsing the Web browsing and watching video.
Measuring performance changes
To see how my upgrades affect performance, I’m going to measure the computer’s abilities along the way with PassMark’s PerformanceTest 6.1 benchmark, which exercises all the major components I’ll be playing with and delivers an overall score. On top of that, I’ll be timing how long it takes to start up the system and measuring how much power it uses with P3 International’s Kill A Watt P4400 power meter.
At the outset, my system scored a 291.1 (about the level of one of today’s netbooks) on the PassMark benchmark, took more than 4 minutes to start up and used 120 watts of power, not including the monitor. It’s time to get to work and see if we can make this puppy bark a little louder.
What not to upgrade
The secret to upgrading success is that what you don’t upgrade is as important as what you do upgrade.
CPU: The processor is generally an expensive upgrade that yields minor improvements. My PC’s 3-GHz Pentium 4 CPU could be replaced by one that runs at 3.2 GHz, but that would cost about $200, which is more than half my budget.
There’s an easy way to see if a CPU transplant can help your PC. To determine if the processor is being overtaxed or if it has some room to perform more work, open the Windows Task Manager and click on the Performance tab. This brings up graphs for how the computer is using its CPU and memory resources.
While you use the machine, periodically glance at the CPU graph. If it is pegged at 100 per cent for extended periods, it’s time for a more powerful CPU — and likely a new PC. In my case, the CPU chart peaks at 100 per cent every once in a while, but generally jumps up and down between 55 and 80 per cent of the processor’s capacity.
That means that there’s probably enough headroom to take the processor off the upgrade list.
Operating system: Similarly, replacing Windows XP with Vista is an expensive dead end. At about $150, the upgrade would bust a big hole in my budget and would likely sap any extra power I’ll be adding to the computer. A good compromise is to replace XP with a free version of Linux, like Ubuntu. It will not only run faster, but the OS comes with a suite of excellent programs.
LCD: Another item I’m going to pass on is the monitor. While it may not be the best display ever, the 17-in. Dell UltraSharp LCD that I got with the system is just fine, so I won’t try to squeeze a new monitor into the budget.
Before you begin
When you buy your own components, make sure to get parts that your PC’s power supply can support. Some items will use more power than the ones they replace; others will use less. My Dimension 8300 has a full-size tower case with a 250-watt power supply, which should be plenty for my new components.
The table below shows the components I’ll be using for my upgrades. All the prices mentioned in this story are actual prices that I found at online retailers — often considerably less than the suggested retail price. But be warned: Prices can fluctuate wildly, so it pays to shop around. My favorite way to find the best price is to use Google Product Search, which lists online retailers’ prices for the item you’re looking for.
As part of the hard drive upgrade, you’ll need to install Windows on the new drive, so now’s the time to find the Windows CD that came with your computer. If you don’t have your original OS disc, try calling your PC’s manufacturer — some of them will mail a replacement disc to you for a nominal charge. Otherwise, it might cost $100 to buy Windows XP, which will blow your upgrade budget. In that case you might be better off buying a new PC.
It may sound silly, but it’s important to find a good place to work. Shoot for a location that has a table big enough to spread out your open PC and parts, and where you won’t be interrupted or stressed if the upgrades take longer than anticipated. Forget about the kitchen table — if you’re not done at dinnertime, there’ll be problems.
Some people insist on wearing a grounding bracelet or antistatic gloves to protect the system against static shocks; either will cost about $5 at a variety of online stores. On the other hand, I’ve been doing this sort of thing for 20 years without wearing either item, and I’ve never had a problem. It is, however, a good idea to touch something that’s grounded to remove any static charge you might have before you touch anything inside the PC case. A metal plumbing pipe or radiator works well.
Task 1: Open case, clean up, and replace clock battery
Time: 15 minutes
Cost: $2
The first step is to unplug the system, open the case and lay it on its side. Gross! If your PC is like mine, inside the case is over four years of accumulated dust, cobwebs, dirt and more than a few dead insects.
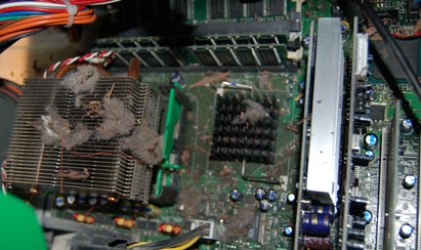
With a can of pressurized air, gently blow out all the garbage, paying particular attention to the processor’s heat fins, which in my PC’s case are clogged with debris. (The system has a habit of overheating, and that is probably why.) A word of advice: You might want to wear a dust mask for this task — who knows what’s in there?
Now that you can see what’s where inside, it’s a good idea to locate the major parts you’ll be dealing with: system memory modules, hard drive, audio and video cards. My system also has a FireWire card, which I won’t be touching, and a modem card that I’ve never used — I’ll toss that out.
Before moving on to the fun stuff, take a minute to replace the system’s backup battery. It’s a standard watch cell that lets the PC keep track of the time and date when it’s off, and it generally has a life of four or five years.
Task 2: Install RAM
Time: 5 minutes
Cost: $80
Adding system memory generally offers good bang for your upgrade buck. Up to a point, the more memory you have for the operating system, applications and data, the faster the system runs, because it avoids having to use slower virtual memory that shuffles data onto and off of the hard drive.
Adding memory is a no-brainer, and the modules are available at a variety of online locations. Kingston, for instance, has a memory search page on its Web site: Plug in the name of your computer or motherboard maker, and Kingston will suggest memory modules that fit your system. Then do an online search for the correct modules; you’ll often find them at prices that are much better than what you’d pay if you bought directly from the manufacturer.
My desktop PC has four slots for 400-MHz DIMM (dual in-line memory module) memory; it came with a pair of 512MB RAM sticks for a total of 1GB. To save money, I’m going to keep using those two 512MB memory modules. Then I’ll fill up the system’s other memory slots with two new 1GB modules that cost about $40 each, for a total of 3GB of RAM.
That’s less than the 4GB that the system can hold, but it’s three times more than what I started with. Going up to 4GB would mean I’d have to throw out the two 512MB memory modules and buy two more 1GB modules (my system can’t take anything larger than a 1GB module) for another $80, which would blow my budget.
With the machine off and unplugged, line up the RAM cards and one at a time slide them into the carrier. Press gently but firmly until you hear a click that tells you the card is properly seated. When they’re locked in place you’re done.
Instead of doing all our upgrades at once, we’re going turn on the computer and test it in between each task, which makes it easy to figure things out if something goes awry. Don’t bother closing the case, though — we have much more to do.
Plug in and fire up the system. Its start-up routine should automatically detect the new memory, but it doesn’t hurt to double-check by selecting Start –> All Programs –> Accessories –> System Tools –> System Information and looking in the System Summary list for Total Physical Memory.
Results
My PC now has 3,072MB of memory. It’s enough to raise the system’s PerformanceTest 6.1 benchmark score to 325.8, a 12 per cent increase. Not bad — the system starts up in 1 minute, 55 seconds — a big improvement, and there was no perceptible change in its energy consumption. Sounds like a win-win to me.
Task 3: Install new hard drive, software and external drive enclosure
Time: 2½ hours
Cost: $94
The second cheap thrill for upgraders is to get a new hard drive. I chose the Western Digital Caviar Black 500GB drive, which is available for $65 at some online electronics retailers.
It can hold four times the stuff that the original drive could hold, and it will run rings around its predecessor. On top of numerous advances in disc technology over the last four years, the new drive has 32MB of buffer memory (four times that of the original drive), so it can hold more frequently used data and won’t keep the rest of the machine waiting for it.
After powering down and unplugging your system, slide the old drive out of its cage and unplug its data and power connections. Then set it aside; we have plans for it, but let’s not get ahead of ourselves.
Your new drive may not fit in the cage perfectly, but chances are you’ve got an extra set of plastic drive rails conveniently stashed inside the system’s case. Screw them onto the new drive, slide it into place and plug the power and data cables in.
If you don’t have an extra set of rails, you can use the ones from the original drive or buy some online. They only cost a few bucks, but it can be confusing trying to choose the right ones for your drive — there are dozens of rail designs that all look alike to me. If all else fails, use adhesive Velcro or duct tape. It’s not as elegant, but it works and nobody will see it.
The drive is in and ready, but it’s not formatted and has no operating system or software. Luckily, I still have the system’s original CDs, so installing Windows and the basic software is relatively easy, although it takes more than an hour and a half. Just start the machine with the disc in the CD drive, and the software does the rest.
The software on your original Windows disc is almost certainly out of date (mine has Windows XP Pro with Service Pack 1a), so you’ll need to get on the Internet to download the latest version. The easiest way is to simply connect your PC to your router with an Ethernet cable — if you’re close enough to your router. If you’re not, a USB Wi-Fi device will do the trick, though you’ll need to load its software onto the new hard drive.
Then you can head toMicrosoft’s download site to get the latest software and set up the system’s automatic updates. It’s also a good idea to stop by your PC manufacturer’s support site and get the latest firmware and drivers. Finally, install your other crucial software; for now, I opt for the AVG antivirus tool and PassMark’s PerformanceTest 6.1 benchmarking test.
What about all the data that’s still on the old hard drive? You could transfer all your files to the new drive, but I have a better suggestion: Turn the old drive into a USB-connected external hard drive. The AcomData Samba kit that I bought costs $29 — a bit of a splurge, but it’s easy to set up and use.
Plug in the hard drive’s power and data connections, screw the drive into the carrier, slide the carrier back into the enclosure and replace the screws in the back.
Next, attach the included USB cable, plug in the unit’s AC adapter and flip on the On switch. The system will detect the unit and set it up as an additional hard drive — in my case, the F: drive. You’ll have all your old data and plenty of room on the new drive for all sorts of new stuff.
Results
Now I’m ready to see how I did. Putting in the new drive gave the old computer a kick in the pants, raising its performance potential to 360.5 on the benchmark test. That’s an 11 per cent improvement over its score after the RAM upgrade. And there are additional payoffs: The system now starts up in 45 seconds, the new drive is much quieter, and the machine now uses only 116 watts — 4 watts less than it did with the old drive.
Task 4: Install new video and audio cards
Time: 25 minutes
Cost: $65
It’s time to rework the system’s audio and video infrastructure with new cards. Video first, in my case with a PNY GeForce 6200 card that has Nvidia’s GeForce 6200 graphics chip and 256MB of dedicated memory. Available at various online retailers for around $40, it’s a big step up from the card that came with the system — a generation newer, with twice the video memory and outputs for DVI, VGA and S-Video (instead of just VGA on the old video card).
With the machine turned off and unplugged, locate the Advanced Graphics Port (AGP), swing open the arm that locks all the cards in place and take out the old card. If it puts up a little struggle, rock the card back and forth a few times to work it loose. Be careful, because you can easily damage the motherboard with too much pressure.
Then slide the new card in. No need to replace the arm that locks the cards into place just yet — we’ll be adding more cards here later on in the upgrade. Plug in and restart the system; the computer detects the new hardware. Place the software CD in the optical drive, and all the needed software is installed, including Nvidia’s control software, the card’s drivers and Microsoft’s DirectX 9.0 software.
When it’s all done, make sure everything is there and working by opening the Control Panel and choosing Display to open the Display Properties dialog box. Click the Settings tab, and then click the Advanced button in the lower right. Click on the Adapter tab, and you’ll see the new chip’s specs and the extra video memory. The Nvidia control panel has a bunch of adjustments for color, but I’ll leave exploring that for another day.
Sound may not seem all that important compared to video, memory and hard drive upgrades, but good audio quality makes a big difference for VoIP or streaming video. As is often the case, the motherboard-mounted audio chip that came with my system was a disappointment from the start, with tinny, distorted sound, so I’m upgrading to Creative Technology’s Sound Blaster Audigy SE.
The Audigy SE (about $25 at online retailers) is packaged on a PCI card and it snaps in right next to the video card. Make sure the computer is turned off and unplugged. We’ve left the locking arm out, so just slide the audio card in place.Plug in the computer, fire it up, put the software CD in the optical drive, and all the software will be loaded.
Even using the original speakers that came with it, my system now sounds great, with richer and more vibrant tones. When I have a few extra bucks, I’m going to splurge on a five- or six-speaker set with surround sound, but for now, the new sound card is a big improvement. One last thing to do: Tape over the old audio chip’s output ports so you don’t try to use them. It won’t do any damage if you do, but it can be confusing when no sound comes out of your speakers.
Results
My system now uses 101 watts of power and starts up in 1 minute and 12 seconds. Yes, that’s slower than the 44-second start-up time that I got after I installed the new hard drive, but the audio card and particularly the video card slow down start-up because they have to load software. Still, it’s less than one-third the time it took with the old components and four years of software buildup. The best part is that the system now rates a 386.1 on the PassMark PerformanceTest benchmark, about one-third faster than when I started. And games now run a lot more smoothly, with more detail.
Task 5: Install cooling fan and test PC overnight
Installing a new fan
Time: 5 minutes
Cost: $7
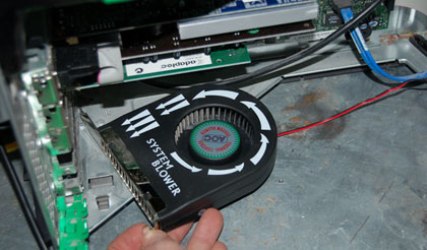
We’re nearly done with the insides of this old PC. The last task is to install an extra cooling fan to prevent the system from overheating. The good news is that the AOC FC-2000-TH System Blower is inexpensive (about $7), sits in a PCI slot and plugs right into one of the system’s extra power connectors.
With the system powered down and unplugged, slide the fan into place into an open PCI slot and plug it in. Then replace the swinging arm that locks the cards into place; we’re done adding PCI cards.
Now close up the case and boot up the PC. The fan starts up automatically when you turn the system on, pulling hot air out of the system’s case.Before starting on the next round of upgrades, let the system run overnight to make sure that everything is operating properly. I’m going to test it overnight by running Microsoft’s Train Simulator, a virtual railroad simulation that is a resource hog and gives the machine a workout.
Results
The next morning, it’s still running fine without any derailments or late trains. The PC now uses only 97 watts of power, starts up in 1 minute and 17 seconds, and rates a 386.1 on the PassMark PerformanceTest benchmark.
Benchmarking done with PassMark PerformanceTest 6.1 (higher score is better);power use measured with P3 International Kill A Watt P4400 power meter
Task 6: Install wireless keyboard, mouse, TV tuner and webcam
Time: 30 minutes
Cost: $110
The rest of my upgrade items are extras that many of you might regard as needless luxuries, but a lot has happened in computer technology in the past four years. With a wireless keyboard and mouse, a webcam and a TV tuner, my old PC will be as up to date as I can make it on a limited budget. Without these extravagances, the upgrade can be done for a miserly $250.
Because it costs only $40 at numerous online retailers and includes both a full-size keyboard and an optical mouse, Microsoft’s Wireless Media Desktop 1000 set perfectly into my upgrade and budget. One snag that I didn’t anticipate, however, is that it requires four AA batteries, two for the mouse and two for the keyboard; that adds an unexpected $5 to my budget.
To get the mouse and keyboard going, run the software installation CD, then plug the transmitter box into an unused USB slot in the back of the PC. The transmitter connects with the keyboard and mouse — and you’re off. Not only are there no wires, but the new keyboard has controls for volume (with a handy mute button), playing CDs and a slew of application start-up keys.hen I bought my PC, there wasn’t an option for including a TV tuner. Today, there are many USB tuners that can turn a PC into a digital TV set. I’m upgrading to AverMedia’s AVerTVHD Volar tuner because it is small, comes with an antenna and, at $40, fits into my upgrade budget.
Plug the small card into a USB slot and load the needed software. It takes a few minutes and tells you when it’s done; the Volar tuner doesn’t require a restart.
Finally, plug in the antenna and set up the tuner by letting it scan for stations in the area. My tuner was able to find a dozen local digital stations, although some were interrupted by dropouts while others came in crystal clear.
On top of letting me watch the ball game as I work, AverMedia’s software lets me use that huge new hard drive as a digital video recorder to tape any show I want. My PC is now a couch potato’s dream come true.
The final part of the upgrade is to add a $30 Logitech QuickCam Connect Webcam. About the size of a golf ball, the Webcam clips onto the top of the monitor. It can capture video at up to 640-by-480-pixel resolution, has a built-in microphone and shows when it’s on with an activity light.
To get it going, clip the cam to the top of the monitor, load the needed software from the included CD, plug it into a USB slot and let the hardware install itself. It’s the ticket for Skype video calls and personal YouTube reflections.
Task 7: Sit back, enjoy your “new” PC and order pizza
Time: 30 minutes for delivery
Cost: $12
That’s it. You’re done. It’s time to sit back and enjoy the rebuilt PC.
All told, it took me about four hours (not counting overnight testing) and $363 worth of parts to turn a piece of junk that was ready for the scrap heap into a reliable midrange PC that can give my family many hours of use over the next several years. Its overall performance went up by 33 per cent, and it boots up faster, runs quieter and uses 20 per cent less power, which will save me a few dollars over the year.
On the downside, the system’s USB slots in the back are now all in use. Luckily, there are two up front, but when I get a few minutes and a few bucks, I’ll get a USB hub so I can connect a few additional new devices in the future.
It’s time to order my celebratory pizza, but with $12 left in my budget there’s only enough money for a small, plain pie. I guess I’ll have to wait for the next upgrade to afford a large pepperoni.
Brian Nadel is a frequent contributor to Computerworld and the former editor in chief of Mobile Computing & Communications magazine.
Source: Computerworld
