


This article was excerpted from Microsoft Windows 7 In Depth with permission of Que Publishing, copyright 2010, all rights reserved.
It covers a new installation of Windows 7 onto a clean hard drive or from inside Windows, as well as multiboot installations.
Performing a New Installation of Windows 7
The three basic types of clean installation procedures are as follows:
- Install on a brand new disk or computer system
- Erase the disk, format it, and install
- Install into a new directory for dual-booting
If you intend to use either of the first two methods, be sure your computer can boot from a DVD (most newer computers support booting from a DVD drive).
Doing so might require changing the drive boot order in the BIOS or CMOS, but try it first as-is. With no floppy disk inserted and a clean hard disk, try the DVD drive next. The Windows 7 DVD is bootable and should run the Setup program automatically.
Related Stories:
How to upgrade from XP to Windows 7
Four big benefits of Windows 7 and four problems
Installation takes 15 to 30 minutes, depending on the speed of your machine. Refer to the following sections if you have questions about any steps in this process.
Note: Windows 7 automatically applies the NTFS format to any disk partition upon which it is installed during a clean installation.
Typical Clean Setup Procedure
If you’re installing into an empty partition and you can boot an operating system that is supported for the purpose of Setup (Windows Vista or XP), just boot up, insert the DVD and choose Install Now from the resulting dialog box. Then you can follow the installation step-by-step procedure.
If Windows doesn’t detect the DVD automatically upon insertion, you must run the Setup program, setup.exe, from the Start, Run dialog box (after opening the Run dialog box, type D:/setup.exe; on Vista use the Start menu Search box instead [using the corect letter for your DVD drive if it isn’t D]). The setup.exe application is located in the Sources directory on the DVD. After the Setup routine starts, you can follow the installation procedure step by step.
If your computer has a blank hard disk or your current OS isn’t supported, this process changes. You must launch the installation process from the Windows 7 DVD (this works only if you can boot from the DVD drive). Setup automatically runs if you boot from the DVD.
Related: In-place Windows 7 upgrades can take up to 20 hours: Microsoft
Yet another setup method involves the network. To initiate a network installation, you must create a network share of the distribution DVD or a copy of the DVD on a hard drive. The destination system must have network access, and the user account must have at least read access to the installation files. Initiate Setup by executing setup.exe from the network share. For example, from the Start, Run command, or the Vista Start menu Search box, type this path: \\\ \sources\Setup. Setup recognizes an over-the-network installation and automatically copies all files from the network share to the local system before the first reboot.
Tip: All versions of Windows 7, 32- or 64-bit, are included on the same DVD.
The product key that you enter during setup determines which actual version of Windows 7 you end up with after the installation completes. Keep your Windows 7 DVD and product key in a safe location after you’ve performed your installation. It’s useful for repairs of all kinds.
* Installing Windows 7 from an existing Windows installation.
Clean Install from DVD, Step by Step
A typical clean installation (on a blank hard disk) step-by-step procedure is as follows:
1. Insert the Windows 7 DVD into your computer’s DVD-ROM drive, and restart the computer. Windows 7 Setup should start automatically. If Setup does not start automatically, ensure that your computer is configured to boot from the DVD drive.
2. You are asked to select regional options for the Windows 7 installation. Make your selections and click Next to continue.
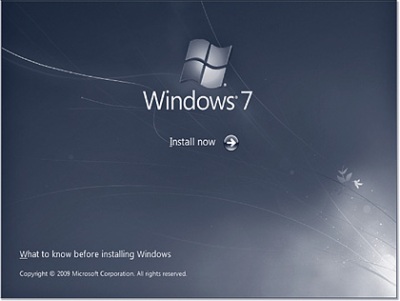
3. In the next dialog box, you are prompted to start the installation. Click Install Now to begin the installation. This produces a screen that tells you that Setup is starting.
4. In the Software License Terms dialog box, ensure that you read and understand the End User Licensing Agreement (EULA). When you’re ready, select the I Accept the License Terms option and click Next to continue.
5. In the Which Type of Installation Do You Want? dialog box, shown in Figure 2.10, you can select only the Custom (Advanced) option because you’re performing a new installation on a blank hard disk. Click Custom (Advanced) to continue.
6. In the Where Do You Want to Install Windows? dialog box, select the partition onto which you’ll install Windows 7. When you’re ready to proceed, click Next. If you need to provide a RAID or SCSI driver, now is the time to do it.
7. The Installing Windows dialog box appears and gives you an updated status of the upgrade process.
8. After some time, your computer restarts and the newly installed Windows 7 loads. Windows 7 resumes the installation process. Before the restart, a warning appears.
9. After the restart, you’ll see a notification telling you that Windows 7 is preparing the new installation. Windows 7 moves back into a graphical display after a few minutes and tells you it’s updating Registry settings and starting services, after which it lets you know it’s completing the installation.
10. After completing the installation, Windows 7 asks you to provide a username and a computer name. After providing this information, click Next to continue.
Note: Always choose a computer name that is unique. It must differ from any other computer, workgroup, or domain names on the network. You’ll probably want to enter your name or a name of your own choice, although Setup supplies a recommendation. You might want to coordinate naming your computer with your LAN administrator, if you have one.
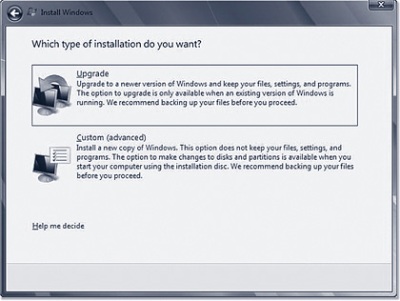
* Figure 2.10: For new installations, only the Custom (Advanced) option is available.
11. In the next dialog box, you are asked to supply a password for your user account (which you must reenter as a double-check) and a password hint to help you remember that string. After making your selections, click Next to continue.
12. In the Type Your Windows Product Key dialog box, enter the product key that came with your Windows 7 DVD. I recommend that you leave the Automatically Activate Windows When I’m Online option checked to take care of Windows Product Activation within the three days after the Windows 7 installation. After entering this information, click Next to continue.
You can also leave the Product Key box blank. If you do this, you’ll be asked which version of Windows 7 you want to install, and you can select any version from Starter to Ultimate. You’ll have to provide a valid product key, however, within 30 days for whatever version you install or else Windows 7 will nag you regularly and often about registration. (If you install a “slip-streamed” copy of Windows 7 Service Pack 1, or use the Windows Update service to upgrade to SP-1, you’ll be reminded to register rather than receiving constant nags.)
You can use the no-key method to play around with different versions of Windows 7, but be careful if you select a version for which you don’t have a key; you must perform a clean install every time you reinstall Windows 7, and you must eventually install a version for which you have a license, or erase it. You’ll lose your applications and data every time you reinstall.
Caution: You should definitely not play with alternate versions if you are upgrading from an older version of Windows. After the first such install, there’s no way to go back and repeat the upgrade with your licensed version of Windows 7.
13. In the Help Protect Your Computer and Improve Windows Automatically dialog box, you configure the base security for Windows 7. In most cases, you should select Use Recommended Settings. To make your selection, click it.
14. In the Review Your Time and Date Settings dialog box, select your time zone, daylight savings option, and current date options. Click Finish to complete the upgrade process.
15. In the Select Your Computer’s Current Location dialog box, shown in Figure 2.17, tell Windows where you’ll be using your computer. As with Windows Vista, Windows 7 configures your network adapters for DHCP and does not ask you what to do.
16. Windows prompts you one last time-after you click Start, you’re finished with the installation.
17. After a few more minutes, you are finally presented with your brand new Windows 7 login screen, as shown in Figure 2.18. Congratulations, you’ve completed the installation of Windows 7!
Tip: If you plan to perform a clean installation on your computer that is currently running some earlier Windows version, be sure to get your data and other files off the computer beforehand. You can perform this process manually, or you can opt to use Windows Easy Transfer to automatically copy all your files and settings to an external hard drive or network location. After the clean installation of Windows 7 has completed, you can run Windows Easy Transfer again to reload your files and settings on the new installation of Windows 7.
Clean Install from Inside Windows, Step by Step
If you initiate the Setup routine from within Windows XP or Windows Vista, the step-by-step procedure is as follows:
1. Insert the Windows 7 DVD into your computer’s DVD-ROM drive. It should AutoPlay and present the Install Windows dialog box. If not, locate and double-click the setup.exe program in the Sources folder on the DVD.
2. To download, install, and use the Windows 7 Upgrade Advisor, click the Check Compatibility Online link. Otherwise, to begin the in-place upgrade to Windows 7, click the Install Now link.
3. In the Get Important Updates for Installation dialog box, you are asked whether you want to download updates to the Windows 7 install files. Typically, for computers that have an active Internet connection, you’re better off getting the updates. Make your selection by clicking it.
4. In the Please Read the License Terms dialog box, ensure that you read and understand the End User Licensing Agreement (EULA). When you’re ready, select the I Accept the License Terms option and click Next to continue.
5. In the Type Your Product Key for Activation dialog box, you are asked to enter your Windows 7 product key. Enter the key and ensure that the Automatically Activate Windows When I’m Online option is checked, to enable Windows Product Activation. After entering the product key, click Next to continue.
6. In the Which Type of Installation Do You Want? dialog box, shown previously in Figure 2.10, select Custom (Advanced) because you’re performing a clean installation here on top of an existing Windows XP installation.
7. In the Where Do You Want to Install Windows? dialog box, shown in Figure 2.20, select the partition onto which you’ll install Windows 7. When you’re ready to proceed, click Next.
8. The Setup application warns you that the selected partition contains files from another Windows installation, as shown in Figure 2.21. After you read this information, click OK to continue.
9. The Installing Windows dialog box appears and updates the status for the upgrade process.
10. From here, the rest of the process is just like that for a clean installation (on a blank hard disk) above, starting with step 9. After some time, your computer restarts and the newly installed Windows 7 loads.
Multibooting Windows 7
In today’s world of advanced OSs and low hard-disk prices, it certainly is not unusual for some users to experiment with different OSs. The world of consumer computing is ripe with many options. Along with just plain curiosity and experimentation, here are other good reasons to switch among or between OSs:
- Many users use two or more OSs because of application-compatibility issues. Hardware support issues occur, too: Windows 2000 and Windows XP might have drivers for older hardware that Windows 7 doesn’t support.
- Some users want to run specific applications or games in an optimal environment for their use.
- A developer might swap among Windows XP Professional, Windows Vista, and maybe even several different versions of Windows 7, to test application compatibility.
- Website developers need to use different OS versions to see how pages look and behave with corresponding web browser versions.
Other than buying multiple computers, there are two ways to accommodate such needs. You can multiboot (that is, select the desired OS at bootup) or you can run one OS in a virtual computer inside another OS (that is, in a special application program that lets the alternate OS think it’s running on a PC of its own). A virtual approach can be quite useful.
Windows 7 uses a boot scheme introduced with Windows Vista based on so-called Boot Configuration Data, usually abbreviated as BCD. BCD is more complex than and incompatible with the boot scheme used in previous versions of Windows. While Windows 2000 and XP let you set up a boot menu from which you could select any version of Windows, as well as other OSs, Windows 7’s boot menu only lets you select Windows Vista or 7 versions, or “something else,” and all something else selections must be managed separately.
As a result of the boot manager changes, if you want to set up a computer that can boot several different versions of Windows and/or other OSs, you need to follow these guidelines:
- You must install each OS into a separate disk volume (drive letter). To get these separate volumes, you can create multiple partitions on one disk drive, or use multiple disk drives, or a combination of these two organizing principles.
- If you install multiple versions of Windows 7 on the same computer, the same rule applies: You must install each version in a separate disk volume.
- Install versions of Windows starting with the oldest and working toward the newest. For example, to set up a computer that can boot into Windows Me, Windows XP, and Windows 7, install Me first, then XP, then Windows 7. You must install Windows 7 last!
- To install OSs other than Windows, such as Linux, you might need a boot manager that can recognize all the different OSs in use. Linux offers a choice of several different boot managers. Their use is beyond the scope of this book, but you should be able to find instructions on the Web for multibooting Linux and Windows 7.
The Skinny on Boot Scheme Changes
Here’s a rough sketch of what’s changed: In the boot scheme used by the Intel x86 versions of Windows 2000 and XP, the boot partition’s boot sector program loaded ntldr, which read the menu file boot.ini, and then loaded Windows.
Aside from the boot sector, all of the stuff was in super hidden files (files marked with the system and hidden attributes), stored in the root directory.
The Windows Vista and Windows 7 boot sectors load a file called bootmgr from the root directory, which loads a set of programs and DLLs in the \boot folder, which then reads the BCD file (actually a Registry hive), and then loads Windows. The BCD hive is also loaded into and visible in the Windows Registry after bootup.
In a Windows 7 multiboot configuration, the root directory file bootsect.bak is a copy of the pre Windows 7 boot sector (XP’s version of the boot sector). Choosing “Legacy” from the Windows 7 boot menu loads and runs the original boot sector program, which carries on as before.
The reason for making this change was to create a common boot system that would work on both BIOS-based computers and computers using the newer EFI configuration system (built around Intel’s Extensible Firmware Interface). The impact of this new scheme is that the Windows 7 boot menu can offer only Windows 7, Windows Vista, and Windows Server 2008 versions, where anything using the older boot loader gets lumped under the Legacy entry. The boot.ini file is used only to list and load non-BCD operating systems.
To create a multiboot installation on a computer that already has Windows Vista installed, follow this procedure. These steps are quite similar to the clean install procedure described earlier.
1. Insert the Windows 7 DVD into your computer’s DVD-ROM drive. It should AutoPlay and present the Install Windows dialog box. If not, locate the setup.exe program in the Sources folder on the DVD, and double-click it.(Alternatively, you can restart your computer and boot from the DVD.)
2. To download, install, and use the Windows 7 Upgrade Advisor, as detailed previously, click the Check Compatibility Online link. Otherwise, to begin the in-place upgrade to Windows 7, click the Install Now link.
3. In the Get Important Updates for Installation dialog box, you are asked whether you want to download updates to the Windows 7 install files. Typically, for computers that have an active Internet connection, you are better off getting the updates. Make your selection by clicking it.
4. In the Please Read the License Terms dialog box, ensure that you read and understand the End User Licensing Agreement (EULA). When you’re ready, select the I Accept the License Terms option, and click Next to continue.
5. In the Type Your Product Key for Activation dialog box, you are asked to enter your Windows 7 product key. Enter the key and ensure that the Automatically Activate Windows When I’m Online option is checked, to enable Windows Product Activation. After entering the product key, click Next to continue.
6. In the Which Type of Installation Do You Want? dialog box, select Custom (Advanced) because here you’re performing a clean, multiboot installation of Windows 7, not an upgrade
.
7. In the Where Do You Want to Install Windows? dialog box, shown in Figure 2.24, select the partition into which you’ll install Windows 7. This must be a partition that does not already have a version of Windows installed on it. When you’re ready to proceed, click Next.
8. Follow the rest of the procedure described previously under “Typical Clean Setup Procedure” from step 6 on through the end.
9. If you plan on installing another version of Windows 7 on this same computer, you’ll want to rename the current version’s title in the boot menu.
10. You can check out the new Windows 7 boot menu, on the next restart of your computer.
![]()
* Figure 2.24: You must select an empty partition for multiboot installation of Windows 7.
Source: Computerworld
