


Interacting with YouTube? That’s easy: Type a brief description of what you want to watch into the site’s search box, pick from one of hundreds of selections, and sit back to enjoy yet another brief glimpse into the musical life of Tay Zonday–or whatever suits your online video fancy.
But watching a YouTube video has always been just that, watching. Until now.
YouTube has bundled a new set of tools into its video authoring system that gives you the ability to hack a small degree of interactivity into your videos. The additions won’t be interactive in the style of a traditional Flash game or application, which let you do whatever you’d like within a single content window, but they will give you the power to do more with YouTube than you ever thought possible. And in our case, it helped us create a choose-your-own-adventure guide for building a PC.
The Setup
You’ll want to come into your YouTube interactive video experience with a game plan. Resist the urge to film your movie off-the-cuff as you do any other YouTube video; treat the project too casually, and you’ll be creating extra work for yourself in the long run.
Your interactive video can take many forms, but our directions assume that you’ll be creating a “click here to do something” kind of movie.
Creating an outline for your interactive movie is the surest way to avoid unnecessary work. Think of the plan for your film as a giant flowchart: Clip A can lead to any number of outcomes–B, C, or D, for example. Regardless of how you decide to organize your video, make sure that you’ve given yourself the ability to reuse as many clips as possible in your interactive chain. Here’s a small example, from how we split our build-a-PC video:
- Introduction [A] links to Full Video [H], Case Overview [B], Motherboard Components [C], and Wiring [F]
- Case Overview [B] links to Motherboard Components [C] and Hard Drive & Optical Drive [E]
- Motherboard Components [C] links to Power Supply [D] and Hard Drive & Optical Drive [E]
Although our video is interactive in that it allows users to select their path through the overall narrative, we’re still guiding the way using a single batch of videos. The power of YouTube’s annotation function is that it allows you to create various pathways through the same batch of videos–basically reusing what you’ve shot in a bunch of different combinations.
The Shoot
The actual process of filming your YouTube video is no different from how you would normally shoot a piece of footage for the site. If you’re aiming for high-quality videos, you’ll want to make sure that your camera of choice can shoot at a resolution of at least 1280 by 720 pixels. And if you want to avoid unpleasant resizing farther down the line, shoot your videos in either 16:9 or 4:3 native format. The former will fill YouTube’s widescreen video player perfectly, whereas the latter will force YouTube to introduce black letterbox bars to the sides of your videos.
Finally, be sure that you’ve thought out the location for the annotations that you’ll be adding later to your videos. Shoot your videos with enough room so that the clickable rectangular annotations can appear without overlapping key video elements.
Annotations stay in one place, so don’t expect to be able to use them to overlay a critical prop such as a moving car or bouncing ball. Also, annotations can’t exist past the length of a YouTube movie.
If you want to slap them at the end of your film to give users a choice of new clips to watch, let the camera roll for a good chunk of time after the scene has ended so that viewers have enough time to select their option.
The Annotations
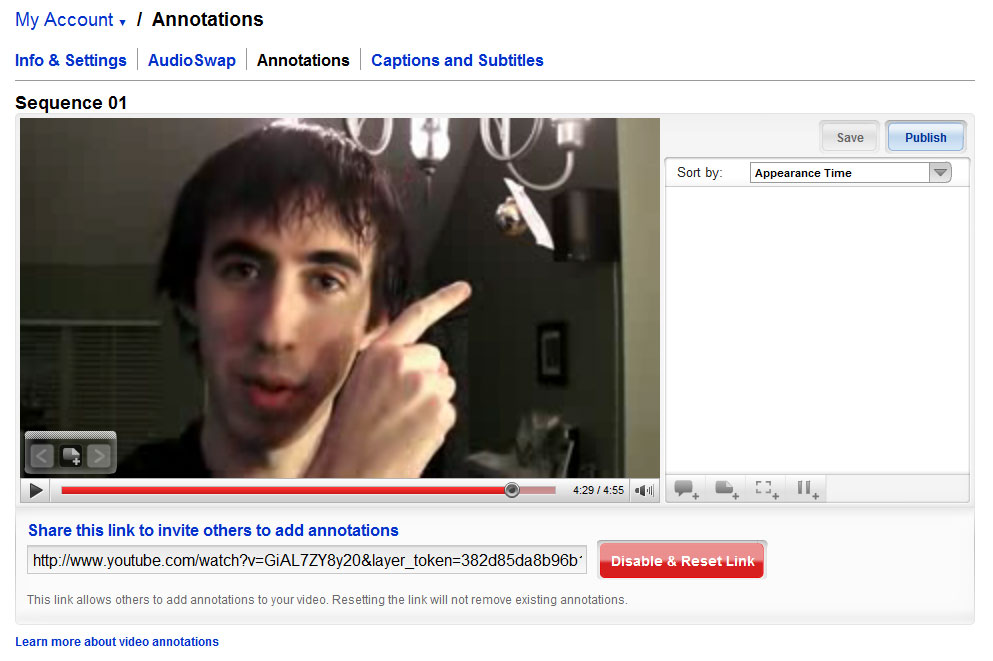
You’ll start your trip down annotation lane by clicking on the “Annotations” button, highlighted here. Then you’ll want to select a “Spotlight” Annotation–it looks like a square with only the corners filled in.
Once you’ve uploaded all of your videos to YouTube, go into your ‘My Videos’ page and click on the Annotations button for the video that you want to serve as the main element (and likely the introduction) for your giant project.
This single video should contain all the necessary YouTube-searchable elements–a title, description, tags, and so on. The clips you’ll be linking to should be named something different and feature no tags of any kind. You want YouTube visitors to find one main video in their searches, after all.
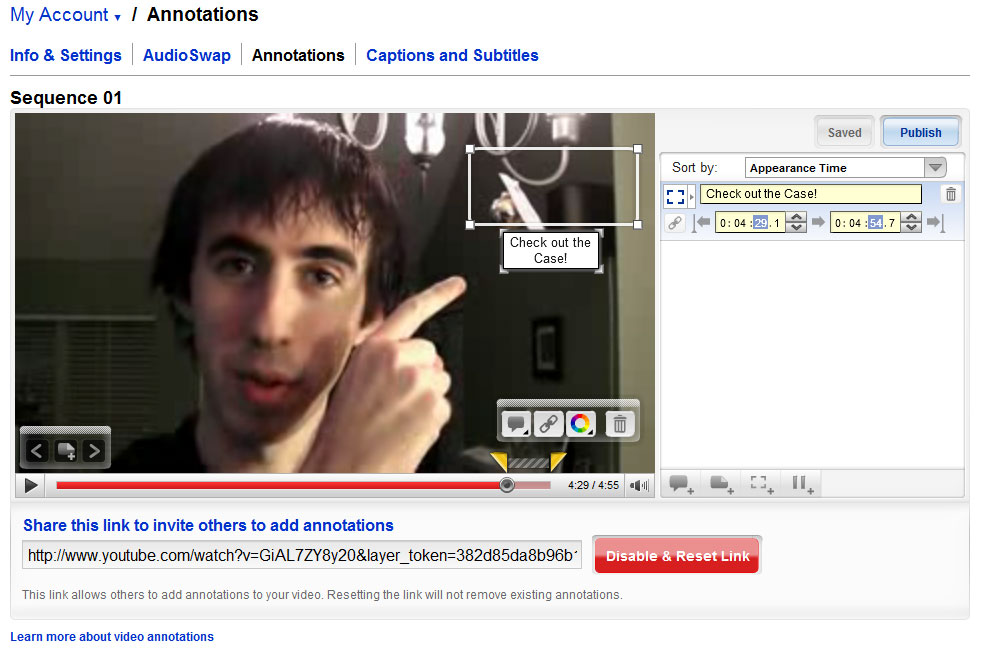
This little see-through box, representing the Spotlight Annotation, is resizable and movable. You can also shuffle and size the optional text that can pop up when a user runs the mouse over the annotation area in the main video.
Wait for your video to load fully once you’ve reached the annotation screen. To make your video interactive, slide the timeline bar to the part of the video where you want your viewers to select how they want the story to unfold. Pause the video and click on the icon in the lower-left corner that looks like a page with a plus sign.
Select the annotation that looks like a rectangle with just the corners outlined. Position the box where you want users to be able to click to make their selection.
You can fine-tune your annotations’ entry points and on-screen durations, as well as the optional text, in this handy properties window. Don’t forget to set links to your other YouTube videos!
You can give your link a name that will pop up when users hover over the area, or you can leave it blank. You can also fine-tune the exact moment the box appears and how long it stays on screen, with the time controls to the right of the video window. Once you’re satisfied, click on the chain-link icon to the left of the time to add the URL to the next YouTube video you want viewers to see. Repeat this step for all of the “choices” you need to create.
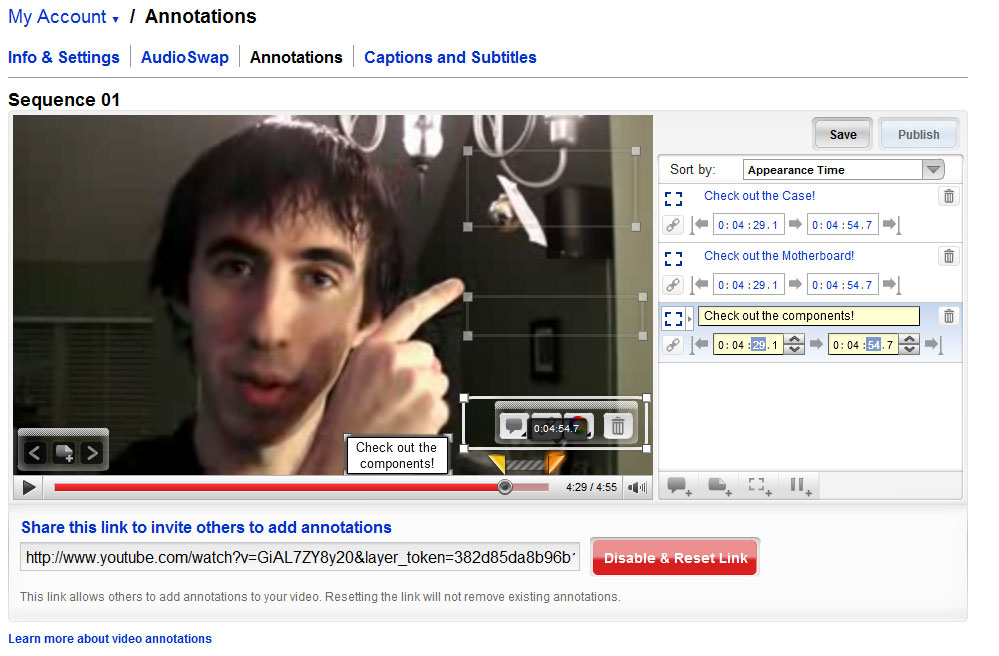
Now that you’ve created your first interactive link from one video to another, you have all the experience you need to set up as many links as you’d like between all of the videos you’ve uploaded.
Annotating videos is an easy technique, but it’s also a powerful tool that gives your users the ability to interact with your video and decide for themselves where they want their experience to go. You can pack as many annotations as you want into a single video, making the potential for interactive exploration truly limitless.
The Top Interactive YouTube Videos
Want to check out some more interactive videos? In no particular order, here’s a list of the finest interactive YouTube videos to date. Use them as inspiration for your own multivideo creations!
- YouTube Street Fighter: Re-create this arcade classic in the comfort of your browser window!
- Interactive Fortune Teller: Remember Big? The Interactive Fortune Teller is YouTube’s answer to Zoltar Speaks.
- Interactive Card Trick: Try out YouTube’s first, and most famous, interactive card trick.
- The Time Machine: This full-length adventure is a great example of how high-quality filmmaking and interactivity can combine to make for a gripping YouTube experience.
Source: PCworld.com
