


I’ve been on the front lines of the Mac-PC war for as long as I can remember. My first work computer was an IBM PC with an 8088 CPU. I liked it so much I forked out the money to buy my own machine: an IBM PC XT clone running an 8086 chip, and bulging with 640KB of RAM and a whopping 20MB hard disk.
Since then, I’ve written dozens of books and hundreds or thousands of articles, columns and blogs about PCs and Windows. Along the way, I’ve earned the unending enmity of plenty of Mac folks. At one point several years ago, I was targeted by hundreds of Mac fans in an e-mail barrage because I used to write a column about shareware that covered only PC software and ignored the Mac. More recently on my Computerworld Windows blog, I’ve been called various schoolyard epithets when I’ve written anything remotely critical about Macs or people who use them.
So it was with more than a little trepidation that I accepted a new assignment from my editor (sort of a follow-up to my article “Living free with Linux: 2 weeks without Windows”) to give up my PC and try living for two weeks on the Mac. Talk about sleeping with the enemy!
I asked for a laptop rather than a desktop, and what showed up on my front door about a week later was the latest MacBook Air, with an Intel Core 2 Duo processor running at 1.83 GHz, 2GB of RAM, an Nvidia GeoForce 9400M graphics processor and a 128GB solid-state hard disk. It sported a 13.3-in. screen and weighed in at a very svelte 3 pounds. And so began my journey with a Mac.
An initial look at the OS
If you haven’t yet touched or used a MacBook Air, take it from me: This is the most beautiful piece of hardware you’ll ever see. Plenty of other people have rhapsodized over it, so I won’t waste the space here extolling its virtues.
How light is this machine? I took it to a nearby cafe to work, and when I left, I panicked halfway down the street. My backpack was so light, I was convinced I had accidentally left it at the cafe. Of course, it was safe, sound and snug in my backpack — I simply hadn’t felt the weight.
At $2,500 for this configuration, though, this is not a machine for Everyman or Everywoman, particularly in these trying economic times. However, my assignment wasn’t to test and review this particular computer, but rather to report on the Mac experience compared to the PC experience. So with a few exceptions, I’ll focus more on the Mac OS X and the Mac way of doing things, rather than on this particular model.
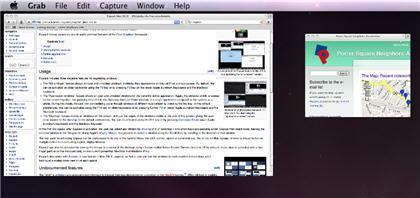
Exposé shows thumbnails of all of your open windows against the desktop.
For PC users, Mac OS X takes some getting used to, but once I did, I found it a more elegant, polished piece of work than Windows (either XP or Vista). With so many nice little touches, it seemed as if I was finding a new one every day.
At first glance, the Mac OS X layout is spare compared to Windows. Apart from an icon representing the hard disk, there are no initial icons on the desktop, no Start button or Start Panel, and no pinned programs. Instead, there’s a single Dock across the bottom of the screen, similar to the new taskbar in Windows 7. There’s a reason for that similarity, of course: Microsoft took the idea from Apple. After all, why not steal from the best?
The Dock took some getting used to, because of its double-duty as both a program launcher and a task switcher. Because I was used to the pre-Windows 7 taskbar, I constantly checked the Dock first to see what programs I was running, but it was no help because the icons were a mix of those pinned there and those that I had recently launched. Only after one of my editors pointed out that there are small, glowing blue dots underneath running apps did I find out that there’s a way to differentiate between apps that are running versus apps whose icons live permanently on the Dock. But those dots are so faint and subtle as to be of very little use.
I quickly discovered the command-Tab key combination for cycling through open programs, much like Alt-Tab in Windows. Still, I wanted better visual clues to show what I was running — preferably thumbnails or a preview of some kind. And then I discovered Exposé, a superb feature for viewing, organizing and switching between your running windows.
To use Exposé, you just press the F9 key (Fn-F9 or F3 on a MacBook Air), and you’ll see previews all of your open windows nicely arranged against the desktop. Click any to switch to it.
There’s a lot more to Exposé as well; Press F11 to get to the desktop, and F10 to see thumbnails of all windows open in your current application. You can also customize Exposé so that when you move your cursor to a specific area of the screen you can perform an Exposé function.
As for launching programs, the Dock isn’t the only way to do it. You can also run them from the Finder, which is a more impressive and useful version of Windows Explorer. And you can put aliases on your desktop to run programs and access files and folders.
Every part of the operating system shows a similar combination of simplicity and elegance. Want to get a rundown about every aspect of your hardware and software? Click the Apple icon in the upper-left-hand part of the screen, select About this Mac, then click More Info and you’ll be able to easily browse through screens of useful, easily accessible information. Similarly, selecting System Preferences from the Dock lets you customize many aspects of the operating system.
There’s a lot more and I could spend more time writing about Mac OS X, but you get the point. While it takes a little bit of getting used to for a Windows user, it’s an excellent operating system.
Networking with PCs
I approached the next task with a bit of apprehension — getting the Mac to work with the Windows-based PCs on my network. I had tried this with Linux, with limited success at best, so I was worried that I would face the same issues with the Mac.
The initial work — getting the Mac to recognize PCs on my network — was a snap; it took no work at all. I launched Finder, saw all of my Windows PCs in the Shared area and was able to connect to every one of them — Windows Vista PCs, Windows XP PCs and even a PC running a beta version of Windows 7. I merely had to click the PC to which I wanted to connect, click Connect As in the upper-right-hand part of the screen, type in my username and password, and I was in. I could open and save files just as if I was connected using a PC.
But it wasn’t a two-way street. None of my PCs could see my Mac or connect to it — the Mac was essentially invisible to them. The problem, I discovered, was that in order for the PCs to see the Mac, the Mac needed to be configured for PC networking using the SMB protocol — the Samba networking protocol used in Linux.
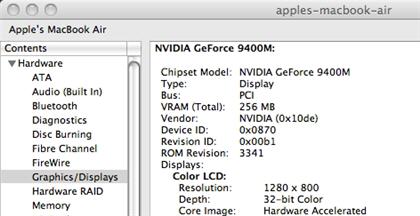
It’s easy to get a rundown about your hardware and software configuration.
Given that I couldn’t get a Linux machine to play properly with my PCs using Samba, I wasn’t optimistic about getting the Mac to work. In fact, with a bit of help, I was able to fix the problem. It’s certainly not obvious or intuitive, but if you know the steps, you can do it. Given Apple’s push to get PC users to switch to the Mac, though, the company would do well to simplify the PC network setup on its Macs.
Before connecting a Mac and a PC, you need a few pieces of information. First, you need the name of your workgroup on your Windows network. If you’ve given your workgroup a name other than the Windows default name, just use that. By default, the workgroup name in Windows Vista is WORKGROUP, and in Windows XP, it’s MSHOME.
If you’re not sure of your workgroup name, in Windows XP, right-click My Computer, select Properties and click the Computer Name tab. Click Change, and you’ll see the Workgroup name. In Windows Vista, right-click Computer and select Properties; you’ll see the workgroup name in the “Computer name, domain and workgroup settings” area.
You also need to know the IP address of your router — the internal IP address it uses on your network. If you don’t know it, check the manual or the vendor’s Web site. If you have a Linksys router, the default IP address is 192.168.1.1.
Now that you have that information, you’re ready to get your Mac recognized on the network. On the Mac, select System Preferences –> Networking and select your main means of networking. In my case, because I was using the Air’s wireless connection, this was AirPort. (If I wanted a hardwired Ethernet connection, I’d have to purchase a $29 USB Ethernet adapter.)
Click the Advanced button and select WINS. In the Workgroup field, type in the name of your network. Click the + button underneath the WINS Servers box, type in the IP address of your router and click OK. Back on the main Network screen, click Apply.
Go back to the System Preferences screen and click Sharing. Check the box next to File Sharing, and add any folders or users you want to share. Then click the Options button and check the box next to “Share files and folders using SMB.” Check the box next to your account name and click Done.
That should do the trick — at least, it did it for me. Once I did that, all of my PCs saw the Mac on the network. I was able to connect to the Mac in XP, Vista and Windows 7, and access its files and folders as easily as if I was doing it from a PC.
I have a network printer, and finding and installing it was also exceptionally easy via System Preferences. When I chose to add the printer, the Mac operating system quickly found the device on my network and installed the driver. At that point, all I had to do was print. Very nice.
As easy as networking with the Mac is, there is one feature I miss from Windows Vista — the Network and Sharing Center, and particularly the Network Map, which draws a map of your network, including all devices, including your home router. From the map, you can easily browse to any device and get information about it. Mac OS X would do well to emulate that.
Installing and upgrading software
For a Windows user, installing software downloaded from the Internet on a Mac takes some getting used to. At first, I found it quite confusing. When I downloaded files, they showed up on the upper-right-hand side of the desktop, as if they were new hard drives, and it wasn’t clear at all what needed to be done at that point.
By clicking on one, I managed to stumble on an installation routine. But then when it was done, I wasn’t sure how to run the program. Unlike Windows, there was no icon on the desktop, and no Start button for accessing installed programs. Eventually, I found the applications in the Application folder of Finder, and ran them from there.
Once I learned how to install software, though, it became a breeze. Generally, when you download a program to install to your Mac, you’re installing a disk image — which is why it shows up on the desktop like a disk. Double-click it and, from the folder that opens, double-click the file with an extension .pkg. At that point, you’ll be walked through the installation process.
Once you’ve installed the software, you can run it from the Application folder, put it permanently on the Dock and run it from there, or create an alias for it on the desktop and run it from there. You can now delete the disk image from the desktop by dragging it to the Trash.
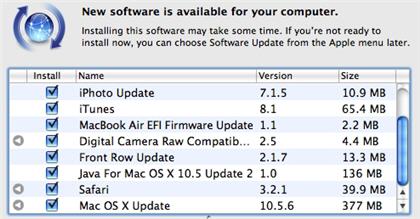
Software Update offers a list of applications ready to be updated on the Mac.
Upgrading software was straightforward and simple as well. Select Software Update after clicking the Apple menu, and you’ll see a screen like the one pictured nearby. By default, all updates will be checked. Uncheck any you don’t want done, and leave those checked you want updated. Then click the Install button, follow the instructions and you’re done. Depending on what you’ve installed, you may have to restart the Mac. I upgraded from Mac OS X 10.5.5 to 10.5.6 in this way, and it went off without a hitch.
Getting work done
With everything set up, it was time to get work done.
When it comes to applications that ship with the operating system, Mac OS X beats Windows hands-down. The iLife suite of applications — including iPhoto, iMovie, Garage Band and iWeb — is superior to anything you’ll find in Windows. You won’t need them for work, but for home use, they’re excellent.
Given that I’m a writer, and also need to occasionally use spreadsheets and sometimes presentation software as well, I needed an office suite — and the Mac doesn’t come with one. Because an Air is not an inexpensive device, and applications are tough on the wallet, I decided that I would try, if at all possible, to get by without paying for software.
Apple offers a reasonably priced office suite in iWork ’09, which costs $79 (or $49 if you pre-order it on a new Mac), but I decided to go for a free alternative. I had previously used the Windows and Linux versions of OpenOffice.org, and decided to give the Mac version a try. As expected, it was straightforward, simple to use, and offered all the features I needed for writing, spreadsheets and presentations.
Then I found out about NeoOffice, an open-source office suite based on OpenOffice.org. NeoOffice has a number of Mac-specific touches not included in OpenOffice.org, such as floating palettes, the ability to use trackpad gestures to zoom in and out, and a more complete set of available menus when no files are open. I found myself using NeoOffice more than OpenOffice.org, but either suite is excellent — there’s no need to purchase Microsoft Office.
Both office suites handle Microsoft Office formats, including .docx files, so there was no problem with document compatibility with Word files. The suites also recognize Word markup, and their markup is recognized by Word.
I found only two relatively minor compatibility issues. First, although I could read comments inserted in documents, I couldn’t add comments of my own — that feature seems nowhere to be found. (The ability to add comments may be added to OpenOffice 3.1 when it’s released.)
Second is that both NeoOffice and OpenOffice.org have a minor bug related to page numbering in documents created in Word. If you create a document with a starting page after one — for example, if you’re writing a book and need to start a chapter on page 24 — neither NeoOffice nor OpenOffice.org will recognize that. Instead, they’ll substitute one for the starting page number.
I also found one anomaly between OpenOffice.org and NeoOffice — in OpenOffice.org, the Command-Delete combination deleted an entire line of text, while in NeoOffice, it back-deleted a single word.
As for Web browsers, I tried both Mozilla Firefox and Apple’s own Safari (the beta of Version 4.0), and found Safari slightly faster, with some very nifty features, such as a panoramic thumbnail display of your favorite sites.
Both Safari and Firefox work with Foxmarks, an add-in that lets you synchronize your bookmarks among different computers. Foxmarks also works with Internet Explorer. So I was able to use any browser on any computer, and my bookmarks would synchronize among them. This let me switch between Safari and Firefox on the Mac without any issues at all.
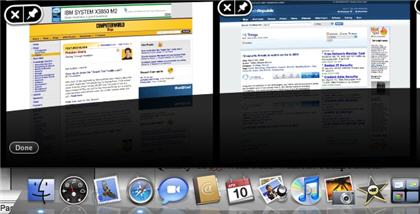
One of Safari’s niftiest features is a panoramic view of your most-visited Web sites.
I was extremely pleased to find that the Mac also supports Microsoft’s Windows Live Sync software, which lets you keep files and folders synchronized among multiple computers. In this way, I could work on my Mac on documents, which would be automatically synchronized back to my PC, and vice versa.
Windows users will at first be confused by one operating systemwide feature related to applications that is quite disconcerting — an application’s menu is separate from the application window, and lives at the very top of the desktop. So, for example, if you’re working in an application, and the window is not maximized, you won’t find the menu in the application window itself — it’s at the very top of the desktop.
More disconcerting still is that when you minimize an application, the menu of that application remains open at the top of the screen, even though you may be now looking at an altogether different app. For example, if I was working in NeoOffice and then minimized it, the NeoOffice menu remained active, even though I was now looking at Firefox (whose window was initially underneath NeoOffice’s window). Admittedly, once I clicked in Firefox, its menu became active. But I never did get used to this, and found it continually confusing.
The keyboard conundrum
Windows users will find that the Mac keyboard will take getting used to, and it’s more difficult if you’re using the MacBook Air keyboard, which has fewer keys than the normal Mac and dispenses with some common keys such as Home and End.
Generally, the Command key works like the Windows Control key — for example, to move forward or backward a word at a time, use the Command key in concert with the left or right arrow key. Most difficult to get used to was the Mac’s Delete key, which works in the exact opposite way as the Windows Delete key — it deletes text to the left of the insertion point, rather than the right. (In other words, it works like a PC’s Backspace key.) To delete to the right, you have to hold down the Fn key while pressing the Delete key.
To delete entire words in this way, you hold down both the Fn and Option keys while pressing Delete. (There is an extended Apple keyboard that has a second delete key, but I was working with the Air.)
The multitouch trackpad gestures also take some getting used to. I would suddenly find my application unaccountably zooming in or out, without any apparent action on my part. The cause: I accidentally brushed two fingers against the trackpad. Move two fingers toward one another on the trackpad (in a pinching gesture) and you zoom out; move the fingers away from one another and you zoom in. There are other trackpad gestures you can use as well, for rotating pictures, for example.
In general, with a little bit of re-learning, I did get used to the MacBook Air’s keyboard. I did miss the Home and End keys, though, and have yet to find any key combination that gives their PC equivalent on the MacBook Air.
If you’re looking for help with keyboard shortcuts, Apple has a very good list of them. And anyone who wants to rearrange their Mac keys, to make them more PC-like, for example, can use the free utility DoubleCommand. You can have the Mac keyboard Home and End keys work on a Mac like they do on a PC, for example, and you can swap the Alt (Option) and Command keys. (On the PC keyboard, the Alt key is to the right of the Ctrl key; on the Mac keyboard the Alt key is to the left of the Command key.)
I found that the single-click trackpad of the MacBook Air was inferior to the two-button trackpad of a PC. It’s simpler to right-click an item to get an options menu than it is to press the Option key and click the spacebar, which is what you have to do on the Air. However, the scrolling trackpad is quite nice; you can scroll through documents by moving two fingers down the trackpad. And, as I mentioned previously, there are other gestures that you can use well, for zooming in and out of documents and more.
Running Windows on the Mac
One of the big benefits touted by Mac users has been the Mac’s ability to run Windows as well as Mac OS X. Boot Camp, which is part of the Mac operating system, lets you set up the Mac as a dual-boot machine that can boot into either Windows or the Mac OS. However, I was more interested in running Windows inside Mac OS X as a virtual machine, so I had to find another solution. Parallels Desktop and VMware’s Fusion will both do that, but each costs $79.99, and I wanted a free alternative.
I found one: the free, open-source VirtualBox from Sun. I had heard that it ran more slowly than Parallels Desktop and Fusion, but you can’t argue with free.
Creating a virtual Windows machine in VirtualBox is relatively straightforward, with some potential gotchas along the way. You’ll need either a Windows installation disc, or else an .ISO image of the installation disc. I chose to go with the .ISO image. Once that’s in hand, you download and install VirtualBox, and then run it. To install Windows as a virtual machine, you launch a wizard, and first choose and name the operating system you’re going to install.
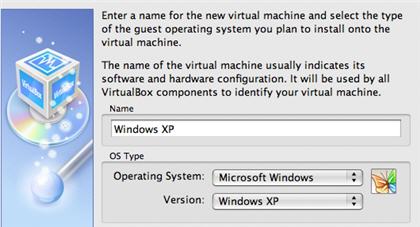
The first step in creating a virtual Windows machine on the Mac, using VirtualBox.
Next, you choose how much RAM you want to give to it. This is an important consideration, because any RAM you give Windows won’t be available to Mac OS X. You need to balance both their needs for sufficient RAM. I chose 768MB for Windows, which seemed a reasonable compromise.
As you go through the rest of the wizard, most of what you’ll encounter is self-explanatory. One thing that may confuse you is that you’ll need to create a virtual hard disk in which to install Windows — something that really should be done at the beginning of the process. So when you’re asked where to install Windows, you’ll need to go through the process of creating a virtual hard disk.
I also ran into somewhat of an oddball issue, possibly because of the way I got the Windows .ISO image onto my Mac. I downloaded the image from my Microsoft Technet account via a Windows PC, and chose to download the file to my Mac via the PC. After the file downloaded, the Mac OS changed the extension from .iso to .img. I had to change the extension back to .iso in order for VirtualBox to use it to install Windows. Once I did all that, though, Windows installed as it normally did on a PC. After setup, Windows ran fine in its own Mac window.
There were a few things I had to get used to, notably switching the focus of the keyboard between the Mac OS X and the window running Windows. By default, pressing the left Command key switches from one to the other. I also had to re-learn some keyboard commands for inside Windows. For example, when you’re in Windows, you can’t just press a Function key such as F8. Instead, you have to press the Mac’s fn key simultaneously with the Function key. When you do that, it works fine.
In addition, because there’s only one button, not two, on the MacBook Air trackpad, you can’t right-click. So you need to hold down the Command key while clicking; that’s the equivalent of a right click.
By default, my virtual Windows machine ran in 800-by-600-pixel resolution, but you can change that as you would normally in Windows. As a result, the VirtualBox window will resize larger to take into account the higher resolution. However, at resolutions higher than 800 by 600, Windows behavior was sometimes a bit flaky on my MacBook Air, with a small portion of the Windows screen cut off at times. It may be that a bit of troubleshooting would solve the problem, but it wasn’t enough of an issue for me to pursue it.
Windows ran normally and recognized all the necessary hardware and network configurations; I was even able to browse the Internet using Internet Explorer. It was a little slow, and running it also slowed down the Mac somewhat, particularly when I ran multiple applications. Overall, though, it worked like a charm.
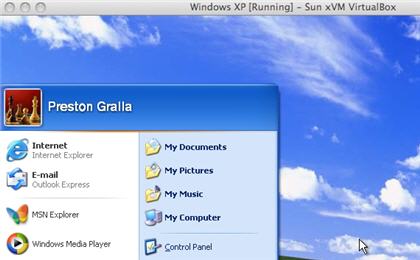
Success! Here’s Windows running as a virtual machine on a MacBook Air.
In fact, I was able to perform a bit of magic, and was able to remotely control PCs on my home network using my Mac when I was away at a Wi-Fi hot spot. I ran VirtualBox with a virtual Windows machine, launched Internet Explorer, then connected to a Windows Home Server that I’d set up for remote access to my PCs. I was then able to run my PCs remotely, including running Outlook and accessing my e-mail. Controlling a PC remotely with my Mac was not something I ever expected to do, but it was simple.
The final verdict
What did I learn after several weeks of living with the Mac?
First off, I had expected there to be a longer learning curve, and had thought that in the long run there wouldn’t be much of a difference between the Mac and a PC. After all, an operating system is just an operating system.
To a certain extent that’s true. When you use productivity applications themselves, there’s not a great deal of difference between using them on a Mac versus using them on a PC. However, when it came to the operating system itself, there’s certainly a difference, and a substantial one. Mac OS X is simpler to use and easier to configure, yet has more bells, whistles and “eye candy.” And much of that eye candy, such as Exposé, is not just elegantly designed and entertaining, but quite useful as well.
That’s not to say that every aspect of the Mac is superior to the PC. Vista’s Network and Sharing Center, and especially the Network Map, is an excellent, simple, all-in-one destination for networking that Mac OS X would do well to emulate.
Overall, though, Mac OS X beats Windows. There, I’ve said it. And lightning hasn’t struck me yet.
However, there’s no doubt that you often pay extra for a Mac; there really is a Mac tax, even if Microsoft has overstated the amount of that tax. But after living with a Mac, I can understand why people would be willing to pay the tax.
Am I giving up PCs for the Mac? Certainly not. I’ve got multiple PCs at home, including those that run Windows XP, Windows Vista and a beta of Windows 7. And I’ve got one that dual-boots into either XP or Linux running Ubuntu. Replacing all those machines with Macs would be prohibitively expensive, and simply not worth the effort.
As for the MacBook Air, for a portable machine, it’s perfect in just about every way but one — its price tag. Still, I’ve bit the bullet and am buying one, used. This isn’t about productivity or getting work done; it’s pure machine lust.
Preston Gralla is a contributing editor to Computerworld.com and the author of more than 35 books, including How the Internet Works (Que, 2006).
Source: Computerworld.com
